
This article will explore the configuration and usage of five Strapi plugins that will help you boost your productivity.
Author: Popoola Temitope
Improving productivity has become a necessary thing for small and big businesses today, as well as for developers too. In headless CMS like Strapi, there are many pre-written plugins that make websites workflow easier and faster. Using plugins to customize your Strapi website or blog is a great way to enhance your website's performance, functionalities, and search engine optimization (SEO), just to mention a few.
For instance, if you want to allow your users to be able to use the Google authentication method or magic link verification on your website, using the GoogleAuth plugin or Passwordless plugin can help in achieving this without taking much time to integrate.
All you have to do is to configure the plugin from your Strapi dashboard. The Strapi marketplace contains collections of plugins that are not limited to the security level only. They also include other plugins that can be used to analyze, customize, and manage your content effectively.
In this tutorial, we are going to explore five Strapi plugins. We'll look at the functions when needed and how we can use each of the plugins in our applications. But before we get started, if you are new to Strapi CMS or Strapi plugins, let's look at what Strapi is and what Strapi plugins are.
What Is Strapi?
Strapi is an open-source headless CMS that is based on Node.js for building fast and dynamic websites. It provides an easy-to-use dashboard for managing and delivering content to the frontend via an API call.
With Strapi, the backend is separated from the frontend using Jamstack technology. This allows your website to be robotic such that when there is an issue at the frontend, it does not affect the backend.
Strapi Installation
Are you new to Strapi? If yes, to get started with Strapi, you'll need to install the following programs on your computer.:
- Node.js V14 or V12
- NPM or Yarn
Once you have the above software installed, the next step is to install Strapi. You can install Strapi using any of the commands below.
For npm, run:
npx create-strapi-app survey-app --quickstart
For yarn, run:
yarn create strapi-app survey-app --quickstart
Once the installation is completed, the Strapi app will automatically be launched in the browser. Register and you will be redirected to your dashboard.

Plugins for Boosting Productivity
Strapi headless CMS allows developers to add functionality to an application using pre-written plugins, thereby speeding up the application development process.
Let's consider developing an application without using plugins. It means that you have to create every single feature from scratch.
Similarly, managing content without using appropriate plugins will have a significant impact on the quality of your website content. The Strapi marketplace contains a collection of plugins that can be used to do the following:
- Customize your website,
- Improve your website's security,
- Enhance website accessibility, and
- Ease the development process by adding more functionality.
Visit the Strapi marketplace to browse the list of available plugins. From your dashboard menu, click on the marketplace.
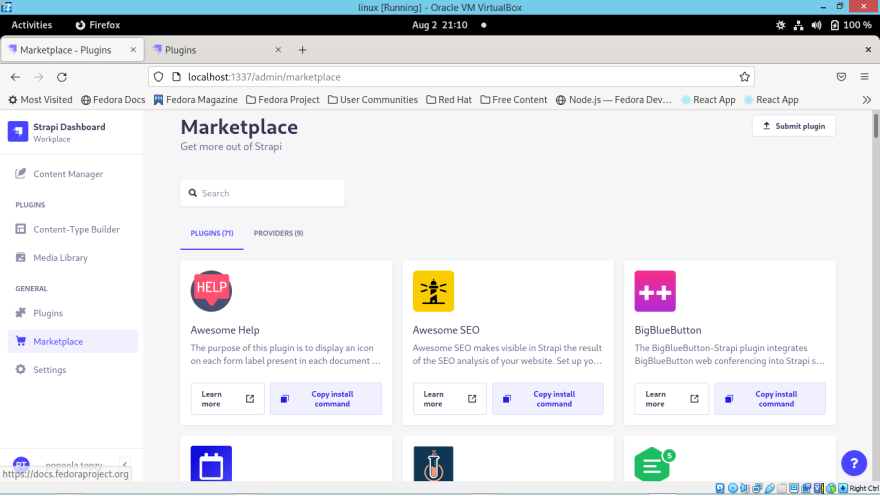
Now, let's demonstrate how to configure and use some plugins for improving productivity in a Strapi application.
Todo Plugin
The Todo plugin allows admin users to easily keep track of content progress. It adds a list of to-do tasks next to the content on the editing page. An admin user can add a list of tasks that are expected to be completed by the authors. The editor can mark each to-do task as completed or not. The super admin user can decide whether to publish the content or not based on the completed tasks.
Installation and Configuration
Run the command below to install the Todo plugin:
    npm install @_sh/strapi-plugin-todo
    npm run build
    npm run develop
Or
    yarn add @_sh/strapi-plugin-todo
    yarn build
    yarn develop
Adding To-Do Tasks to Content
Once the installation is complete, navigate to Content Manager on the Strapi dashboard. Click on any collection type, and then click on Edit on any content.

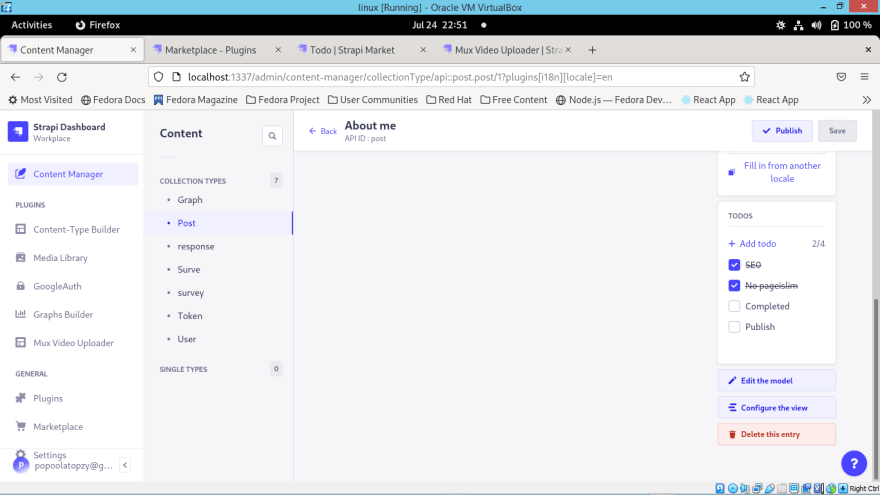
You can add tasks to the to-do list by clicking "Add todo" in the TODO section, which is located on the right side, below the Locales section.

Then, enter the task and click Save. When a task is done, mark it as completed by checking the task box as shown below.
Mux Video Uploader Plugin
Mux Video Uploader is a Strapi plugin for managing videos on your website. This plugin makes it easy to upload videos from the Strapi dashboard to Mux, and all the video management is done from the Strapi dashboard. With this plugin, you can upload content via URL or file upload. It also supports audio uploading too.
Installation
Run the following commands to install the mux video upload plugin:
    npm i strapi-plugin-mux-video-uploader@latest
    npm run build
    npm run develop
Or
    yarn add strapi-plugin-mux-video-uploader@latest
    yarn build
    yarn develop
Configuration
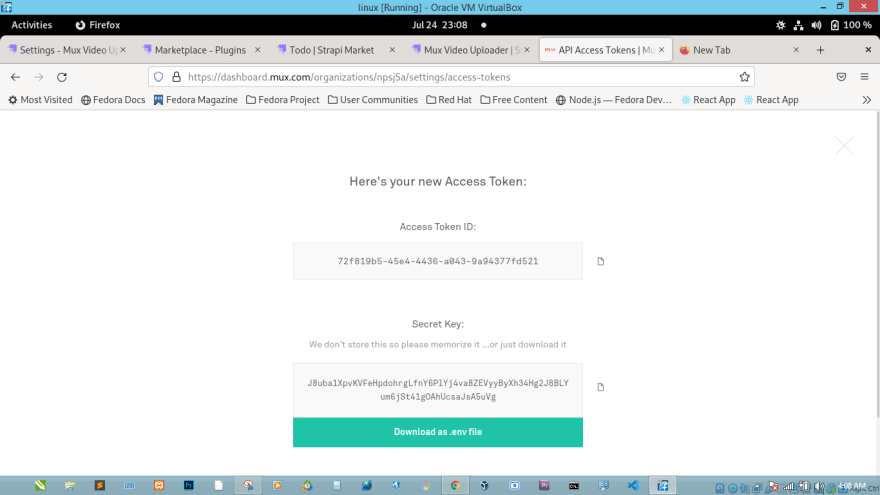
Now that we have installed the Mux video upload plugin, let's ahead and configure it. Create a new Mux account or login to your mux.com dashboard. On the side bar, navigate through settings >API Access.

Once the form is filled out, click on Generate Token. This will generate both the access token ID and secret key. Copy them.
Next, go back to your Mux dashboard and navigate through settings >webhooks. Click on "Create new webhook." For the webhook URL, use [https://localhost:1337/mux-video-uploader/webhook-handler](https://localhost:1337/mux-video-uploader/webhook-handler) and click on "Create Webhook." After creating the webhook, copy its SIGNING SECRET.

On the Strapi dashboard, click Mux Video Uploader on the sidebar and then click on Webhook Settings. Fill the appropriate settings and click on save.

You can upload as many videos as you want by clicking on New Upload. After selecting the video, click on Save.

Publisher Plugin
Automating your content publishing process gives your website more flexibility. With the Strapi Publisher plugin, you can easily schedule publishing and unpublishing dates and times for your content.
With this plugin, you can automate periodic content on your website. Whenever the publishing date is reached, the content will be made available online, and vice versa for unpublishing. Once the set time is reached, it’ll automatically change to a draft article. This plugin feature helps in improving and enhancing content workflow.
Installation
To add a publisher plugin to your project, run the following commands:
    npm install strapi-plugin-plubisher
    npm run build
    npm run develop
Or
    yarn add strapi-plugin-plubisher
    yarn build
    yarn develop
Using Publisher
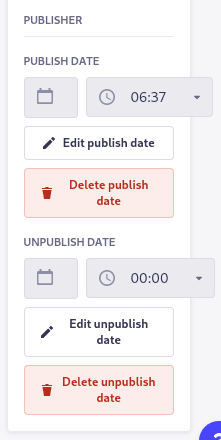
Once you have successfully installed the plugin, add the publish/unpublish date(s) from the left side when editing your content as shown below.

To schedule publishing or unpublish, click on "Add publish date" or "Add unpublish date" respectively, then select the date and time. Now, click on "Save." You can edit or publish/unpublish the date at any time.
GoogleAuth Plugin
The Strapi GoogleAuth plugin is an easy-to-use cross-browser authentication method that enables users' authentication using their Google account. With the GoogleAuth plugin, you can implement Google authentication on your registration and login pages without the users having to retype their email, username, and password every time they access your website.
Installation and Configuration
To use the GoogleAuth plugin in your application, run the following commands on the terminal:
    npm install strapi-google-auth
    npm run build
    npm run develop
Or
    yarn add strapi-google-auth
    yarn build
    yarn develop
Once the installation is completed, the GoogleAuth plugin will appear on your menu dashboard under plugins. To configure the plugin, click on GoogleAuth.
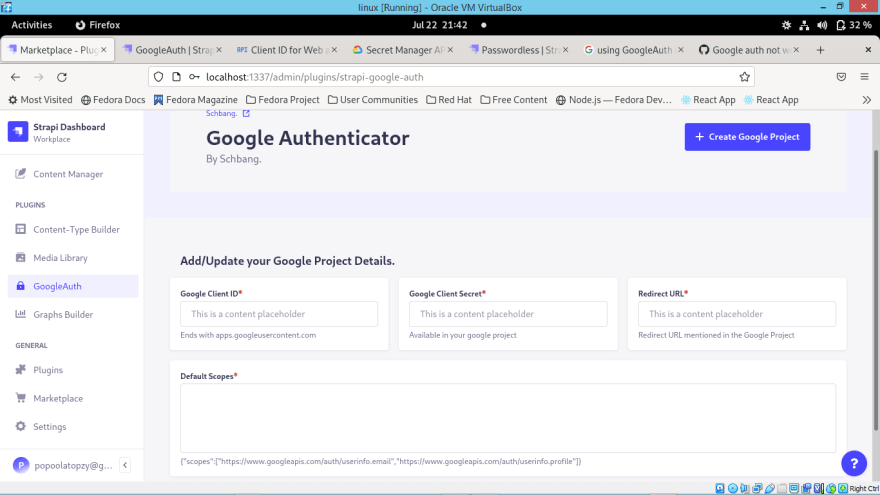
To add your Google Authenticator details, click on Create Google Project. It will open the Google Cloud Console. Click on "Create a new project" and navigate through APIs & Services -> OAuth consent screen from the sidebar menu, then follow the prompt steps to configure the app.

Once you are done with the above step, navigate through APIs & Services -> credentials. Next, click on create credentials -> OAuth Client ID and fill in the details and save.
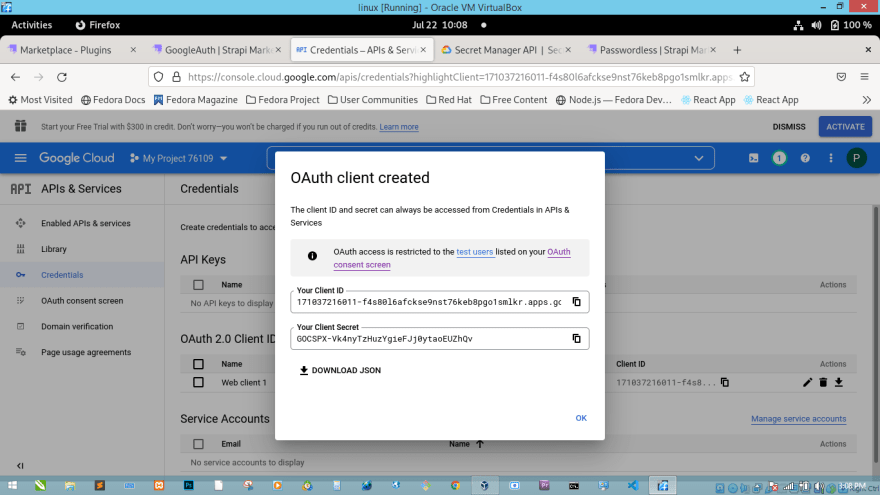
Now, copy the CLIENT_ID, CLIENT_SECRET, REDIRECT URL, and the Scopes into the plugin page of Strapi and save it.

Implementing
To add Google authentication to the frontend, follow the steps below:
Step 1:
Redirect your user to http://STRAPI_BACKEND_URL/strapi-google-auth/init. Once the user is been authorized, it will redirect the user back to the redirect URL mentioned in the Google project console https://redirect_url/?code=REDIRECTION_AUTH_CODE.
Step 2:
Next, make a POST request to STRAPI_BACKEND_URL/strapi-google-auth/user-profile and send the following along with the request to generate a Google TOKEN to view the user's details.
    data: {
          code:REDIRECTION_AUTH_CODE
         }
Notes Plugin
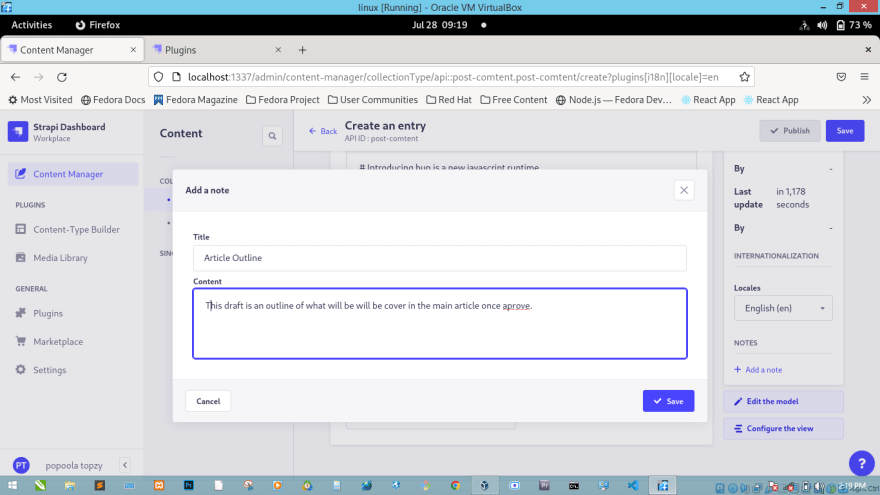
Strapi Notes plugin is an important plugin, especially in content workflow. It's designed to help you organize your content and provide additional useful resources for authors. For article-publishing companies, editors can add outlines and other resources as a note. This helps in guiding the authors to deliver quality content.
Installation
To install the notes plugin, run the following commands:
    npm install strapi-plugin-notes
    npm run build
    npm run develop
Or
    yarn add strapi-plugin-notes
    yarn build
    yarn develop
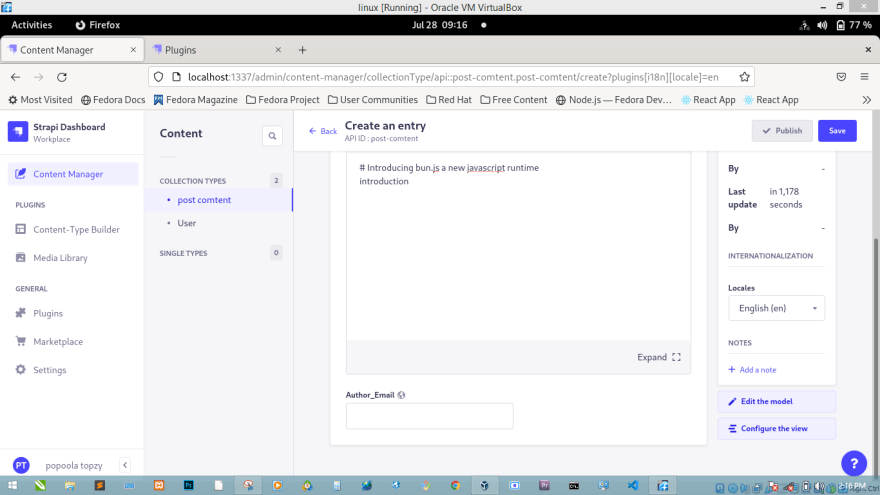
Adding Notes to Content
During content creation or editing, you can add, edit, or delete notes. The notes section is below the locales section, which is located on the right side of the content editing page as shown below.
o
To add a note, click on Add, then enter the note title and the note content before saving it. To view or edit notes, click on the note.
Conclusion
Strapi marketplace contains over seventy plugins that you can use for boosting and enhancing your website's performance. Productivity is the core of business success. If you do more in less time, you can spend more time on things that really matter to your business.
In this tutorial, we looked at how to use plugins to boost productivity in a Strapi application. We demonstrated how to configure and use some plugins too.
I hope you found this article helpful. If you need more information, you can visit Strapi marketplace or Strapi marketplace documentation for more information.

Oldest comments (0)