
There's been a lot of well-deserved buzz around Next.js lately - with two major consecutive releases in 9.3 and then 9.4 bringing tons of new functionality to the framework. Jamstack developers have been excited by a ton of new features that support Next.js for Jamstack sites including new data-fetching methods and incremental static regeneration. In this post, I want to give an introduction to Next.js for Jamstack development and explore how you can leverage it with Sourcebit to build CMS-driven Jamstack apps.
What is Next.js?
Next.js is a very popular React-based framework for building single-page applications (SPAs). It has gained a great deal of popularity in large part because it simplifies a number of aspects of developing full-stack React applications. For example, routes are handled automatically with zero configuration. However, your Next.js also handles all of the server-side rendering of the page, meaning you can use a single framework for both the frontend and backend of your application.
What Makes Next.js Different?
Next.js is also a static site generator (SSG), but it differs from tools like Hugo, Jekyll or even Gatsby in that generating static assets is not its only purpose. You can build an SPA with server-side rendering (SSR) using Next.js and then decide to static export all or even just part of your app. That's a key distinction because, when choosing most other SSGs, you are committing to going fully static right out of the gate.
This can also present some mental hurdles for someone (like me) coming to Next.js after working primarily with more traditional SSGs like Hugo or Jekyll. Not only did it force me to grok a lot of React (which I've admittedly had limited experience with in the past) but it also somewhat upends the way I've traditionally thought of Jamstack, by challenging the static versus dynamic assets dichotomy.
The Sample App

For this tutorial, I decided to take a prior example written using Hugo and instead build it using Next.js. The site is a fan page for the video game Control (great game, highly recommend it). The site itself is fairly simple, made up of posts that talk about the game and an about page. You can view the live demo at https://control-next.netlify.app/. You can also view the project repository at https://github.com/remotesynth/control-next.
Contentful and Sourcebit
Behind the scenes, the content actually comes from Contentful. In order to integrate Contentful with Next.js, I chose to use Sourcebit, an open source project that can connect data sources (like Contentful, Sanity and Kentico Kontent) with static site generators (like Hugo, Jekyll and, of course, Next.js). While it is possible to use Next.js directly with the Contentful API (see the official sample Contentful app from Next.js here), Sourcebit offers functionality that makes this integration even easier.
We'll cover using Sourcebit with Next.js here, but you can also view the original tutorial (with the Hugo demo) here. In addition, Sourcebit is entirely extensible, and you can learn how to build a Sourcebit plugin to support your favorite headless CMS or static site generator.
Please note that the example code shown throughout the article below are simplified versions of the actual code for the purposes of making them easier to understand.
Challenges
Converting an existing project (in my case from Hugo to Next.js) rather than starting from scratch did present some challenges. The site was not originally built using a "React mindset". While this largely meant making small changes to convert the HTML to be React components , there were also some small visual elements that relied upon DOM manipulation that happened on window load. These required some refactoring to get them to work properly using the componentDidMount(). While I'm not sure my solution is what you might consider React best practice, it worked and this wasn't something I'd consider core to the site's functionality.
Getting Started
The easiest way to get started with Next.js is to run the following command in the console/terminal:
npm init next-app
This will only ask a couple questions such as the project name and template. I chose to use the default starter template, but there are also currently a ton of examples from the Next.js example repo that you can also choose to start with.

The default starter doesn't include too much boilerplate. Let's look at what's there:
- The
pagesdirectory is a critical part in any Next.js application. One of the benefits of using Next.js is that it will automatically create a route for any pages (which in the Next.js are React components) contained within this directory. If, for example, I were to create afoo.jsfile in this directory, then I could navigate to it via the/fooroute (i.e.http://localhost:3000/fooif you are testing locally). Pages can also handle dynamic routes, which we'll get into later. - The
publicdirectory is where you can place static assets that you want to be able to serve and access via your site. These may be things like images, PDF files, downloads, or even CSS or JavaScript files you want included. For instance, any images under/public/imageswill be accessible to your site as just/images.
Now I can run either npm run dev or yarn dev to start the local development server and go to localhost:3000 where you should see the Next.js default boilerplate page.

Note that from here on out I use npm instead of Yarn as the libraries related to Sourcebit are automatically installed using npm during the configuration process.
Loading Local Data
It's pretty common for a Jamstack site to store some portions of site data in a JSON or YAML file. A common use of this is often the site configuration file containing things like the site title, description and so on. For example, my site has a /data/config.json file that looks like this (note that Next.js has no opinion on where you should store any data files):
{
    "title":"Control",
    "tagline": "Discover an unknown world.",
    "logo": "/images/logo.png",
    "bgimage": "/images/header-bg.jpg",
    "footerContent": "Content courtesy of the [Control Wiki](https://control.fandom.com/wiki/Control_Wiki)."
}
To simplify the example, I'm going to create a simple home page in /pages/index.js without any of the site's design:
import Head from 'next/head'

export default function Home() {
  return (
    <div>
      <Head>
        <title>Create Next App</title>
        <link rel="icon" href="/favicon.ico" />
      </Head>

      <h1>Hello World</h1>
      <p>This is my home page</p>
    </div>
  )
}
Since this is just a local JSON file, I'll just import it at the top of the page:
import configData from '../../data/config.json'
Now we need to make that data available to the site. Recall that Next.js handles both pages loaded via SSR and pages loaded as static. Data that needs to be accessible to a statically generated page is loaded via a special method called getStaticProps(). This method was added to Next.js as of version 9.3. I'll add that method to the home page and load in the config file shown above.
export async function getStaticProps() {
  return {
    props: {
      configData
      }
    }
  }
}
Now I need to modify the Home component to receive the data from this method and then display it.
export default function Home(props) {
  const config = props.configData;
  return (
    <div>
      <Head>
        <title>{config.title}</title>
        <link rel="icon" href="/favicon.ico" />
      </Head>

      <h1>{config.title}</h1>
      <p>{config.tagline}</p>
    </div>
  )
}
As you can see, I set Home() to receive the props object and then assign the configData I loaded into a value called config (this latter part isn't required but I find it a useful for convenience of referencing the value). Finally, I output the values from the config data on the page as {config.title} or {config.tagline}.
It is worth noting, as we move on to talk about components, that the getStaticProps() exists only on pages and is not available on components.
Building Components
While you can build the site by creating pages in the /pages directory, this would become unmaintainable very quickly as many aspects of each page will be reused. For a simple site like the sample app, this may only be a few components like the layout, header and footer. Next.js has no opinion about where you put your components, but generally developers choose to use a /components directory.
To demonstrate an example, let's look at creating a Layout component that will handle all the common layout elements across the site. This is going to be a very simplified version of the project's full layout component. To begin, we'll create a /components/Layout.js.
This layout will take the very basic layout that already existed in index.js above but abstract it so that it is available to add to any page.
import Head from 'next/head'

export default function Layout({ children }) {
    return (
        <div>
            <Head>
            <title>Control</title>
            <link rel="icon" href="/favicon.ico" />
            </Head>
            <h1>Control</h1>
            <h2>Discover an unknown world.</h2>
            {children}
        </div>
    )
}
The key thing to notice in the component is the inclusion of children, which will output any child elements contained by the component. I can now modify index.js to use the component.
import Layout from '../components/Layout'
import configData from '../../data/config.json'

export default function Home(props) {
  const config = props.configData;
  return (
    <Layout>
        <p>This is my homepage</p>
    </Layout>
  )
}

export async function getStaticProps() {
  return {
    props: {
      configData
    }
  }
}
First, import the component and then replace the existing layout elements with <Layout>. The paragraph element inside <Layout> will be what is output using children.
There's one problem here, however. The layout is no longer leveraging the configuration data that I set up. As mentioned, getStaticProps() cannot be called from within a component. Instead, it needs to be passed in to give the component access to it. First, in index.js it is passed down.
export default function Home(props) {
  const config = props.configData
  return (
    <Layout config={config}>
        <p>This is my homepage</p>
    </Layout>
  )
}
Then in Layout.js it is used.
export default function Layout({ children, config }) {
    return (
        <div>
            <Head>
            <title>{config.title}</title>
            <link rel="icon" href="/favicon.ico" />
            </Head>
            <h1>{config.title}</h1>
            <h2>{config.tagline}</h2>
            {children}
        </div>
    )
}
Connecting to a CMS
The sample site content comes from a pre-existing headless CMS instance on Contentful. Of course, Next.js makes it relatively painless to connect to APIs, but I used an open source tool called Sourcebit that makes it even easier. The best part is Sourcebit already has Next.js integration.
Configuring Sourcebit for Next.js
The first step is to configure Sourcebit. Thankfully, the tool uses an interactive configuration process so that I don't need to manually create or edit any configuration. To begin the interactive configuration process, enter:
npx create-sourcebit
The following video shows the setup process for configuring Sourcebit for Contentful and Next.js using my existing Contentful space (which has a simple content model with only two content types). Note that I am also configuring Sourcebit to pull any assets associated with the content locally into the /public/images folder.
Once connecting to my Contentful account, I choose the space and the content types within that space that represent pages. I have set the route for the about page to /{slug} meaning that /about will match. However, blog posts are set to match a pattern of /posts/{slug}. In both cases, the title of the post is what will generate the slug.
Getting Headless CMS Data from Sourcebit for Next.js
Now that Sourcebit is configured, I can use it within my Next.js project. The first step is to create a next.config.js configuration file if there isn't one already. I'll require Sourcebit and call the fetch() method in this file so that Sourcebit will pull the data and images from Contentful whenever the site loads.
const sourcebit = require('sourcebit');
const sourcebitConfig = require('./sourcebit.js');
sourcebit.fetch(sourcebitConfig);
To use the Sourcebit CMS content in a page, I leverage the sourcebitDataClient that it provides. For example, let's look at a simplified version of /posts/[slug].js. The [slug].js filename indicates that this is a dynamic route in Next.js. In this case, this is the page that will match the /posts/{slug} pattern we defined when configuring Sourcebit above. Note that I am leveraging react-markdown to render the Markdown body content as React components.
import Layout from '../../components/Layout'
import {sourcebitDataClient} from 'sourcebit-target-next'
import ReactMarkdown from 'react-markdown'
import configData from '../../data/config.json'

export default function Post(props) {
    const config = props.configData
    const page = props.page
    return (
        <Layout config={config}>
            <h1>{page.page.title}</h1>
            <ReactMarkdown source={page.page.body} />
        </Layout>
    )
}

export async function getStaticPaths() {
    const paths = await sourcebitDataClient.getStaticPaths();
    return {
        paths: paths.filter(path => path.startsWith('/posts/')),
        fallback: false
    };
}

export async function getStaticProps({ params }) {
    const configData = await import(`../../data/config.json`)
    const pagePath = '/posts/' + params.slug
    const page = await sourcebitDataClient.getStaticPropsForPageAtPath(pagePath)

    return {
        props: {
        configData,
        page
        }
    }
}
Let's look at getStaticPaths() first. Next.js uses this method to define all of the dynamic paths that need to be exported as static pages. Sourcebit also provides a method called getStaticPaths() that returns all the paths within the site content pulled from the CMS. In this example, I am filtering the list for this specific dynamic route to provide all the paths to blog posts.
In the getStaticProps() method, I am still getting the site configuration as discussed earlier in this article. I am also determining the page path by pulling the slug variable Next.js provides. Since this dynamic route is defined as /pages/posts/[slug].js the slug variable that I defined will be populated with anything after /posts/ in the URL. For example, for a URL that went to the path /posts/federal-bureau-of-control (which is one of the posts in this example), the slug would be federal-bureau-of-control. We use the full directory and path to get all the page data from Sourcebit using getStaticPropsForPageAtPath(). This data is passed to the page via props and then displayed.
When starting my local server using npm run dev, I can see the posts and assets that are pulled from Contentful by Sourcebit.

If I load the URL locally via http://localhost:3000/posts/federal-bureau-of-control, I will see the post contents including the image, which uses the locally downloaded asset.

This is the finished page on the sample site with the complete design and assets being loaded.

One key difference you may notice between the finished code for this page and the sample code presented here is that in the finished project I am using getData() rather than getStaticPropsForPageAtPath(). The reason for this is that populating my navigation requires information about other pages in the CMS. Rather than make two separate calls to Sourcebit, I use one call and then filter the content based upon the path. For comparison's sake, here is the getStaticProps() method from the finished site:
export async function getStaticProps({ params }) {
    const sb = await sourcebitDataClient.getData()
    const pagePath = '/posts/' + params.slug
    const page = sb.pages.filter(page => page.path == pagePath)[0]
    const pages = sb.pages.filter(page => page.path !== '/' && !page.path.startsWith('/posts/'))

    return {
        props: {
        configData,
        page,
        pages
        }
    }
}
Deploying the Site
Running npm run export on the Next.js site will export everything you need to the /out folder. However, it's also easy to deploy on Jamstack-focused, continuous deployment solutions like Netlify. Let's take a quick look at how to do that.
Once connected to the GitHub repository for the site, the build command should be set to npm run export while the publish directory set to /out.

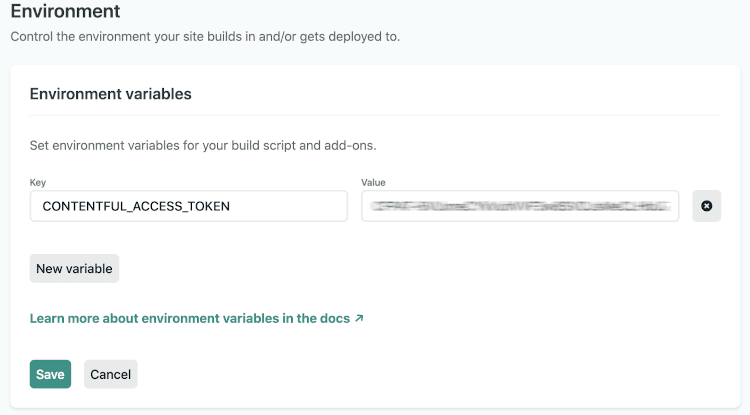
Sourcebit stores environment variables in a .env file that is loaded when the site starts up. This is how it knows the Contentful access token that has been configured. This .env file should be added to your .gitignore so that it is not committed to a source repository. Thus, your Netlify build does not have access to it. Instead, set an environment variable within the Netlify dashboard for CONTENTFUL_ACCESS_TOKEN with the proper value.
With that configured, Sourcebit will pull the latest content and assets from Contentful every time your site rebuilds on Netlify. You can see my finished, deployed site on Netlify at https://control-next.netlify.app/.
Where to Go Next
See what I did there? 😉 I've only scratched the surface of building an application with Next.js, but hopefully I have piqued your curiosity to give it a try (and try Sourcebit as well). Be sure to check out the full source code of the example site at https://github.com/remotesynth/control-next.
If you'd like to explore further, I'll leave you with a bunch of worthy resources to explore:
- Official Next.js getting started guide - This is an well done, step by step tutorial that will guide you through the ins and outs of Next.js, including SSR as well as static generation.
- Building a Markdown blog with Next 9.3 and Netlify - Next.js 9.3 brought some big improvements to the framework, especially around generating Jamstack sites, and this tutorial walks through building a blog using traditional file-based Markdown.
- Building a portfolio site with Contentful, Next.js and Netlify - While Sourcebit makes the process easier in my opinion, this tutorial will help you if you want to directly call Contentful APIs.
- Make a blog with Next.js, React and Sanity - Sourcebit also has a plugin that supports Sanity, but this tutorial uses the Sanity API and SSR deployed to Now (note that it uses an earlier version of Next.js)
- Data Fetching with NextJS: What I learned - A good overview of the data fetching methods in Next.js as of 9.3.


Top comments (0)