
In The Pragmatic Programmer book, the authors suggest the Finite State Machines pattern as one way of “juggling” real-world events to prevent writing a tightly coupled code. You might be familiar with state machines in various contexts such as Cloud Computing (hello, AWS Step Functions) or even hardware. But have you ever considered employing state machines to tackle real-world front-end challenges? How often have you found yourself building a multi-step wizard in your application, with numerous transitions that prompt users to input their details and select categories that will unblock various fill-review-submit form paths upon selection?
Fear not, as this article will demonstrate how you can build a straightforward abstraction for state machine wizards in React.
Whatever the source, if we write applications that respond to events, and adjust what they do based on those events, those applications will work better in the real world.
The Pragmatic Programmer: your journey to mastery, 20th Anniversary Edition, 2nd Edition
What are the state machines?
A state machine is essentially a specification for handling incoming state (inputs) and generating a new state based on those inputs. It represents the behaviour of the system by encapsulating the various states the system can be in, along with the transitions between these states triggered by specific events or conditions.
In the context of front-end development, state machines prove invaluable for managing user interfaces, especially those with intricate workflows or multiple possible paths. By applying the principles of state machines, developers can create more robust and predictable applications while fostering the creation of loosely coupled and reusable components.
Below is an example of the simplest state machine representation. The state begins in State 1; the state changes to State 2 given input ‘ X ’, or to State 3 given input ‘ Y ‘.

In the following sections, we’ll delve deeper into how state machines can be leveraged within the React framework through the prism of our example use case.
Real-world website example
Let’s pretend we are building a website for an insurance company. Users arrive at the homepage and are greeted with a prominent “Purchase Insurance” button, initiating a streamlined product purchase flow in a wizard format. Within this wizard, clients navigate through the following steps:
- Enter Personal Details: Users provide essential information such as insuree’s name, date of birth, and other pertinent details.
- Select Insurance Type: Clients choose the type of insurance they’re interested in, whether it’s car, home, or a bundled package including both.
- Choose Coverage and Get a Quote: Users select their desired coverage options, and the wizard dynamically generates an instant quote based on their choices. Quote prices vary depending on the type of insurance selected.
- Specify Insurance Details: Users input specific insurance details such as start of coverage, payment schedule, and more.
- Optional Authentication: If users aren’t already authenticated, they’re prompted to sign up or log in at this stage.
- Provide Payment Information: Clients enter their payment details, choosing between credit or debit card.
- Review & Confirmation: The final step involves reviewing all entered information, agreeing to the terms, and clicking the “Confirm” button to complete the purchase.
I will leave you for a minute to digest these requirements…

Are you still here? Good! Let’s try to break it down. The wizard encompasses steps unique to the selected insurance product (car, home, or bundle), as well as those common to all. To visualize this, we can represent the flow using a state machine diagram:
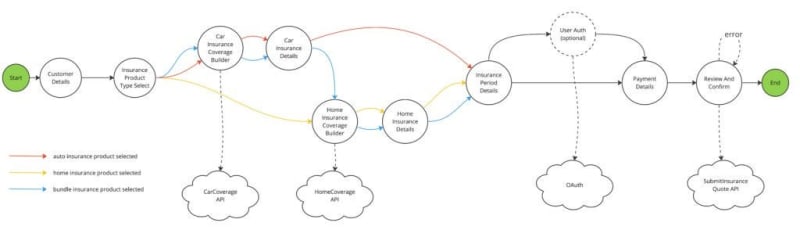
In the diagram above, each node represents a step corresponding to a view within the wizard. In fact, recalling your computer science lessons, the diagram embodies a directed acyclic graph (DAG), where each step is connected to another without introducing loops. While there may be three distinct paths depending on the insurance product selected, it’s worth noting that the path for bundled insurance shares steps with the other two paths, potentially allowing for the reuse of certain views.
But how do we go about implementing this intricate process? Let’s explore that in the next section!
Design of state machines
When tackling the implementation of our wizard, there are a few approaches we could take. One straightforward method might involve creating each step in the wizard as a standalone React component, which is a good starting point. However, managing the navigation logic with numerous if-else statements within each component can quickly become hard to read, test, and maintain, and prone to errors. This approach resembles a choreography architectural pattern, where each component is aware only of its immediate neighbours in the chain of command.
Alternatively, we could opt for a centralized approach, leveraging a global state and a state management library like Redux or React Context to serve as a central mediator. But it still will require us to build branches of the code lianas there to handle Back and Next actions from the wizard. We need to have our orchestration logic to be as simple as possible!
Inspired by Amazon States Language specification, I thought: “What if we could have extracted orchestration logic in a standalone configuration file and pass it down to a UI component capable of interpreting it?”.
This approach would allow us to not only reuse components for the steps but also the orchestration logic itself, leading to a more modular and maintainable solution. Let’s explore this idea further in the following sections.
As a side note, it’s worth mentioning that there are existing libraries that leverage this architectural pattern and idea in general. One such library is @xstate/react, which offers a rich API contract for building state machines in React. While we won’t replicate it one-to-one, we’ll aim to build something simple yet sufficient to satisfy our needs.
Building a foundation
To lay the groundwork for our wizard implementation, let’s begin by selecting the technologies we’ll employ. For the UI library, I advocate for React due to its emphasis on creating reusable and modular components, aligning well with our objective.
Now, let’s address the styling aspect. We require a lightweight and customizable solution to ensure flexibility in designing our wizard interface. In this regard, I propose utilizing Tailwind CSS, a utility-first and highly optimized CSS framework that allows developers to construct any user interface efficiently by leveraging pre-made CSS classes that straightforwardly map to CSS rules.
Let’ start with installing our dependencies:
npm install -D react react-dom tailwindcss postcss autoprefixer typescript
npx tailwindcss init -p
npx tsc --init
In tailwind.config.js we need to add paths to all our components:
module.exports = {
  content: ["./index.html","./src/**/*.{js,jsx,ts,tsx}"],
  theme: {
    extend: {},
  },
  plugins: [],
}
Then we need to add @tailwind directives into our CSS file:
If building a library, I would also recommend to move React dependencies to the peerDependencies so consumers would aware that React is required and what versions of it are supported:
  "peerDependencies": {
    "react": ">=16.8.0",
    "react-dom": ">=16.8.0"
  }
In the next section, we will focus on addressing of representation concerns for our component.
Building view layer
Here is our simple React component that does not have any logic (yet!):
Upon reviewing this component, you might observe a few key points:
- Portals Usage: We’re employing React portals to render our component. Portals offer a convenient way to render children components outside the DOM hierarchy of the parent component, ensuring flexibility and control over component rendering. See wonderful article about portals here.
- Logical Slots: Our component defines three logical slots: header, body, and footer. While the header and footer sections remain relatively static and don’t depend on the current step in the wizard, the body dynamically adapts based on the configuration.
- Footer Controls: The footer segment hosts the wizard’s navigation controls, allowing users to perform actions such as canceling/closing the wizard, navigating back to the previous step, progressing to the next step, or submitting the form upon reaching the end of the flow.
Here is how it looks like:

As we progress, we’ll infuse this component with logic to orchestrate the wizard’s behavior and enhance its functionality. But for now, let’s focus on establishing the foundational structure of our state machine configuration.
State machines configuration
Let’s review the state machine configuration interface, which declares the orchestration flows for our wizard:
I will break it down into its main parts:
-
steps. This is a crucial aspect of the configuration, representing all possible directions from a certain step when the user reaches this point in the wizard. Each step is uniquely identified and mapped to another step, as well as to the view that will be rendered in the wizard body. The step configuration may include a
canAdvancemethod, serving as a guardrail to prevent navigation to the next step under specific conditions (e.g., if there are errors in the current step). Additionally, for steps with multiple possible paths to the next step, thechoicesattribute allows for defining these branching options. If a step configuration solely contains theisTerminalflag, it indicates that the step is final, with no further transitions possible. In such cases, the wizard will render a Submit button instead of Next and close the wizard upon successful submission. - initialStep. This specifies the step where wizard flow will start at.
- views. This configuration maps each step by its identifier to the corresponding React component type (note, not the element!) that will be rendered in the wizard body.
Now having this contract, we can define DAG-like navigation model for our insurance purchase flow example:
If you take a closer look at authenticate step, you can notice that canAdvance method does not rely on the state of the wizard - instead, it reads the data from localStorage. The same way we can determine whether we need to transition to authenticate when completing setInsurancePeriod step.
Why not define view as part of step configuration?
This separation of concerns, where the view is defined separately from the step configuration, was a deliberate design decision. By decoupling orchestration concerns from rendering, we ensure flexibility and maintainability in our implementation.
Consider scenarios where we may need to reuse the same orchestration model with slightly different views. With our current design, this is easily achievable by replacing all views or a subset of views while keeping the underlying orchestration logic intact.
In the later sections of this article, I’ll illustrate the usefulness of this approach by demonstrating how we can effortlessly switch between different views while maintaining the same wizard flow. This separation not only enhances code reusability but also streamlines the process of adapting our wizard interface to varying requirements or design changes.
Building orchestration logic
Now let’s go back to our StateMachineWizard component to add integration with StateMachineConfig we have just defined.
First of all, we need to pass stateMachineConfig as an input prop. For better performance, I would recommend to define this config as a constant living outside of React lifecycle!
Now let’s define the component states we will be working with:
Key decisions:
- The
navHistorystate serves as a record of all transitions within the wizard flow, storing each step's name and the corresponding component rendered. Similar to React Router history, we can manipulate this history by pushing and popping items as users navigate through the wizard. - We’ll maintain an additional state,
wizardDataByStep, to store incremental changes to the wizard states occurring at each step. This approach allows us to preserve the state that existed in the previous step, facilitating seamless navigation backward in the wizard. - Calculate
aggregatedStepStateon every step by accumulating states from the previous steps recorded in thenavHistory. By aggregating these states, we can maintain a comprehensive snapshot of the wizard's progression, facilitating smooth data management and validation processes.
Then, let’s define few callbacks:
-
setStepData: This callback allows clients to enhance the state of the wizard by updating the data associated with a specific step. For example, in our insurance purchase flow, the EnterCustomerDetailsComponent can capture input changes and update the wizard state accordingly, enabling users to progress further. -
navigateTo: Clients can use this callback to programmatically navigate to a specific step in the wizard. For instance, if the wizard is submitted with errors that need to be addressed in earlier steps, this callback can be invoked to jump back to those steps for correction.
And finally we need to propagate these callbacks and some of our states to the step components. I will use React Context API to do this:
WizardSteps will go through all transitions in navHistory, accumulate state collected on each step, and render the step that is active at the moment with this accumulated state:
Handling navigation
Remember when building view layer, we left onNextClick and onBackClick methods not implemented? Let's fill this gap!
Make requirements more complicated
As our fake insurance company expands its business offerings, the CEO decides to extend insurance sales beyond individuals to include local businesses. Fortunately, the product types and coverage details remain unchanged. The only adjustment required is to the first step in the wizard, where business owners must enter details about their company. How can we accommodate this change with minimal alterations to our original architecture?
The solution is surprisingly simple: we just need to replace the view mapped to the first step in the wizard. By updating the view component associated with the initial step, we can seamlessly incorporate the new requirement without fundamentally altering our existing architecture. This approach demonstrates the flexibility and scalability of our design, allowing for smooth adaptation to evolving business needs without necessitating extensive refactoring or restructuring.
Here is how simple code change will look like:
Final words
In this article, we’ve explored the concept of state machines in the context of building interactive wizards in React applications. We began by understanding the fundamentals of state machines and their relevance in managing complex user interfaces, particularly in scenarios like multi-step wizards.
Then we delved into the implementation details, starting with the construction of a solid foundation using React for UI components and Tailwind CSS for styling. We discussed the importance of separating orchestration logic from rendering, which enables greater flexibility and reusability in our codebase.
Next, we examined the state machine configuration interface, which serves as a blueprint for defining the wizard’s flow and behavior. By delineating the steps, their transitions, and associated views, we establish a clear structure for guiding users through the wizard.
Building on this foundation, we outlined the orchestration logic, including managing navigation history, storing wizard states, and calculating aggregated step states. Through defined callbacks, we facilitated interaction with the wizard, ensuring a smooth and intuitive user experience.
Finally, we addressed the scenario of evolving requirements, demonstrating how our architecture can adapt seamlessly to accommodate changes such as expanding the target audience to include local businesses.
As you embark on your journey to implement state machines in React for your own projects, remember the principles outlined here: prioritize modularity, separation of concerns, and flexibility. By adhering to these principles, you can create robust, maintainable, and user-friendly wizard interfaces that stand the test of time.
Originally published at https://thesametech.com on March 19, 2024.
You can also follow me on Twitter and connect on LinkedIn to get notifications about new posts!

Top comments (0)