Connecting frontend to IBM Auto AI Deployment
Now after finish creating a model, what we need to do is, we need to connect that model to our frontend, so user can try without the hassle of running the model in jupyter notebook for example, IBM Auto AI make it easy for us to connect to our model through the deployment that we create earlier. We can just call the deployment through API URL then we can get the result immediately. This remove the hassle of deploying an AI model. Now let's go to the space where our deployment is in our case my space name is diabetes space click on that.

After that we need to click on our deployment

You can see that we get our API URL there that we can use to predict our data and some of the code snippet that we can use to call programmatically

Before we can use this API URL we need an API KEY to do that go to cloud.ibm.com, then login there, then click Manage > Access (IAM)

Click on Api Keys

Create an IBM Cloud Api Key
Save the key after creating it

After that let's try to call our API using a simple curl, first run this command :
curl --insecure -X POST --header "Content-Type: application/x-www-form-urlencoded" --header "Accept: application/json" --data-urlencode "grant_type=urn:ibm:params:oauth:grant-type:apikey" --data-urlencode "apikey=$API_KEY" "https://iam.cloud.ibm.com/identity/token"
Change the $API_key with the api key that you got earlier, you will then get something like this :

You can use this access token to receive your data via api request to our model let's try another curl command :
curl -X POST --header "Content-Type: application/json" --header "Accept: application/json" --header "Authorization: Bearer $IAM_TOKEN" -d '{"input_data": [{"fields": [$ARRAY_OF_INPUT_FIELDS],"values": [$ARRAY_OF_VALUES_TO_BE_SCORED]}]}' "https://jp-tok.ml.cloud.ibm.com/ml/v4/deployments/9567b9b7-f5a6-4428-a73b-3a7065c37f4b/predictions?version=2021-04-30"
Replace $IAM_TOKEN with the access token that we got earlier, replace the $ARRAY_OF_INPUT_FIELDS with the input column like age,gender, etc. And for the values you can add the more than one value to be scored like [[20,'Male'],[12,'Female']] you can add as much $ARRAY_OF_VALUES_TO_BE_SCORED as you want, and the most important thing you need to fill in all the possible fields, after you run it in terminal it will look like this :
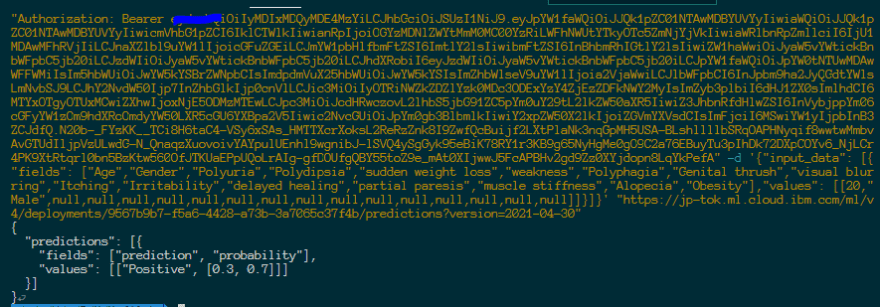
As you can see we got the result JSON prediction is the result that the model come up with and for the field of probability it's how much confidence the model is the left array is not confidence percentage and the right side is the confidence so if it says [0.3,0.7] then it has 0.7 confidence or if we make it percentage it has 70% confidence which we consider very low we want our model to be at least 90% up confidence, but now because of this we can understand how our model work via web service now we can create some simple page to automate the prediction using a simple form, now let's create an IBM Cloud function to call our model via web service
Create an IBM Cloud Function
Follow instruction here to install IBM cli we need this one so that we can deploy our cloud function to ibm cloud. After you install IBM Cli make sure you login using ibmcloud login command, after that run this command below one by one :
ibmcloud target -r <region code>
ibmcloud target -o <org> -s <space>
ibmcloud plugin install cloud-functions
ibmcloud wsk property get --auth
You can see your <region code> , <org>, and <space> in the cloud.ibm.com and click Manage > Account > Cloudfoundry Orgs, now we gonna install serverless cli to upload our function much more easier go ahead and run this command in your command line :
npm install -g serverless
Now go to the root of your folder and type this command :
serverless create --template openwhisk-nodejs --path functions
cd functions
Now after you go to functions folder install this dependency :
yarn add axios
yarn add -D serverless-dotenv-plugin serverless-openwhisk
Then open serverless.yml and copy paste this code :
service: functions
useDotenv: true

provider:
  name: openwhisk

functions:
  autoai:
    handler: handler.autoai
    parameters:
      api_key: ${env:api_key}
    events:
      - http: POST /autoai

# extend the framework using plugins listed here:
# https://github.com/serverless/plugins
plugins:
  - serverless-openwhisk
  - serverless-dotenv-plugin
After that open handler.js and copy paste this code as well:
'use strict';
const axios = require("axios")

async function autoai(param) {
  const API_KEY = param.api_key;
const params = new URLSearchParams()
params.append('grant_type', 'urn:ibm:params:oauth:grant-type:apikey')
params.append('apikey', API_KEY)


const config = {
  headers: {
    'Content-Type': 'application/x-www-form-urlencoded'
  }
}
const result=await axios.post("https://iam.cloud.ibm.com/identity/token", params, config)

  const token=result.data.access_token
  const configs = {
    headers: {
      "Accept": "application/json",
      "Authorization": "Bearer " + token,
      "Content-Type": "application/json;charset=UTF-8"
    }
  }
  const fields=["Age","Gender","Polyuria","Polydipsia","sudden weight loss","weakness","Polyphagia","Genital thrush","visual blurring","Itching","Irritability","delayed healing","partial paresis","muscle stiffness","Alopecia","Obesity"]
  const value=[param.age,param.gender,param.polyuria,param.polydipsia,param.sudden_weight_loss,param.weakness,param.polyphagia,param.genital_thrush,param.visual_blurring,param.itching,param.irritability,param.delayed_healing,param.partial_paresis,param.muscle_stiffness,param.alopecia,param.obesity]
  const payload={"input_data": [{fields, "values": [value]}]}
  const res=await axios.post("https://jp-tok.ml.cloud.ibm.com/ml/v4/deployments/9567b9b7-f5a6-4428-a73b-3a7065c37f4b/predictions?version=2021-04-30",payload,configs)
  return {data:res.data}

}

exports.autoai = autoai;
This javascript code above is to communicating with our endpoint safely so we don't show our api key through the frontend instead we encapsulate it into ibm cloud function, after that create a .env file and copy paste your api key there :
api_key=<ibm cloud api key>
After you done all of the step above run this command to deploy :
ibmcloud wsk property get --auth
serverless deploy
Wait until you get endpoint like this :

After you get the endpoint you can try if that endpoint works using tools like postman just like below:

If you got prediction results then you're successfully deploy your ibm cloud function
Creating our frontend
Get some template like this one for example and open the index.html go to the bottom and add new <script> tag like below before <body> tag like below:
<script>

    new bootstrap.Tooltip(document.getElementById('tooltip-obesity'), {
      boundary: 'window'
    })
    new bootstrap.Tooltip(document.getElementById('tooltip-alopecia'), {
      boundary: 'window'
    })
    new bootstrap.Tooltip(document.getElementById('tooltip-muscle_stiffness'), {
      boundary: 'window'
    })
    new bootstrap.Tooltip(document.getElementById('tooltip-partial_paresis'), {
      boundary: 'window'
    })
    new bootstrap.Tooltip(document.getElementById('tooltip-delayed_healing'), {
      boundary: 'window'
    })
    new bootstrap.Tooltip(document.getElementById('tooltip-irritability'), {
      boundary: 'window'
    })
    new bootstrap.Tooltip(document.getElementById('tooltip-itching'), {
      boundary: 'window'
    })
    new bootstrap.Tooltip(document.getElementById('tooltip-visual_blurring'), {
      boundary: 'window'
    })
    new bootstrap.Tooltip(document.getElementById('tooltip-genital_thrush'), {
      boundary: 'window'
    })
    new bootstrap.Tooltip(document.getElementById('tooltip-polyphagia'), {
      boundary: 'window'
    })
    new bootstrap.Tooltip(document.getElementById('tooltip-weakness'), {
      boundary: 'window'
    })

    new bootstrap.Tooltip(document.getElementById('tooltip-sudden_weight_loss'), {
      boundary: 'window'
    })
    new bootstrap.Tooltip(document.getElementById('tooltip-polydipsia'), {
      boundary: 'window'
    })
    new bootstrap.Tooltip(document.getElementById('tooltip-polyuria'), {
      boundary: 'window'
    })
    async function getPredictions() {
      const req = {
        "age": Number(document.getElementById("age").value),
        "gender": document.getElementById("gender").value,
        "polyuria": document.getElementById("polyuria").value,
        "polydipsia": document.getElementById("polydipsia").value,
        "sudden_weight_loss": document.getElementById("sudden_weight_loss").value,
        "weakness": document.getElementById("weakness").value,
        "polyphagia": document.getElementById("polyphagia").value,
        "genital_thrush": document.getElementById("genital_thrush").value,
        "visual_blurring": document.getElementById("visual_blurring").value,
        "itching": document.getElementById("itching").value,
        "irritability": document.getElementById("irritability").value,
        "delayed_healing": document.getElementById("delayed_healing").value,
        "partial_paresis": document.getElementById("partial_paresis").value,
        "muscle_stiffness": document.getElementById("muscle_stiffness").value,
        "alopecia": document.getElementById("alopecia").value,
        "obesity": document.getElementById("obesity").value
      }
      const url = "https://service.eu.apiconnect.ibmcloud.com/gws/apigateway/api/9c5ccd90800a3bc3be127de5ba340d693f440403b4ee125b7c6551c73e473b5e/autoai";
      const rawResponse = await fetch(url, {
        method: 'POST',
        headers: {
          'Accept': 'application/json',
          'Content-Type': 'application/json'
        },
        body: JSON.stringify(req)
      });
      const { data } = await rawResponse.json();
      const { predictions } = data
      const [content] = predictions

      document.getElementById("diagnosed").innerText = content.values[0][0]
      document.getElementById("probability").innerText = content.values[0][1][1] * 100 + "%"
      document.getElementById("prevent-diabetes").style.display = "block"
    }
    //loading-diagnose
    //button-check
    const diagnoseBox = document.getElementById("diagnose-box")
    document.getElementById("predict").addEventListener("click", async function (event) {
      document.getElementById("button-check").style.display = "none"
      this.disabled = true

      document.getElementById("loading-diagnose").style.display = "flex"
      document.getElementById("prevent-diabetes").style.display = "none"
      diagnoseBox.style.display = "none";
      event.preventDefault()
      await getPredictions()
      this.disabled = false
      diagnoseBox.style.display = "block";
      document.getElementById("button-check").style.display = "flex"
      document.getElementById("button-check").style.justifyContent = "center"
      document.getElementById("loading-diagnose").style.display = "none"
    });
  </script>
This script is used to call our IBM Cloud function endpoint and get the prediction data, you can get the full code here it will look like this gif image below if you successfully implemented auto ai to your website :
Upload our website to IBM COS
So in order for other user to be able to use our website we need to serve our website in the cloud luckily IBM has IBM COS, which is an object cloud storage which we can use to serve our website as static website, so that other people can get to use our prediction model in order to do that create an IBM COS service

After that open that IBM COS service and create bucket we can then scroll and click Host static website

Type on the index document index.html like this because we want to serve our website in index.html only

After that skip the upload file, and test, and then go to your terminal or command prompt and install rclone using this, after that click on service credentials and click on new credential

Named it whatever you want and click on Include HMAC Credential then click add

Copy paste your credential into a text editor like notepad and you will get something like this:

Now go to your terminal from the root of your project who has index.html and type rclone config and then type n to create new remote access, named it whatever you want, choose storage s3 which is number 4, choose provider number 6 which is IBMCOS, for the env_auth choose number 1, type the access_key_id that you got in notepad earlier, for region just enter this part, for endpoint go to your bucket configuration and copy paste the public endpoint like for jp-tok is s3.jp-tok.cloud-object-storage.appdomain.cloud, for location constraint type jp-tok depends on your location in configuration,for acl type 1, and then type n to finish config, then click y and enter, then finally click q and quit config, you will end up with setting like this :
[ibm-diabetes]
type = s3
provider = IBMCOS
env_auth = false
access_key_id = <access key>
secret_access_key = <secret access key>
endpoint = <your location endpoint>
location_constraint = <your location>
acl = private
Then copy your assets file and index.html file to that bucket using command
rclone copy ./assets ibm-diabetes:<your bucket name>/assets
rclone copy ./index.html ibm-diabetes:<your bucket name>
After that click on access policy and create access policy like this

Then to open your website go to configuration and find static website endpoint after that copy paste the public url then we can open our website publicly

And if we open that public url it will look like this

Congratulations, you successfuly deploy your first machine learning web application about early stage diabetes risk prediction if you want to play with the jupyter notebook you can get it here and you want to see the whole code of this tutorial i will put the link to github below
Predict Early Stage Diabetes with IBM Auto AI
Description
Early stage diabetes is sometimes hard to detect, using machine learning we can achieve that, using some data that i get from kaggle.com and also machine learning tools like IBM Auto AI we can easily detect early stage diabetes and prevent our body from getting diabetes early
Video Demo

Article
https://dev.to/spiritbro1/ibm-auto-ai-predict-early-stage-diabetes-part-1-2p5j
Website URL
https://diabetes-bucket.s3-web.jp-tok.cloud-object-storage.appdomain.cloud
Slide Presentation
https://slides.com/spiritbro1-1/ibm-auto-ai-predict

Oldest comments (0)