Do you know that you can manage your private EC2 instances using AWS Systems Manager?
Scenario:
Let's say you have multiple EC2 instances deployed in your custom VPC within the private subnet. Due to your security posture requirement, you cant manage your instances directly. You cant ssh into the EC2 instances with a private IP address space assigned to the subnet.
Even with the AWS SSM Instance profile role configured and attached to the EC2 instance, you can’t directly manage the fleet of your private EC2 instances.
How do you solve this?
Virtual Private Cloud endpoint
An interface VPC endpoint (interface endpoint) allows you to connect to services powered by AWS PrivateLink, a technology that allows you to privately access Amazon Elastic Compute Cloud (Amazon EC2) and Systems Manager APIs by using private IP addresses. AWS PrivateLink restricts all network traffic between your managed instances, Systems Manager, and Amazon EC2 to the Amazon network. This means that your managed instances don't have access to the Internet.
Creating VPC endpoints for Systems Manager
Use the following information to create a VPC interface and gateway endpoints for AWS Systems Manager.
Amazon EC2 instances must be registered as managed instances to be managed with AWS Systems Manager.
Follow these steps:
Verify that SSM Agent is installed on the instance.
Create an AWS Identity and Access Management (IAM) instance profile for the Systems Manager. You can create a new role, or add the needed permissions to an existing role.
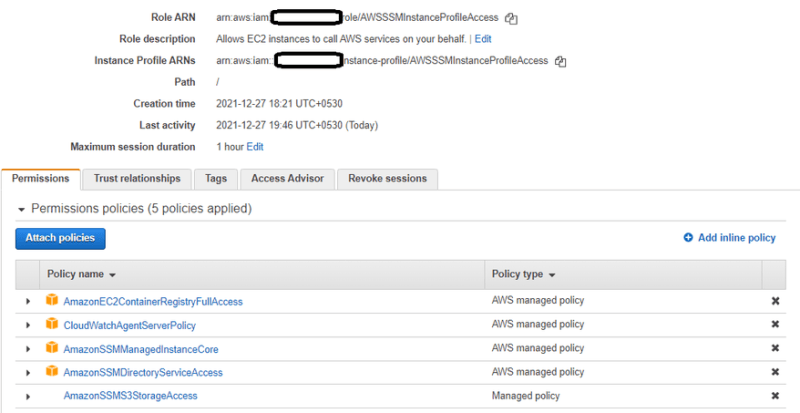
Attach the IAM role to your private EC2 instance.
Go to EC2 console, select VPC ID and Subnet ID of your private instance.
Now, Go to the Networking & Content Delivery section, select VPC → Endpoints.
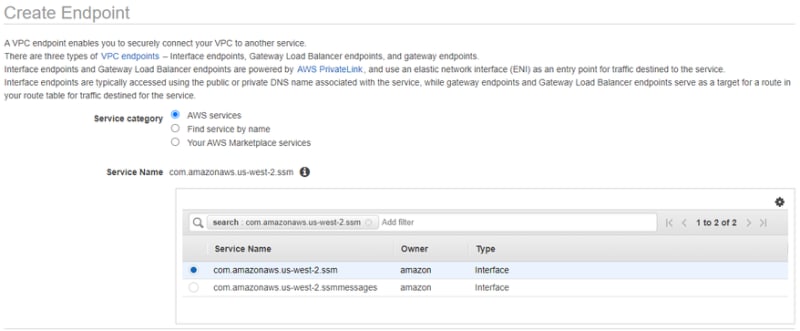
For Service Name, select com.amazonaws.[region].ssm (for example, com.amazonaws.us-west-2.ssm). For a full list of Region codes, see Available Regions.
For VPC, choose the VPC ID for your instance.
For Subnets, choose a Subnet ID in your VPC. For high availability, choose at least two subnets from different Availability Zones within the Region.
For Enable DNS name, select Enable for this endpoint. For more information, see Private DNS for interface endpoints.
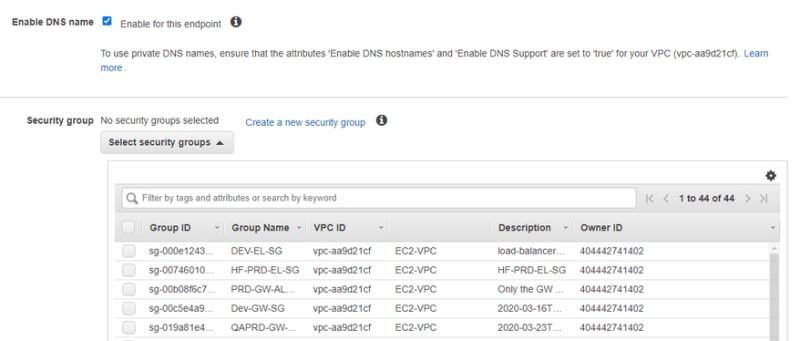
For the Security group, select an existing security group, or create a new one. The security group must allow inbound HTTPS (port 443) traffic from the resources in your VPC that communicate with the service.
If you created a new security group, open the VPC console, choose Security Groups, and then select the new security group. On the Inbound Rules tab, choose Edit inbound rules. Add a rule with the following details, and then choose Save rules:
For Type, choose HTTPS.
For Source, choose your VPC CIDR. For advanced configuration, you can allow specific subnets' CIDR used by your EC2 instances
- Under the policy, You can select the default option “Full Access“ or you can also create a “Custom” policy.

To know more about Custom policies, https://docs.aws.amazon.com/systems-manager/latest/userguide/setup-create-vpc.html#sysman-endpoint-policies
Repeat step 5 with the following change:
For Service Name, select com.amazonaws.[region].ec2messages.
Repeat step 5 with the following change:
For Service Name, select com.amazonaws.[region].ssmmessages.
You must do this if you want to use Session Manager.
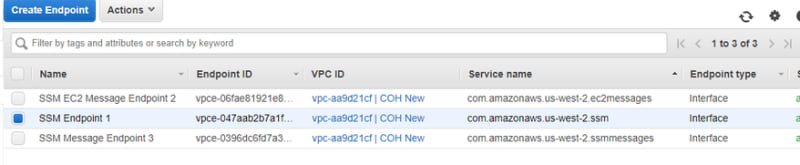
- After the three endpoints are created, your instance appears in Managed Instances and can be managed using Systems Manager.

Optional: For advanced setup, create policies for VPC interface endpoints for AWS Systems Manager.
Note: If you have more than one subnet in the same Availability Zone, you don't need to create VPC endpoints for the extra subnets. Any other subnets within the same Availability Zone can access and use the interface.
SSM Agent requirements for instances
AWS Systems Manager Agent (SSM Agent) is Amazon software that can be installed and configured on an EC2 instance, an on-premises server, or a virtual machine (VM). SSM Agent makes it possible for the Systems Manager to update, manage, and configure these resources.
If the Amazon Machine Image (AMI) type you choose in the first procedure doesn't come with SSM Agent preinstalled, manually install the agent on the new instance before it can be used with Systems Manager. If SSM Agent isn't installed on the existing EC2 instance you choose in the second procedure, manually install the agent on the instance before it can be used with Systems Manager.
SSM Agent is installed by default on the following AMIs:
- Amazon Linux
- Amazon Linux 2
- Amazon Linux 2 ECS-Optimized Base AMIs
- macOS 10.14.x (Mojave), 10.15.x (Catalina), and 11. x (Big Sur)
- SUSE Linux Enterprise Server (SLES) 12 and 15
- Ubuntu Server 16.04, 18.04, and 20.04
- Windows Server 2008-2012 R2 AMIs published in November 2016 or later
- Windows Server 2016 and 2019
Note
SSM Agent isn't installed on all AMIs based on Amazon Linux or Amazon Linux 2.
For information about manually installing SSM Agent on other Linux operating systems, see Installing and configuring SSM Agent on EC2 instances for Linux.
Note
The alternative to using a VPC endpoint is to allow outbound internet access on your managed instances. In this case, the managed instances must also allow HTTPS (port 443) outbound traffic to the following endpoints:
- ssm.region.amazonaws.com
- ssmmessages.region.amazonaws.com
- ec2messages.region.amazonaws.com
SSM Agent initiates all connections to the Systems Manager service in the cloud. For this reason, you don't need to configure your firewall to allow inbound traffic to your instances for Systems Manager.
For more information about calls to these endpoints, see Reference: ec2messages, ssmmessages, and other API operations.

Top comments (0)