
A case study, where we will build a statically pre-rendered site, using NextJS, and host it in AWS Cloud, fully serverless, using CloudFront, Lambda@Edge and S3. Also, we will apply Infrastructure as Code approach by leveraging Terraform and automate deployments with Github Actions.
- What is a statically rendered page?
- The Blog - high level plan
- Solution overview
- Implementation
- Infrastructure
- Automated deployment with Github Actions
I think I've managed to squeeze every possible buzzword in the article title ;) but every single one is true! Using my blog (https://sosnowski.dev) as an example, we will review the implementation of the statically generated site using NextJS and TypeScript. Next, we will discuss how such site can be hosted on AWS cloud, fully serverless, using CloudFront for serving content, Lambda at Edge for requests routing and S3 bucket as a file storage. We will define the whole infrastructure using Terraform. Additionally, we will create some simple Github Actions to automate the deployment of our site.
The source code of the blog is available on my github. So, let's start.
What is a statically rendered page?
Web development is an interesting profession, where every few years we change the main architecture paradigm.
At the beginning, web pages were just static html files, served via the server to the browser. Later, html files were generated dynamically on the server, using languages like PHP.
Next, everyone felt in love with the idea of fat-client applications, so called Single Page Applications, where the only served html file is empty index.html and all the content is dynamically generated by JavaScript. This approach however had several flaws, mostly around performance and SEO. So, we've started to move back.
First, we've got back to Server Side Rendering (SSR), but this time using frontend frameworks and JavaScript on the backend. But, to fully close the cycle, we had to go back to the beginning.
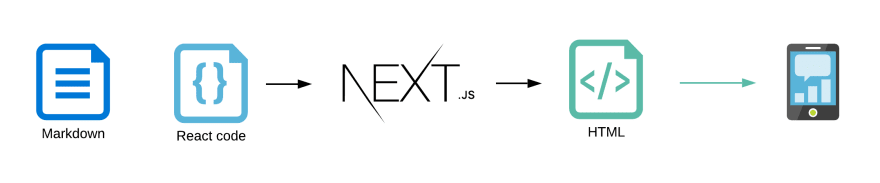
Now, the JAM stack (JavaScript, API and Markdown) is on the rise. Using static content generators, we can combine the advantages of static files (performance, SEO and reliability) with the ability to serve dynamic content to our users. Instead of generating files per request, we can pre-generate all the pages on build time (or when data is updated) and serve static html files to the users.

Many of those tools go far beyond just using markdown, and allow us to use any source of data to pre-render our pages.

In this case study, we will use NextJS, a React - based framework, to create a statically generated blog.
The Blog - high level plan
I write my articles using Notion (by the way, you should check it, it's an amazing productivity tool that I use to organize my notes, tasks and any information I want to preserve). Than, after the article is ready, I can export it to a markdown file. It's convenient, since I can use a great editor to create my content (I'm not the VIM type of developer) and then just export it to an easy-to-use format.
From those markdown files (and related images) I would like to generate a blog, with all my articles.
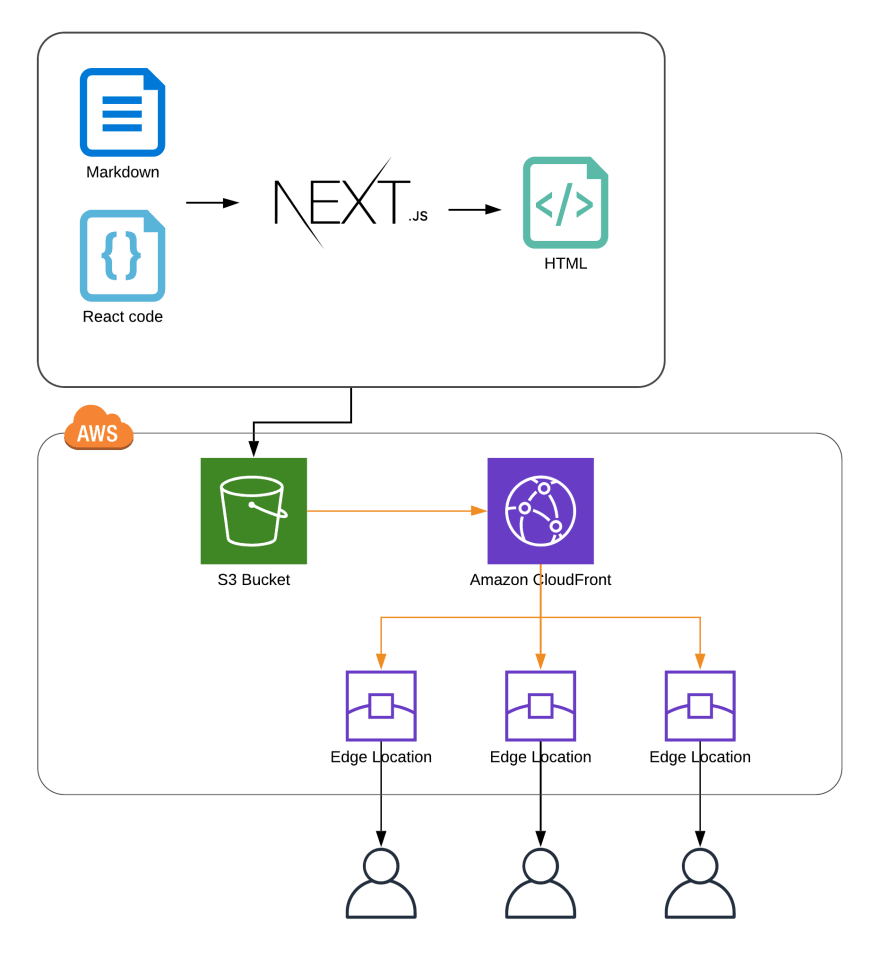
Normally we could use Vercel to host our blog. It's easy to use and has a decent free plan. But, we want to have some fun! That's why we will try to host our blog in AWS Cloud. Still, to reduce the costs as much as possible, we will leverage the serverless approach and try to host it without any actual application server running in the background.
Solution overview
Let's summarize what we will create:
- We will use NextJS to create a blog site
- Posts will be stored in the Github repository, as markdown files
- The build task will generate the static page using markdown as a data source
- Generated files will be uploaded to the S3 bucket
- We will serve the content to the users with Amazon CloudFront CDN
- We will use Terraform to define AWS infrastructure
Implementation
Let's start with the blog implementation. We will not go through every single line of code here, since most of it is just a standard React application. You can always refer to the source code here.
Project structure
We will us a standard structure of NextJS project.

We only have two pages: index.tsx which will be our main page, with a list of blog posts and /post/[id].tsx which will display the selected post.
Static assets (including posts' images) will be stored in the public directory. Markdown files with the posts' content will be placed in posts.
Pre-rendering main page
NextJS has a very decent documentation, explaining how it statically renders its pages. In short, at build time, NextJS checks all the files in pages directory and looks for those that are exporting getStaticProps function.
Below, you can find a simplified version of index.ts page of my blog.
interface PageProps {
    articles: PostMetadata[]
}
// Page component, it will render a list of articles
export default ({ articles }: PageProps) => {
  return (
    <Fragment>
        <GreenSectionHeader>More articles</GreenSectionHeader>
        {
            articles.map(post => {
                return (<ArticleTile post={post} key={post.id} />);
            })
        }
        </Fragment>
  );
}

/*
 this function will be called at build time.
 It returns props that will be passed to the page component
*/

export const getStaticProps: GetStaticProps<PageProps> = async () => {
    const data = await getPostsMetdata();
    return {
        props: {
            articles: data
        }
    };
}
getStaticProps function will be executed at build time and the returned result will be used as props input for the page component. The component will render a HTML content that will be saved to a generated static file.
It's a simple yet powerful concept. getStaticProps can read data from files (as in this case), but it can also query the database, make a request to the server or fetch it from any other source. Then you can use all React power to generate content. Everything at build time. The result is compiled down to a plain HTML file (and some JS and JSON if needed).
Parsing Markdown Metadata
Let's take a quick look at getPostsMetadata function. It uses gray-matter library to extract metadata from markdown files.
// ...
import matter from 'gray-matter';

export interface PostMetadata {
    title: string;
    created: string;
    updated: string;
    tags: string[];
    abstract: string;
    id: string;
}

// extract metadata from a markdown file
export const getPostMetadata = async (postFile: string): Promise<PostMetadata> => {
    const fileContent = await readFileAsync(join(postsPath, postFile), {
        encoding: 'utf8'
    });

        // read metadata using gray-matter
    const result = matter(fileContent);
        // file name is used as post id
    const postId = basename(postFile, extname(postFile));
    return {
        title: result.data.title,
        tags: result.data.tags,
        abstract: result.data.abstract,
        created: result.data.created,
        updated: result.data.updated,
        id: postId
    };
};

// extract metadata from all post files
export const getPostsMetdata = async (): Promise<PostMetadata[]> => {
        // read list of files from /posts directory
    const dirContent: Dirent[] = await readDirAsync(postsPath, {
        withFileTypes: true,
        encoding: 'utf8'
    });

    // iterate through the list and call getPostMetadata on every element
    return Promise.all(
        dirContent
            .filter(entry => entry.isFile())
            .map((entry) => {
                return getPostMetadata(entry.name);
            })
    );
}
Metadata is defined on top of a markdown file. Here is an example from one of the articles:
---
title: "Scalable Angular Applications"
author: Damian Sosnowski
abstract: Currently, one of the most popular frameworks among the Web community...
created: "2019-08-16"
updated: "2019-08-16"
tags:
    - angular
    - redux
    - architecture
    - webdev
---

Article content here
Array of PostMetadata records is returned to index.tsx file and used to render the list of articles on the main blog page.
Pre-rendering post content
Pre-rendering of post content works in a very similar way, post page also has getStaticProps
function that will load and parse post content. The results are then passed to the page component that will render it. Let's look at /post/[id].tsx
interface Props {
    post: {
        content: string
    } & PostMetadata;
}

export default ({ post }: Props) => {
    return (
        <ContentWrapper>
            <article>
                <PrimaryHeader>{post.title}</PrimaryHeader>
                ...
                <Content content={post.content}></Content>
            </article>
        </ContentWrapper>
    );
}

// read both metadata and article content from markdown file
export const getStaticProps: GetStaticProps<Props> = async (context) => {
    const id = Array.isArray(context.params.id) ? context.params.id[0] : context.params.id;
    const postData = await getAllPostData(id);
    return {
        props: {
            post: {
                ...postData.meta,
                content: postData.content
            }
        }
    };
}
Pre-rendering multiple posts
If we want to have a fully pre-rendered site, NextJS has to generate a separated html file for every blog post. So how does it now how many files should be rendered? This is where getStaticPaths function is used. It works the same way as getStaticProps , being called on build time, but instead of returning component input properties, it returns an array of dynamic URL parameters. In our case, an array of posts' ids.
export const getStaticPaths: GetStaticPaths = async () => {
    return {
        paths: (await getPostsMetdata()).map(meta => {
            return {
                params: {
                    id: meta.id,
                }
            };
        }),
        fallback: false
    };
}
The resulting array is than used to render multiple static files. You can see, that getStaticProps function above is using post id that is passed in a context parameter.
You can read more about dynamic routes and static content rendering in NextJS documentation.
Parsing markdown content
In order to display a blog post content, we have to convert it from markdown to html. There is an entire set of libraries and plugins around unified ecosystem, designed to parse and modify markdown files. We will use those in our blog.
import markdown from 'remark-parse';
import remark2rehype from 'remark-rehype';
import html from 'rehype-stringify';
import matter from 'gray-matter';
import unified from 'unified';

// ...
/*
  Get both metadata and content of the article
*/
export const getAllPostData = async (postId: string): Promise<PostData> => {
    const fileContent = await readFileAsync(join(postsPath, `${postId}.md`), {
        encoding: 'utf8'
    });
    // extract metada with gray-matter
    const postMeta = matter(fileContent);

    /*
      define a unified pipeline, that will parse markdown to syntax tree,
      modify it and convert to html
    */
    const postHtml = await unified()
        .use(markdown) // parse markdown
        .use(remark2rehype) // convert to syntax tree
        .use(htmlParser) // my custom html modifications
        .use(html, { allowDangerousHtml: true }) // convert to html
        .process(postMeta.content); // provide article content as input

    return {
        meta: {
            title: postMeta.data.title,
            tags: postMeta.data.tags,
            abstract: postMeta.data.abstract,
            created: postMeta.data.created,
            updated: postMeta.data.updated,
            id: postId
        },
        content: postHtml.toString()
    };
}
You can remark documentation for detailed API explanation.
For my blog, I've created a simple remark plugin, that slightly modifies the html syntax tree. For example it adds a lazy loading attribute to the images and it generates syntax highlighting for code blocks, using highlight.js. This way I can improve the performance of my blog, by running those tasks at build time. You can check detailed implementation in the repository.
Resulting html is then rendered in the React component
export const Content = ({ content, className, children }) => {
    return (
        <ContentContainer className={className} dangerouslySetInnerHTML={{ __html: content }}></ContentContainer>
    );
}
Building and exporting the project
In order to build our site we just have to run this command:
next build && next export
NexJS will create an optimised build of our application, running getStaticPaths and getStaticProps for our pages. Then, the result will be placed in the out directory.
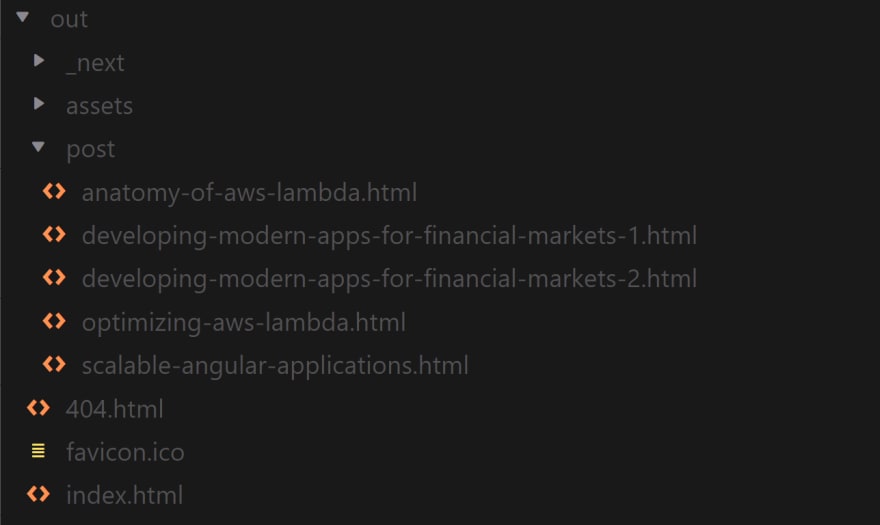
Build output
Those are the files that we will upload to the S3 bucket and serve to our users.
We finally have a working blog implementation, now let's define the infrastructure that will host it.
Infrastructure
We will use Terraform to define our infrastructure. You can refer to its documentation and check the full terraform project in the repository.
All infrastructure is set up in us-east-1 region, as this is the region where CloudFront distribution is created. This will not affect our site performance, since the content will be delivered from Edge Locations closest to the users.
provider "aws" {
  profile = "default"
  region  = "us-east-1"
}
S3 Bucket

Let's start with an S3 bucket that we will use to store generated html files and static assets. The content of the bucket will be a direct copy of the out folder, described in the previous section.
resource "aws_s3_bucket" "blog_bucket" {
  bucket        = "your-bucket-name"
  acl           = "private"
  force_destroy = true
}
The bucket is private and not accessible from the internet, we don't want users to load files directly from the bucket, we want all the requests to go through the CloudFront distribution.
Bucket policy
To achieve it, we have to create a proper policy, that will allow CloudFront to list files in the bucket and load the files to serve it to the users.
resource "aws_cloudfront_origin_access_identity" "origin_access_identity" {
  comment  = "cloudfront origin access identity
}

data "aws_iam_policy_document" "s3_policy" {
  statement {
    actions   = ["s3:GetObject"]
    resources = ["${aws_s3_bucket.blog_bucket.arn}/*"]

    principals {
      type        = "AWS"
      identifiers = ["${aws_cloudfront_origin_access_identity.origin_access_identity.iam_arn}"]
    }
  }

  statement {
    actions   = ["s3:ListBucket"]
    resources = ["${aws_s3_bucket.blog_bucket.arn}"]

    principals {
      type        = "AWS"
      identifiers = ["${aws_cloudfront_origin_access_identity.origin_access_identity.iam_arn}"]
    }
  }
}
And assign the policy to our bucket.
resource "aws_s3_bucket_policy" "policy_for_cloudfront" {
  bucket = aws_s3_bucket.blog_bucket.id
  policy = data.aws_iam_policy_document.s3_policy.json
}
With those settings in place, our bucket is now ready to serve as an origin for the CloudFront distribution.
CloudFront
Time to setup the main element of our infrastructure, a CloudFront distribution. CloudFront is a Content Delivery Network, that users Amazon Edge Locations to cache and deliver the content from the servers that are in a close proximity to our users.

When user requests an asset from our site (an image, html file etc.) the request goes to CloudFront edge location, if the asset is in its cache, it's served to the user immediately. If not, CloudFront will load the asset from so called origin (S3 bucket in our case), cache it on Edge Location and deliver it to the user.
Origin
First, we define the origin for our CloudFront distribution. This will simply create the S3 bucket where we store generated files.
resource "aws_cloudfront_distribution" "blog_assets_distribution"
  origin {
    domain_name = aws_s3_bucket.blog_bucket.bucket_domain_name
    # just some unique ID of the origin
    origin_id = "s3_blog_assets_origin"

    s3_origin_config {
      origin_access_identity = aws_cloudfront_origin_access_identity.origin_access_identity.cloudfront_access_identity_path
    }
  }

# ...
Cache behaviours
Next, we will define cache behaviour. Cache behaviour defines what files should be cached by CloudFront and for how long. We will define two behaviours, the default one, that will apply to all the requested files:
#...
# Default cache behavior. Will cover all requests to html, js files etc.
default_cache_behavior {
    allowed_methods  = ["GET", "HEAD", "OPTIONS"]
    cached_methods   = ["GET", "HEAD"]
    target_origin_id = "s3_blog_assets_origin"
    compress         = true
    forwarded_values {
      query_string = false
      cookies {
        forward = "none"
      }
    }
    viewer_protocol_policy = "redirect-to-https"
    # Time for which the files will be stored in cache (12h)
    default_ttl = 43200
  }
And an additional behaviour, that will override the default one for files in the /assets directory.
# Cache behavior for assets reuests
ordered_cache_behavior {
    path_pattern     = "/assets/*"
    allowed_methods  = ["GET", "HEAD"]
    cached_methods   = ["GET", "HEAD"]
    target_origin_id = "s3_blog_assets_origin"
    compress         = false
    forwarded_values {
      query_string = false
      cookies {
        forward = "none"
      }
    }
    viewer_protocol_policy = "redirect-to-https"

    # 24h * 3
    default_ttl = 259200
  }
By having two separated behaviours, we can adjust the caching time. Assets like images and fonts are unlikely to change, so we can cache those for longer periods of time.
Lambda @ Edge for routing
With the current setup we could already run our application. You can upload the output of NextJS export task to the S3 bucket and CloudFront will serve those to the end users. There is however one more problem that we have to solve.
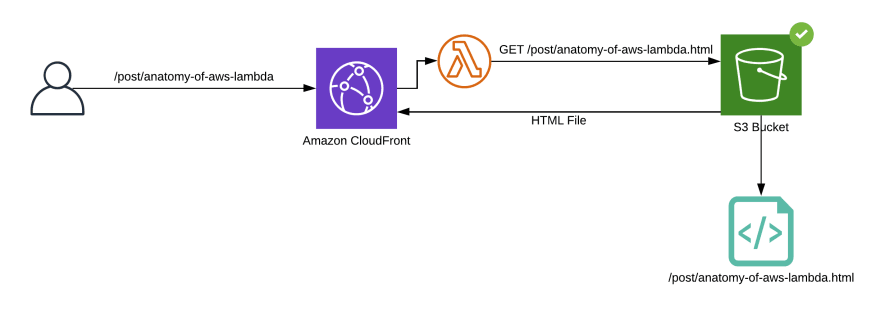
NextJS will generate links based on our routing definitions. Link to the post will follow the pattern /post/[id] , for example /post/anatomy-of-aws-lambda . When browser requests this URL, CloudFront will try to server this file... which does not exists. Our bucket contains HTML file /post/anatomy-of-aws-lambda.html but obviously CloudFront is not able to guess that.
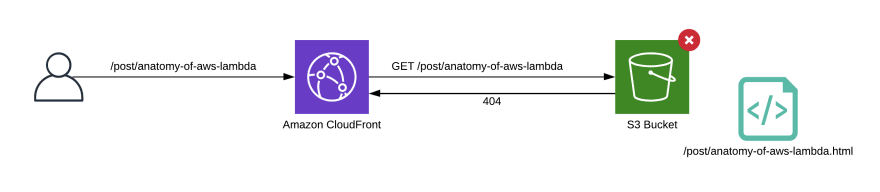
Normally NextJS server knows what files we are looking for and is able to server a proper HTML file when requested. But we don't have any server! So, what can we do?
We can leverage Lambda@Edge, which is simply a Lambda function running directly on the Edge Location of our CloudFront distribution. Lambda at Edge can be triggered by four different events:
- When CloudFront receives a request from a viewer (viewer request)
- Before CloudFront forwards a request to the origin (origin request)
- When CloudFront receives a response from the origin (origin response)
- Before CloudFront returns the response to the viewer (viewer response)
For us, the perfect fit is origin request.We will create a simple function, that will change the path of requested post by adding .html to the URL. Here is the code:
import { CloudFrontRequestEvent } from "aws-lambda";

const isPost = /^\/post(.+)/;
const hasExtension = /(.+)\.[a-zA-Z0-9]{2,5}$/;

export const handler = async (event: CloudFrontRequestEvent, context: unknown) => {
    const request = event.Records[0].cf.request;
    const url: string = request.uri;

    // if it's a post request and has not extension, add .html
    if (url && url.match(isPost) && !url.match(hasExtension)) {
        request.uri = `${url}.html`;
    }

    return request;
}
This function will allow us to route requests to proper files.
We will use a simple webpack configuration to compile function to JavaScript and bundle all dependencies in to a single, easy to deploy JS file.
Now we just have to add Lambda to our Terraform definition.
# Terraform will handle zipping the JS bundle
data "archive_file" "cdn-origin-request-zip" {
  type        = "zip"
  source_file = "dist/cdn-origin-request/handler.js"
  output_path = "dist/cdn-origin-request.zip"
}

# Lambda at Edge requires specific execution role
# in order to be able to execute on CF Edge Location

resource "aws_iam_role_policy" "cdn-lambda-execution" {
  name_prefix = "lambda-execution-policy-"
  role        = aws_iam_role.cdn-lambda-execution.id

  policy = <<EOF
{
  "Version": "2012-10-17",
  "Statement": [
    {
      "Action": [
        "logs:CreateLogStream",
        "logs:PutLogEvents",
        "logs:CreateLogGroup"
      ],
      "Effect": "Allow",
      "Resource": "*"
    }
  ]
}
EOF
}

resource "aws_iam_role" "cdn-lambda-execution" {
  name_prefix        = "lambda-execution-role-"
  description        = "Managed by Terraform"
  assume_role_policy = <<EOF
{
   "Version": "2012-10-17",
   "Statement": [
      {
         "Effect": "Allow",
         "Principal": {
            "Service": [
               "lambda.amazonaws.com",
               "edgelambda.amazonaws.com"
            ]
         },
         "Action": "sts:AssumeRole"
      }
   ]
}
EOF
}
You can read more about Lambda at Edge permissions here.
Finally, we can define a Lambda function:
resource "aws_lambda_function" "cdn-origin-request-lambda" {
  filename         = "dist/cdn-origin-request.zip"
  function_name    = "cdn-origin-request"
  role             = aws_iam_role.cdn-lambda-execution.arn
  handler          = "handler.handler"
  source_code_hash = data.archive_file.cdn-origin-request-zip.output_base64sha256
  runtime          = "nodejs12.x"
    # this enables versioning of Lambda function
  # Lambda@Edge requires our functions to be versioned
  publish          = true
}
The only thing left is connecting the newly created Lambda function with our CloudFront distribution. You connect function to a specific cache behaviour, in our case it will be a default cache behaviour.
default_cache_behavior {

    # ...

    lambda_function_association {
      event_type   = "origin-request"
      # We have to provide a specific version of our Lambda function, not just @latest
      lambda_arn   = aws_lambda_function.cdn-origin-request-lambda.qualified_arn
      include_body = false
    }

    # 12h
    default_ttl = 43200
  }
And that's all! Now, you can apply Terraform script and the fully serverless infrastructure of your blog will be ready!

Automated deployment with Github Actions
Now, when we have implemented both the site and the infrastructure hosting it, it's time to deploy!
Since I'm a lazy person and always prefer some machine to do my work, we will use Github Actions to automate the deployment of the blog.
Deployment steps
First, let's review what we need
- We have to get the most up to date version of the site, after it's changed
- Generate pre-rendered content based on updated data and code
- Upload the files to S3 bucket where it can be picked up by CloudFront
Github Actions configuration
Let's define our Actions configuration file. As stated in the documentation, actions should be stored in .github/workflows directory.
name: Build and deploy
on:
    push:
        branches: [ master ]
jobs:
    parse-posts:
        name: Build and deploy
        runs-on: ubuntu-latest
        steps:
        # Checks-out your repository under $GITHUB_WORKSPACE, so your job can access it
        - uses: actions/checkout@v2
          with:
            fetch-depth: 0
        # setup nodejs environment
        - uses: actions/setup-node@v1
          with:
            node-version: '12'
        - name: Install yarn and dependencies
          run: npx yarn
        - name: Build and export
          run: yarn workspace blog build-export
        # Upload to S3 requires ENV variables with AWS credentials
        - name: Upload statics to S3
          env:
            AWS_S3_ACCESS_KEY: ${{ secrets.AWS_S3_ACCESS_KEY }}
            AWS_S3_ACCESS_KEY_ID: ${{ secrets.AWS_S3_ACCESS_KEY_ID }}
          run: yarn workspace bin upload-statics
The file is quite self explanatory. The flow will be triggered on push to master branch. It will setup an environment, checkout new version of the code and run two scripts:
- Build and Export blog code using NextJS cli
- Upload Statics - a custom script that will take the result of the build and upload it to S3 bucket.
The last script requires AWS credentials that, for security, are stored as encrypted secrets. You can read more about creating and using those in the Github docs.
Uploading script
The uploading script is not very complicated. It has to read the /out directory that contains the results of NextJS export action and upload all the files to S3. To save some bandwidth, I'm also fetching a list of /assets/* already uploaded to the bucket, and skip those that have been uploaded previously. You can check the entire (a bit messy) implementation in the repository.
import { lookup } from 'mime-types';
import { S3Client } from '@aws-sdk/client-s3-node/S3Client';
import { PutObjectCommand, PutObjectInput } from '@aws-sdk/client-s3-node/commands/PutObjectCommand';
import { ListObjectsCommand, ListObjectsInput } from '@aws-sdk/client-s3-node/commands/ListObjectsCommand';

const s3 = new S3Client({
    region: 'us-east-1',
    credentials: {
        // read secret credentials from ENV variables
        secretAccessKey: process.env.AWS_S3_ACCESS_KEY,
        accessKeyId: process.env.AWS_S3_ACCESS_KEY_ID
    }
});

const bucketName = 'your-bucket-name';
const staticFolder = join(__dirname, '..', 'blog', 'out');

(async () => {
    console.log('Reading static files in ' + staticFolder);
    const allStaticFiles = getAllFiles(staticFolder);
    console.log('Loading existing assets from S3...');
    // it will load a list of files in the /assets/ directory
    const existingAssets = await getS3Assets();

    for(let i = 0; i < allStaticFiles.length; i++) {
        const file = allStaticFiles[i];
        const imageKey = relative(staticFolder, file);
        // don't upload assets that are already uploaded
        if (!existingAssets.includes(imageKey)) {
            console.log(`Uploading file ${file} to ${imageKey}...`);
            await s3.send(new PutObjectCommand({
                Bucket: bucketName,
                Key: imageKey,
                Body: readFileSync(file),
                // set proper mime-type using mime-types library
                ContentType: lookup(file) || 'plain/text'
            }));
            console.log('Done');
        } else {
            console.log(`${imageKey} already uploaded`);
        }
    }
    console.log('All done');
})();
And that's it! Now every time you push a new version of your code, or a new article, Github will automatically build the code and deploy it to S3. Our project is finished!
Feel free to clone or fork the repository with the full implementation and play with it! You can also ask me questions on twitter @sosnowsd
You can find this post and many others on my blog: sosnowski.dev


Top comments (0)