
I recently discovered Eleventy, a modern static site generator that's customizable and flexible, but without fuss.
Eleventy uses JavaScript, but it's not a JavaScript framework. It uses Node.js under the hood to transform templates into static (HTML, CSS) content. But those pages don't contain any JavaScript.
Eleventy was created to be a JavaScript alternative to Jekyll. It’s zero-config by default but has flexible configuration options. Eleventy works with your project’s existing directory structure.
A few days ago I tried deploying an Eleventy project to GitHub Pages.
In this post, I'll show you how to setup and deploy an Eleventy site to GitHub Pages with automatic deployment via GitHub Actions.
Setup
Make sure that your computer has Node.js and Git installed. You also need a (free) GitHub account.
You should have basic Git knowledge. If not, you might want to take a look at FreeCodeCamp's guide to Git.
We'll need an Eleventy site. You can find some tutorials on 11ty.dev.
I recommend starting with Creating A Blog With Eleventy by Jon Keeping or Tatiana Mac's Beginner's Guide to Eleventy [Part I].
For the sake of this tutorial, we'll use a template. To make it easy, let's use Jon Keeping's starter.
Inside your terminal navigate to the place where you want to store your project. Then type into the terminal:
npx degit JonUK/eleventy-blog eleventy-gh-demo
This command runs a temporary command of degit, which copys the code to your computer.
You can name your project whatever you like. In the example above, the project's name (and folder name) is eleventy-gh-demo.
Navigate into that folder and use your terminal to install the necessary packages:
npm install
After you've installed all packages, you can take a look at the package.json file with your code editor. In the scripts section, you'll see that there's a command for serve. The command runs a local development server on your computer.
Excerpt from the package.json file:
{
  "name": "eleventy-blog",
  "version": "1.0.0",
  "description": "An example blog site using Eleventy that covers fundamental functionality",
  "scripts": {
    "build": "npx eleventy",
    "serve": "npx eleventy --serve",
    "debug": "DEBUG=* npx eleventy",
    "test": "jest"
  }
}
Try it out in your terminal:
npm run serve
(If you use a different starter package, the script section might look different. But you will have a line with npx eleventy --serve (or similar).)
Now open your web browser and go to http://localhost:8080/.
Prepare Eleventy Code for GitHub Pages (And Fix Navigation)
GitHub Pages deploys your code to a subdirectory of the myname.github.io domain.
For example, to myname.github.io/eleventy-gh-demo
This leads to problems for internal links. Eleventy expects the links to live at the root url /, but GitHub Pages needs the subdirectory domain, too: /eleventy-gh-demo.
All your links that work fine in local development will break in production.
To fix this problem, we can add a path prefix to Eleventy.
For our use case, we can add a command line override in package.json.
Use your text editor to replace the build script inside package.json:
-    "build": "npx eleventy",
+    "build": "env NODE_ENV=production npx eleventy --pathprefix 'eleventy-gh-demo'",
We also add an environment variable for production, to be on the safe side.
(Alternatively, you can edit the .eleventy.config file. Choose one way or the other.)
Now we have to change the links in our layout/html files.
Instead of linking directly to the internal URL, we can pipe the link to an Eleventy filter.
Example before:
<link rel="stylesheet" href="/css/site.css" />
Example after:
<link rel="stylesheet" href="{{ '/css/site.css' | url }}" />
We have to do that for every link.
Here is the example for the starter blog from Jon Keeping that we use for this tutorial. Replace _includes/base-layout.njk:
<!DOCTYPE html>
<html lang="en">
<head>
<meta charset="utf-8" />
<meta name="viewport" content="width=device-width, initial-scale=1" />
<title>Eleventy Blog</title>
<link rel="stylesheet" href="{{ '/css/site.css' | url }}" />
<link
href="https://fonts.googleapis.com/css?family=Roboto+Slab:700|Roboto&display=fallback"
rel="stylesheet"
/>
</head>
<body>
<header>
<a href="{{ '/' | url }}" class="link--home">My Blog</a>
<a href="{{ '/About' | url }}" class="link--about">About</a>
</header>
<main>
{{ content | safe }}
</main>
<footer>© My Blog</footer>
</body>
</html>
GitHub Workflow
Create a GitHub Repository
To get up and running with GitHub Pages, we'll first need a GitHub repo.
Follow the instructions here to create a new online repository.
The name should be the same as the project name, in this tutorial it's eleventy-gh-demo.
Follow the guide to connect your local repository (the one on your computer) to the remote repository (GitHub):
git remote add origin <url-of-your-github-repo>
For example, if your GitHub username is myname and the project's name is eleventy-gh-demo, you'll have to type the following into your terminal:
git remote add origin https://myname.github.com/eleventy-gh-demo.git
(If you're unsure, take a look at the FreeCodeCamp guide to Git.)
We'll add all the files to Git and then push them to GitHub:
git add .
git commit -m 'Initial Commit'
git push -u origin master
GitHub Action Workflow
We'll stand on the shoulder of giants and use some pre-made actions.
In your project folder create a new file: .github/workflows/build.yml.
(You might need to create the .github folder and the workflow folder beforehand.)
Excerpt from the project structure:
.
├── About.md
├── css
│   └── site.css
├── _includes
│   ├── base-layout.njk
│   └── post-layout.njk
├── index.njk
├── LICENSE
└── .github
    └── workflows
           └── build.yml
Here's how the .github/workflows/build.yml's content should look like:
name: Build Eleventy

on:
  push:
    branches:
      - master

jobs:
  build:
    runs-on: ubuntu-20.04

    strategy:
      matrix:
        node-version: [12.x]

    steps:
      - uses: actions/checkout@v2

      - name: Use Node.js ${{ matrix.node-version }}
        uses: actions/setup-node@v1
        with:
          node-version: ${{ matrix.node-version }}

      - name: Install dependencies & build
        run: |
          npm ci
          npm run build

      - name: Deploy
        uses: peaceiris/actions-gh-pages@v3
        with:
          publish_dir: ./_site
          github_token: ${{ secrets.GITHUB_TOKEN }}
You can read more about the syntax for GitHub actions on the official site.
The build file uses Node.js 12.x, installs all dependencies and then runs the build script from package.json.
The result of the npm build script will be a folder called _site.
Finally, we use the excellent actions-gh-pages package by Shohei Ueda.
We set the publish_dir to ./_site, our build folder.
Commit and push the code to GitHub:
git add .github
git commit -m 'Add GitHub action'
git push origin master
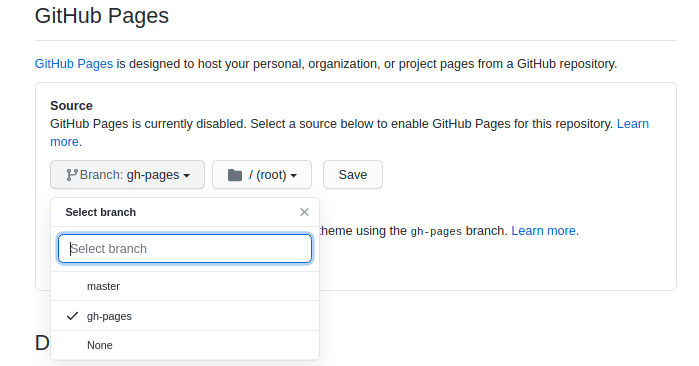
Configure GitHub Pages
You'll need to enable GitHub pages in the settings and choose gh-pages as the source.
The first time the GitHub action runs, it might not work correctly.
If it doesn't, you need a new git push to your master branch.
Edit some file on your computer. For example, add a third blog post. Then go through the standard Git workflow: add the file to git, commit, push.
Recap
In this article, you learned how to automatically deploy an Eleventy-created static site to GitHub Pages.
The biggest hurdle is the broken navigation in production. Eleventy offers a way to solve that problem by using a pathPrefix configuration and a filter function.
With GitHub actions, you can easily automate the publishing of your Eleventy blog.
You should give Eleventy a whirl, it's a superb tool for creating static websites.
Further Reading
- Eleventy
- Beginner's Guide to Eleventy [Part I] by Tatiana Mac
- Creating and Hosting a Personal Site on GitHub by Jonathan McGlone
- Creating A Blog With Eleventy by Jon Keeping
- The beginner’s guide to Git & GitHub by FreeCodeCamp/Thanoshan MV
- Build Eleventy Using Github Actions and Github Pages by Avinash

Top comments (3)
Can I ask you why github pages instead of netlify?
Eleventy is such an elegant piece of software.
Yes, it's great. Very versatile, and not as cryptic (and slow) like Gatsby.js