Abstract
최근 배포 프로세스는 프로젝트를 Docker 이미지로 말아서 AWS ECS/ECR 조합으로 가는 것이 일반적이다.
그러나 라이트유저에겐 상대적으로 사악할 수 있는 가격 정책을 보여주는 AWS ECS이기에 이번 포스팅에서는 그냥 기본 서버 환경을 제공하는 AWS EC2에 AWS ECR 이미지를 올리는 방법을 소개하고자 한다.
추가로 대세 CI 툴인 CircleCI를 통해 파이프 라인을 구성해보았다.
참고할만한 링크: https://circleci.com/developer
Getting Started
Prerequisite
-
AWS EC2인스턴스 생성 -
Dockerdocker compose설치 작업할 Project Repository
Preparing AWS ECR
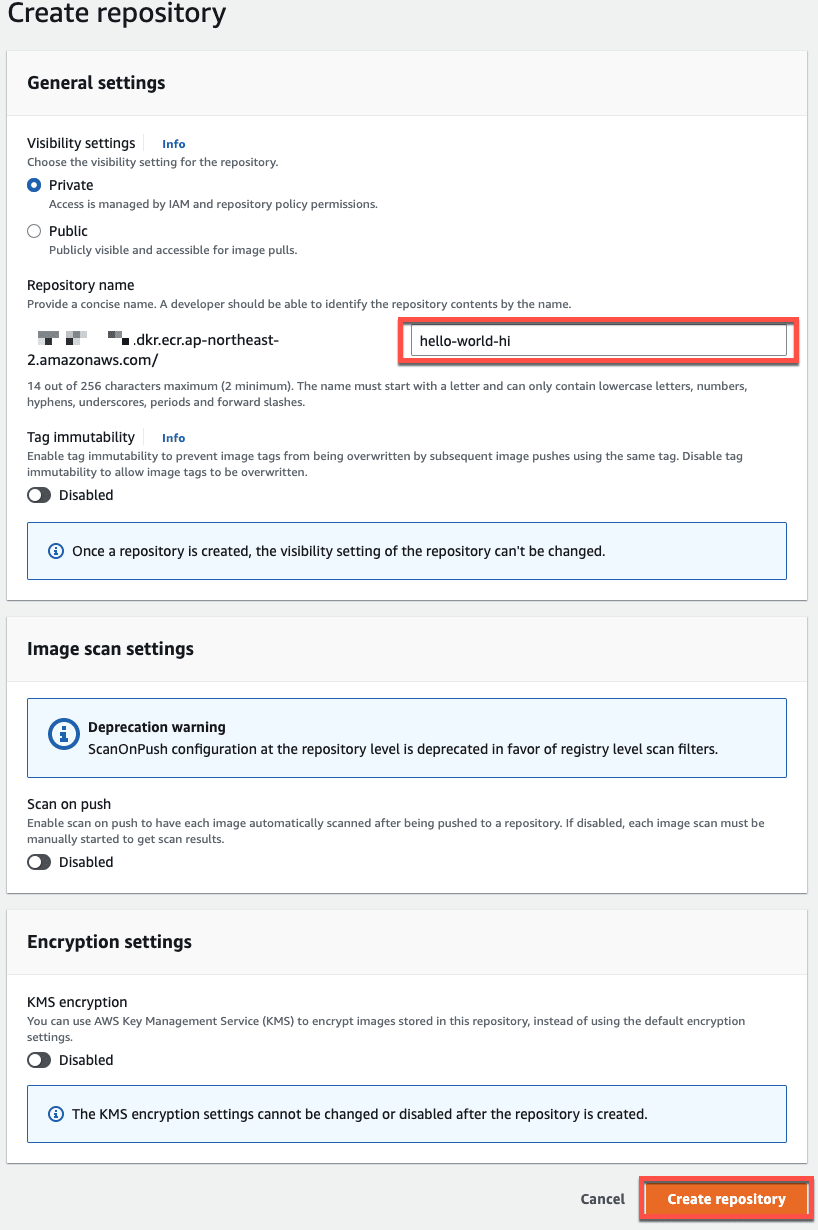
AWS ECR (Elastic Container Registry) 서비스에 들어가 Repository를 생성
다른 설정은 기본으로 name 만 잘 설정해주면 앞으로 이미지를 저장할 레포지토리가 생성된다.
여기서 중요한 것은 Repository name 과 URI. 기억해두자.
Setting up CircleCI Application
먼저 프로젝트에서 /.circleci/config.yml empty 파일을 생성한 후 깃레포지토리에 푸시
Project tree
.
├── ./circleci/
│   └── config.yml
└── ...project
CircleCI에 로그인한뒤 프로젝트 탭에서 Set Up Project 를 선택
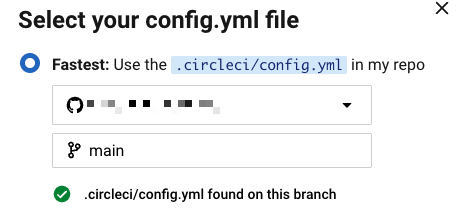
작업할 branch 이름를 입력해주면 다음처럼 메세지가 나오고 진행하면 프로젝트 대쉬보드로 진입
Project Setting에 환경 변수 입력
실제 프로젝트에서 config.yml 설정할때 사용하게 될 변수들
추가로 SSH Keys 메뉴에서 EC2 접속을 위해 Additional SSH Keys를 등록해준다
안할 경우 CircleCi 에서 EC2 접근 불가할 수 있음
해당하는 키 생성 방법 링크 참조: https://circleci.com/docs/add-ssh-key/
Required Env Value
- AWS_ACCOUNT_ID
- AWS_ACCESS_KEY_ID
- AWS_SECRET_ACCESS_KEY
- AWS_REGION
- AWS_ECR_ACCOUNT_URL
- AWS_ECR_REPO_NAME
Generating Dockerfile
먼저 로컬에서 Docker image 를 말아보자.
여기서는 자세한 Docker 사용법은 언급하지 않고 넘어가겠다.
참고할만한 링크: https://docs.docker.com/get-started/
Root 폴더에 Dockerfile을 생성, 다음과 같이 작성
Doockerfile
ARG node_version=18-bullseye-slim
ARG prod_port=3000

FROM node:${node_version}

WORKDIR /app

COPY . .

ENV TZ=Asis/Seoul

RUN corepack enable
RUN corepack prepare pnpm@latest --activate
RUN pnpm install
RUN pnpm build

EXPOSE ${prod_port}

CMD pnpm start:prod
node 18버전 환경에서 작업: 18-bullseye-slimnode 18에서pnpm패키지는corepack으로 활성 가능하다
Configuring CircleCI in project
Root 폴더에 /.circleci 폴더를 생성
해당하는 폴더 내에 config.yml 파일을 작성해보자
맨 첫줄은 CircleCI version 부분이다.
두번째 orbs 란 CircleCI가 제공하는 편의성 패키지
여기서는 ecr 을 편리하게 지원해주는 aws-ecr 패키지를 사용
executor는 여기서 반복적으로 사용할 환경 실행에 대한 언급
- machine:image:ubuntu-2004:current
보통 CircleCI 에서는 직접 Docker 환경을 불러오는 것이 보통이나
여기서는 이미지에 프로젝트를 복사해서 직접 명령어를 실행하는것이 아닌
Dockerfile로 이미지를 빌드 후 AWS ECR에 업로드할 예정이기에
다양한 명령어 접근을 위해 이미지가 아닌 machine 레벨로 구성하였다. (여기서는 ubuntu 환경을 구성)
- working_directory: ~/project
/project 폴더에 작업할 예정 (checkout도 이 폴더에서 진행된다)
config.yml
version: 2.1

orbs:
  aws-ecr: circleci/aws-ecr@8.2.1

executors:
  machine-executor:
    machine:
      image: ubuntu-2004:current
      docker_layer_caching: true

    working_directory: ~/project
# ... more on next line
기본적으로 CircleCI 는 Job을 Jobs 에 정의하고
workflow 에 흐름을 등록하는 방식으로 진행된다.
여기서는 Pre-Build라는 첫번째 job 을 선언하였다.
미리 선언해 주었던 machine-executor를 이용해 환경 구성을 진행하고
- checkout
checkout 을 통해 연결된 git repository 를 복사한다. (/project 폴더 안에 복사)
- Getting Node Environment / the Code
여기에서는 machine의 Node Environment 확인, checkout 정상 진행여부 확인
- persist_to_workspace
마지막으로 이 전체를 다음 job에 동일하게 진행할 예정이기에 workspace에 관련 부분을 선언
Note
CircleCI어플리케이션 설정은 다음 챕터에 설명 (Github연결 포함)workspace개념은 다음 링크 참조: https://circleci.com/docs/workspaces/
config.yml
# ... continue

jobs:
  Pre-Build:
    executor: machine-executor

    steps:
      - checkout

      - run:
          name: Getting Node Environment
          command: |
            node -v
            npm -v
            npm -g ls
            echo '^^^ node default env^^^'

      - run:
          name: Getting the Code
          command: |
            ls -al
            echo '^^^ Your repo files^^^'

      - persist_to_workspace:
          root: .
          paths:
            - .
# ... more on next line
두번째 job 선언 부분
- attach_workspace
여기서는 방금 전 step에서 저장한 환경을 다시 load한다.
- Attach Workspace Complete
그 다음에 환경이 다시 잘 구성되었는지 확인
- aws-ecr/build-and-push-image
마지막으로 aws-ecr orb 설정 부분이다.
이 orb 는 따로 복잡한 설정 필요없이 간단한 설정만으로
도커로 이미지 빌드후 등록한 AWS ECR에 이미지를 푸시해주는 역할을 해준다.
$AWS_ECR_REPO_NAME 은 ECR Repo 이름이고 $CIRCLE_SHA1는 CircleCI에서 자동으로 생성하는 난수
image_name:tag name 형식으로 AWS ECR에 이미지 생성
Note
- 원래라면
aws-ecrorb를 사용하려면 AWS Account 및 다양한 정보를 설정해야하지만 미리 환경변수로 선언해두면 이부분을 생략할 수 있다.aws-ecr상세한 내용은 다음 링크 참조: https://circleci.com/developer/orbs/orb/circleci/aws-ecr
config.yml
# ... continue

jobs:
  #  ... Pre-Build

  Build-and-Push:
    executor: machine-executor

    steps:
      - attach_workspace:
          at: ~/project

      - run:
          name: Attach Workspace Complete
          command: |
            ls- al
            echo '^^^ Attaching workspace success. ^^^'

      - aws-ecr/build-and-push-image:
          repo: $AWS_ECR_REPO_NAME
          tag: $CIRCLE_SHA1
          dockerfile: Dockerfile
# ... more on next line
마지막 job인 Deploy
- Allow Access to Production EC2
먼저 첫번째 step 에서는 AWS EC2 에 ssh를 이용해 접속하기 위해 22번 포트를 개방
- Waiting for AWS Security Settings to Take Effect
적용 하는데 다소 시간이 필요하기에 sleep을 실행
- AWS EC2 Deploy
AWS EC2 에 접속 후 서버 환경에서 Docker login 후 ECR에 등록된 Docker Image 를 pull 해온다.
이 이미지를 미리 AWS EC2에 작성해둔 docker-compose.yaml 을 통해 서버에서 실행할 예정
docker-compose.yaml 파일은 infra 폴더안에 위치할 예정
이때 docker-compose.yaml 에서 사용할 환경변수를 미리 선언
- Remove Circle CI Instance Ingress Rule
일전에 개방한 22번 포트를 다시 폐쇄
config.yml
# ... continue

jobs:
  #  ... Pre-Build, Build ..

  Deploy:
    executor: machine-executor

    steps:
      - run:
          name: Allow Access to Production EC2
          command: |
            CIRCLE_CI_BUILD_MACHINE_IP=$(curl ipinfo.io/ip)

            aws ec2 authorize-security-group-ingress --region $AWS_REGION \
                                                   --group-id $PROD_SERVER_SG_ID \
                                                   --protocol tcp \
                                                   --port 22 \
                                                   --cidr $CIRCLE_CI_BUILD_MACHINE_IP/24
      - run:
          name: Waiting for AWS Security Settings to Take Effect
          command: sleep 5

      - run:
          name: AWS EC2 Deploy
          command: |
            ssh -o StrictHostKeyChecking=no $AWS_DEPLOYER@$EC2_PUBLIC_DNS \
            "sudo docker login --username AWS -p $(aws ecr get-login-password --region $AWS_REGION) $AWS_ECR_ACCOUNT_URL && \
            sudo docker pull $AWS_ECR_ACCOUNT_URL/$AWS_ECR_REPO_NAME:$CIRCLE_SHA1 && \

            export CIRCLE_SHA1=$CIRCLE_SHA1 && \
            export AWS_ECR_ACCOUNT_URL=$AWS_ECR_ACCOUNT_URL && \
            export AWS_ECR_REPO_NAME=$AWS_ECR_REPO_NAME && \
            export PROD_PORT=3000 && \

            cd /home/ec2-user/infra && \

            docker compose up -d hello-world"

      - run:
          name: Remove Circle CI Instance Ingress Rule
          command: |
            CIRCLE_CI_BUILD_MACHINE_IP=$(curl ipinfo.io/ip)

            aws ec2 revoke-security-group-ingress --region $AWS_REGION \
                                                          --group-id $PROD_SERVER_SG_ID \
                                                          --protocol tcp \
                                                          --port 22 \
                                                          --cidr $CIRCLE_CI_BUILD_MACHINE_IP/24

# ... more on next line
config.yml 전문은 다음과 같다
기본 workflow 상태에서는 설정한 branch (여기서는 main) 소스를 푸시하면 바로 빌드가 시작
여기서는 따로 릴리즈 태그를 등록해야 배포 프로세스가 시작하도록 설정하였다.
config.yml
version: 2.1

orbs:
  aws-ecr: circleci/aws-ecr@8.2.1

executors:
  machine-executor:
    machine:
      image: ubuntu-2004:current
      docker_layer_caching: true

    working_directory: ~/project

jobs:
  Pre-Build:
    executor: machine-executor

    steps:
      - checkout

      - run:
          name: Getting Node Environment
          command: |
            node -v
            npm -v
            npm -g ls
            echo '^^^ node default env^^^'

      - run:
          name: Getting the Code
          command: |
            ls -al
            echo '^^^ Your repo files^^^'

      - persist_to_workspace:
          root: .
          paths:
            - .

  Build-and-Push:
    executor: machine-executor

    steps:
      - attach_workspace:
          at: ~/project

      - run:
          name: Attach Workspace Complete
          command: |
            ls- al
            echo '^^^ Attaching workspace success. ^^^'

      - aws-ecr/build-and-push-image:
          repo: $AWS_ECR_REPO_NAME
          tag: $CIRCLE_SHA1
          path: docker
          dockerfile: Dockerfile.prod

  Deploy:
    executor: machine-executor

    steps:
      - run:
          name: Allow Access to Production EC2
          command: |
            CIRCLE_CI_BUILD_MACHINE_IP=$(curl ipinfo.io/ip)

            aws ec2 authorize-security-group-ingress --region $AWS_REGION \
                                                   --group-id $PROD_SERVER_SG_ID \
                                                   --protocol tcp \
                                                   --port 22 \
                                                   --cidr $CIRCLE_CI_BUILD_MACHINE_IP/24
      - run:
          name: Waiting for AWS Security Settings to Take Effect
          command: sleep 5

      - run:
          name: AWS EC2 Deploy
          command: |
            ssh -o StrictHostKeyChecking=no $AWS_DEPLOYER@$EC2_PUBLIC_DNS \
            "sudo docker login --username AWS -p $(aws ecr get-login-password --region $AWS_REGION) $AWS_ECR_ACCOUNT_URL && \
            sudo docker pull $AWS_ECR_ACCOUNT_URL/$AWS_ECR_REPO_NAME:$CIRCLE_SHA1 && \

            export CIRCLE_SHA1=$CIRCLE_SHA1 && \
            export AWS_ECR_ACCOUNT_URL=$AWS_ECR_ACCOUNT_URL && \
            export AWS_ECR_REPO_NAME=$AWS_ECR_REPO_NAME && \
            export PROD_PORT=3000 && \

            cd /home/ec2-user/infra && \

            docker compose up -d allco-kids-backend"

      - run:
          name: Remove Circle CI Instance Ingress Rule
          command: |
            CIRCLE_CI_BUILD_MACHINE_IP=$(curl ipinfo.io/ip)

            aws ec2 revoke-security-group-ingress --region $AWS_REGION \
                                                          --group-id $PROD_SERVER_SG_ID \
                                                          --protocol tcp \
                                                          --port 22 \
                                                          --cidr $CIRCLE_CI_BUILD_MACHINE_IP/24

workflows:
  build_and_deploy_image:
    jobs:
      - Pre-Build:
          context: fetch-code
          filters:
            tags:
              only: /server-v\d{1}\.\d{1,2}\.\d{1,3}/ # 버전 정규식 server-v1.0.0의 형태
            branches:
              ignore: /.*/

      - Build-and-Push:
          requires:
            - Pre-Build
          filters:
            tags:
              only: /server-v\d{1}\.\d{1,2}\.\d{1,3}/ # 버전 정규식 server-v1.0.0의 형태
            branches:
              ignore: /.*/

      - Deploy:
          requires:
            - Pre-Build
            - Build-and-Push
          filters:
            tags:
              only: /server-v\d{1}\.\d{1,2}\.\d{1,3}/ # 버전 정규식 server-v1.0.0의 형태
            branches:
              ignore: /.*/
Setting up docker-compose on EC2
EC2 에 접속해서 root에 /infra 폴더를 생성
그 안에 docker-compose.yaml 을 생성한 뒤 다음과 같이 작성
docker-compose.yaml
version: '3.9'

services:
  hello-world:
    image: ${AWS_ECR_ACCOUNT_URL}/${AWS_ECR_REPO_NAME}:${CIRCLE_SHA1}
    restart: always
    ports:
      - ${PROD_PORT}:${PROD_PORT}
    volumes:
      - ../src:/app/src
이제 github 에 태그를 생성하면 자동으로 CircleCI 에서 배포 프로세스가 시작될 것이다.
ECR 에 이미지도 정상적으로 생성된 것을 확인할 수 있다.
Conclusion
CircleCI를 쓰면서 느낀점은 Jenkins 보다는 훨씬 직관적인데다 미관적으로 더 낫다 라는 점이었다.
이런 부분이 작업하는 중간중간 만족감을 주었으며, 특히, SasS 레벨에서 환경 변수를 따로 관리해주는 부분은 보안 부분에 있어서도 훨씬 간단하고 쉽게 접근할 수 있다는 장점을 느낄 수 있었다.
여기에는 언급하지 않았지만 CircleCI를 통해 ECS로 배포하는 과정은 aws-ecs orb를 통해 훨씬 간단하게 진행할 수 있으나 Abstract에서 언급했다시피 AWS ECS는 가격부분에서 다소 부담스러운게 사실이기 때문에 여기서는 언급하지 않았다.
본 포스팅에서는 EC2를 사용하여 적은 비용으로 배포를 진행할 수 있는 나름의 접근 방법을 소개하였다.
물론, ECR 을 쓰지않고 Gitlab 등을 통해 무료로 이미지를 관리할 수 있으나 그 부분은 차후 기회가되면 소개하도록 하겠다.


Top comments (0)