
Vue.js is a JavaScript framework developed by Evan You that’s making significant inroads as the framework of choice for modern single-page applications. One reason it has become so popular is that it comes with components any single-page-application is expected to have, such as a router, a developer UI to manage your application, and a state management library called Vuex. To learn more about Vue.js, visit the Getting Started with Vue site.
What is Vuex?
According to the official web site for Vuex, it is a state management pattern and library for Vue.js applications. It serves as a centralized store for all the components in an application, with rules ensuring that the state can only be mutated in a predictable fashion. It also integrates with Vue’s official devtools extension to provide advanced features such as zero-config time-travel debugging and state snapshot export / import.
Key to the architecture of Vuex are the concepts of state, views, and actions:
- State serves as the source of truth that drives our applications
- The view is a declarative mapping of the state
- Actions are the ways the state could change in reaction to user inputs from the view

A simplistic illustration of a Vuex workflow
The Vuex store is instantiated within your application as a singleton, which means there is a single instance of the store that lives within your Vue application, and your various components look to it as the source of truth.
What makes Vuex even more powerful and easier to use is its deep integration into the Vue.Js DevTool Chrome Extension, which allows you to look at the sequence of state mutations and even replay state changes.

Example of the Vuex view in the Vuex DevTool browser extension
Why are state machines important for your JavaScript applications?
State machines are becoming an increasingly important part of any modern application framework. With the pervasiveness of single-page application frameworks, it is also becoming a de facto part of front-end applications.
Depending on the JavaScript framework you are using, there are a variety of choices such as Vuex for Vue and Redux for React. There is also a JavaScript framework-agnostic library called XState.
If you are building an application, it will almost have ‘state’ associated with it. For front-end applications, your application state may include whether the user is logged in or whether the user is an admin. Compared to sprinkling and checking the logic for these transitions throughout your application, handling these states from a single location in your codebase is easier and less prone to errors. This is where a state machine library comes into play – typically exposed as a ‘singleton’ and accessed from within your application, it provides a single source of truth for the state of your applications.
Implementing Vuex for a turn-based game
Now let’s implement a basic Vuex container (state, actions, and mutations) for a turn-based game. Here are the key components we will need to implement:
- State
- player – The ID of the player (Player1or Player2 )
- isTurn – Boolean value that represents whether it is the player’s turn
- Actions
- logIn – sets the player’s id
- makeMove – Sends the move to the other player and swaps the turn off for the current player
- receiveMove – Receives a move from the other player and activates the current player’s turn
Here is the bare-bones implementation:
export default new Vuex.Store({
  state: {
    player: '',
    isTurn: false
  },
  mutations: {
    LOGIN(state, player) {
      state.player = player
      if (state.player === 'Player1') state.isTurn = true
    },
    TOGGLE_TURN(state) {
      state.isTurn = !state.isTurn
    }
  },
  actions: {
    login({ commit }, player) {
      console.log('Attempting to login with ' + player)
      commit('LOGIN', player)
    },
    makeMove({ commit, getters }, move) {
      if (getters.isTurn()) {
        //TODO: Send a move to the other player
      }
    },
    receiveMove({ commit, getters }, otherPlayerMove) {
      if (!getters.isTurn()) {
        console.log(
          `Received move from other player ${JSON.stringify(otherPlayerMove)}`
        )
        commit('TOGGLE_TURN')
      }
    }
  },
  getters: {
    isTurn: state => () => {
      return state.isTurn
    },
    getPlayer: state => () => {
      return state.player
    }
  }
})
Implementation gaps
Now you’ve implemented a bare-bones skeleton of your Vuex store, but you may have noticed there are a few gaps.
- You aren’t sending the ‘move’ object anywhere.
- How do you get notified if another player made a move?
Suppose this was a two-player game, the sequence expected would be as follows:
- Player1 and Player2 log in.
- Player1 has his isTurn flag set to true and Player2 has his isTurn flag set to false.
- Player1 sends his move over to Player2.
- Player1’s isTurn flag is set to false.
- Player2 receives the move and sets his isTurn flag to true.
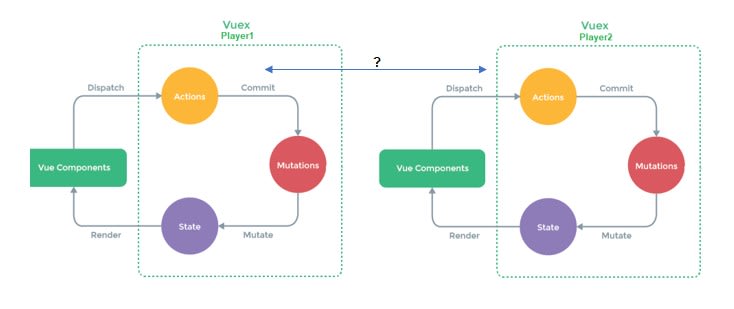
We need a mechanism to establish communication between two different Vuex instances
Using Solace PubSub+ Event Broker to distribute your Vuex state
Solace PubSub+ Event Broker is a multi-protocol, fully featured and free-to-use event broker. One of the many transports that it supports is WebSocket for both Node.js and a browser, which makes it ideal for solving this particular problem.

The APIs and protocols that Solace PubSub+ Event Broker natively supports
The APIs and protocols that Solace PubSub+ Event Broker natively supports
Getting started with the PubSub+ Event Broker
To get started with PubSub+ Event Broker, you create a new Solace cloud messaging service (for FREE!). If you need help with creating a messaging service, refer to this guide.
Publish events from your Vuex store
Now in your makeMove(…) action, we can change the code as follows:
makeMove({ commit, getters }, move) {
      if (getters.isTurn()) {
        console.log(
          `Sending ${JSON.stringify(move)} to ${getters.getPlayer()}/Move`
        )
        mqttClient.publish(`${getters.getPlayer()}/Move`, move).then(() => {
          commit('SWAP_TURN')
        })
      }
    }
Note you are now sending a message on a well-defined topic ‘Player1/Move’ or ‘Player2/Move’ with the move payload.
Subscribing to move events from the other player
Now how do you get notified when another player, connected from another browser, makes a move?
In your view (in the beforeMount() lifecycle hook, for example) you will simply make use of a subscription function which may look something like this:
//Subscribe to the other player's move message
     this.$mqttClient
       .subscribe(
          'Player2/Move',
         ({ topic, message }) => {
           store.dispatch('receiveMove', message)
           //rest of your business logic
         }
       )
       .then(() => {
         console.log('Succesfully subscribed')
       })
   })
You are adding a subscription to the topic ‘Player2/Move’ if you are ‘Player1’ or ‘Player1/Move’ if you are ‘Player2’. Your callback will instantaneously be triggered once you get a message with the event on the topic.
Your finished product will look something like this across two browser windows:
GitHub Repo
To take a look at a fully built out sample implementation, navigate to this linking-vuex-stores repo .
Conclusion
In this post, I showed you how easy it is to link different Vuex stores together using simple publish/subscribe semantics via Solace PubSub+ Event Broker.
While this works, you may realize that state is being distributed and controlled on the client side. Ideally you would want state to be validated and distributed from the server side. In a future post, we will show you how easy it is to add a node.js server using XState (a popular JavaScript state machine library) to this architecture to control and validate state on the server side while continuing to use Vuex on the client side.
The post Linking Vuex State Machines Across Your Vue Client Applications with Solace PubSub+ appeared first on Solace.

Top comments (0)