
When architecting a system, it’s important to make sure it’s redundant, resilient, and fault-tolerant so it can carry on if a node fails, or even if all the nodes in one datacenter fail.
PubSub+ Event Broker can be deployed in a high availability (HA) group, and configured for disaster recovery (DR). In this post, I’ll focus on deploying for HA in AWS. There is an AWS CloudFormation template available for you to easily spin up your HA group, but I’d like to show you how to do it manually so you understand how it works.
How does HA work with PubSub+ Event Broker?
A typical HA deployment of Solace’s PubSub+ Event Broker consists of three nodes:
- Primary
- Backup
- Monitor
The primary and backup brokers are set up in active-standby configuration, while the third acts as a monitoring node. The two brokers have their own storage, so they share nothing and are completely independent. The monitoring node is just responsible for maintaining quorum between the primary and backup brokers.

When a message is published to the primary broker, it is persisted locally and synchronously pushed to the backup broker. Once the backup broker receives the message, it acknowledges receipt to the primary broker, at which point the primary broker sends an acknowledgement back to the publisher.
If there is a subscriber interested in this message, it will be forwarded to that subscriber. Otherwise, the message will be forwarded later. Once the subscriber receives the message, it will send a confirmation back to the primary broker. Upon receiving this receipt, the primary and standby brokers will both delete their copies of the message.
Note that at any given time, only the active broker will accept connections. For example, let’s say your primary broker is your active broker. If and when the primary broker fails, the backup broker will become the active broker and start accepting connections. When the primary broker becomes available again, you can either configure your system to automatically make it the active broker again, or leave the secondary broker active. It’s recommended that you run the primary and secondary brokers on different servers within the same datacenter.
This HA setup makes systems very resilient, because if the primary broker fails, the backup will quickly take over and minimize the impact to your system.
Now that we know how an HA group works, let’s spin up three instances of PubSub+ Event Broker on AWS and configure them to be part of an HA group.
Launching EC3 instances with PubSub+ Event Broker
Let’s see how we can configure three broker instances to be our primary broker, secondary broker, and monitoring node. We will be running three instances of PubSub+ Event Broker on three different EC2 instances on AWS. See my blog post on how to launch an EC2 instance with PubSub+Event Broker.
Once you have an EC2 instance up and running, you should use the security group that was created for this instance and attach it to the backup and monitoring EC2 instance. Do not create all 3 instances with 3 different security groups.
I also edited the security group that was created for the first EC2 instance to allow all incoming traffic from any instance that is attached to this security group. You can do this by going to the security group and under Inbound section, clicking Edit , then clicking Add Rule , selecting All Traffic and in the Source field, enter the security group Id. Here is what it should look like:
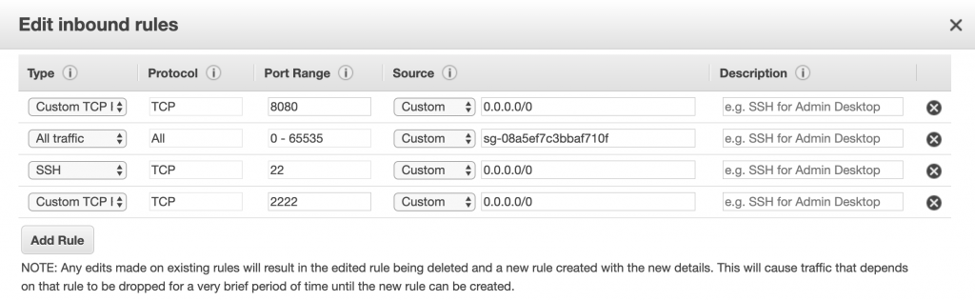
Again, this is just for demo purposes to make sure all our instances can speak to each other.
Configuring HA group
Now that we have all 3 EC2 instances with PubSub+ Event Broker up and running, we can begin to configure them as part of one HA group. The following steps have been thoroughly documented in the HA Group Configuration section of Solace PubSub+ Technical Documentation.
Before we begin, we need to update our router name on each instance. For an HA group to be configured, the router names must match the node name. When we launched EC2 instance from Solace AMI, we were given a default router name (it’s usually the private IP address). We can use the given router name as our node name, but I would rather give our nodes more descriptive names such as ha-demo-primary, ha-demo-backup, and ha-demo-monitor.
Primary node
Log in to your primary node and change the router name to ha-demo-primary :
/ Activate Solace CLI[sysadmin@ip-172-31-26-146 ~]$ solacectl cliSolace PubSub+ Standard Version 9.3.1.5Operating Mode: Message Routing Nodeip-172-31-26-146> enableip-172-31-26-146# configure/ Change router name to primaryip-172-31-26-146(configure)# router-name ha-demo-primaryThis command causes a reload of the system.Do you want to continue (y/n)? y
Note that a router name change requires a reboot of PubSub+ Event Broker so you will have to wait a minute or so before it comes back up. Run the following command once the broker has been rebooted to confirm the router name was changed:
ip-172-31-26-146> show router-nameRouter Name: ha-demo-primaryMirroring Hostname: NoDeferred Router Name: ha-demo-primaryMirroring Hostname: No
Once you have updated the router name, you will need to run some commands to:
- Create and designate different instances as primary , backup, and monitor
- Provide the authentication key
From Solace docs: pre-shared-key is 44 to 344 characters (which translates into 32 to 256 bytes of binary data encoded in base 64). It’s used to provide authentication between nodes in a HA Group and must be the same on each node. I used Base64 Encode to create my key. Once you have your key, run the following commands and replace my key with the one you created.
ip-172-31-26-146(configure)# hardware message-spool shutdownAll message spooling will be stopped.Do you want to continue (y/n)? yip-172-31-26-146(configure)# redundancyip-172-31-26-146(configure/redundancy)# switchover-mechanism hostlistip-172-31-26-146(configure/redundancy)# exitip-172-31-26-146(configure)# redundancyip-172-31-26-146(configure/redundancy)# groupip-172-31-26-146(configure/redundancy/group)# create node ha-demo-primaryip-172-31-26-146(configure/redundancy/group/node)# connect-via 172.31.26.146ip-172-31-26-146(configure/redundancy/group/node)# node-type message-routing-nodeip-172-31-26-146(configure/redundancy/group/node)# exitip-172-31-26-146(configure/redundancy/group)# create node ha-demo-backupip-172-31-26-146(configure/redundancy/group/node)# connect-via 172.31.26.208ip-172-31-26-146(configure/redundancy/group/node)# node-type message-routing-nodeip-172-31-26-146(configure/redundancy/group/node)# exitip-172-31-26-146(configure/redundancy/group)# create node ha-demo-monitorip-172-31-26-146(configure/redundancy/group/node)# connect-via 172.31.22.77ip-172-31-26-146(configure/redundancy/group/node)# node-type monitor-nodeip-172-31-26-146(configure/redundancy/group/node)# exitip-172-31-26-146(configure/redundancy/group)# exitip-172-31-26-146(configure/redundancy)# authenticationip-172-31-26-146(configure/redundancy/authentication)# pre-shared-key key c29sYWNlaXNhZ3JlYXRldmVudHBsYXRmb3Jtd2hpY2h5b3VzaG91bGR1c2Vmb3JhbGx5b3VyZXZlbnRpbmduZWVkcw==ip-172-31-26-146(configure/redundancy/authentication)# exitip-172-31-26-146(configure/redundancy)# active-standby-role primaryip-172-31-26-146(configure/redundancy)# no shutdown
You will mostly run the same commands on your backup node that you ran on your primary node. The only difference is that you will designate it as a backup node by running this command instead:
active-standby-role backup
Here are the commands you need to run on your backup node:
ip-172-31-26-208> enableip-172-31-26-208# configureip-172-31-26-208(configure)# router-name ha-demo-backupThis command causes a reload of the system.Do you want to continue (y/n)? yip-172-31-26-208(configure)# [sysadmin@ip-172-31-26-208 ~]$ solacectl cliSolace PubSub+ Standard Version 9.3.1.5Operating Mode: Message Routing Nodeip-172-31-26-208> show router-nameRouter Name: ha-demo-backupMirroring Hostname: NoDeferred Router Name: ha-demo-backupMirroring Hostname: Noip-172-31-26-208> enableip-172-31-26-208# configureip-172-31-26-208(configure)# hardware message-spool shutdownAll message spooling will be stopped.Do you want to continue (y/n)? yip-172-31-26-208(configure)# redundancyip-172-31-26-208(configure/redundancy)# switchover-mechanism hostlistip-172-31-26-208(configure/redundancy)# groupip-172-31-26-208(configure/redundancy/group)# create node ha-demo-primaryip-172-31-26-208(configure/redundancy/group/node)# connect-via 172.31.26.146ip-172-31-26-208(configure/redundancy/group/node)# node-type message-routing-nodeip-172-31-26-208(configure/redundancy/group/node)# exitip-172-31-26-208(configure/redundancy/group)# create node ha-demo-backupip-172-31-26-208(configure/redundancy/group/node)# connect-via 172.31.26.208ip-172-31-26-208(configure/redundancy/group/node)# node-type message-routing-nodeip-172-31-26-208(configure/redundancy/group/node)# exitip-172-31-26-208(configure/redundancy/group)# create node ha-demo-monitorip-172-31-26-208(configure/redundancy/group/node)# connect-via 172.31.22.77ip-172-31-26-208(configure/redundancy/group/node)# node-type monitor-nodeip-172-31-26-208(configure/redundancy/group/node)# exitip-172-31-26-208(configure/redundancy/group)# exitip-172-31-26-208(configure/redundancy)# authenticationip-172-31-26-208(configure/redundancy/authentication)# pre-shared-key key c29sYWNlaXNhZ3JlYXRldmVudHBsYXRmb3Jtd2hpY2h5b3VzaG91bGR1c2Vmb3JhbGx5b3VyZXZlbnRpbmduZWVkcw==ip-172-31-26-208(configure/redundancy/authentication)# exitip-172-31-26-208(configure/redundancy)# active-standby-role backupip-172-31-26-208(configure/redundancy)# no shutdownip-172-31-26-208(configure/redundancy)#
Monitor node
The commands you need to run on your monitor node are slightly different but for the most part, you are doing the same sort of configuration that you did on primary and backup nodes.
Before changing the router name on the monitor node, you need to run this command:
[sysadmin@ip-172-31-22-77 ~]$ solacectl cliSolace PubSub+ Standard Version 9.3.1.5Operating Mode: Message Routing Nodeip-172-31-22-77> enableip-172-31-22-77# reload default-config monitoring-nodeThis command causes a reload of the system which will discard all configurationand messaging data stored on this system.Do you want to continue (y/n)? y
This will restart your node with default configs and designate it as a monitoring node (instead of a message routing node).
Now, you can change the router name like we did with our primary and backup nodes.
ip-172-31-22-77(configure)# router-name ha-demo-monitorThis command causes a reload of the system.Do you want to continue (y/n)? y
Confirm the name was changed by running this command:
ip-172-31-22-77# show router-nameRouter Name: ha-demo-monitorMirroring Hostname: NoDeferred Router Name: ha-demo-monitorMirroring Hostname: No
You can now go ahead and run the following commands (just like you did with primary and backup nodes).
ip-172-31-22-77(configure)# redundancyip-172-31-22-77(configure/redundancy)# switchover-mechanism hostlistip-172-31-22-77(configure/redundancy)# groupip-172-31-22-77(configure/redundancy/group)# create node ha-demo-primaryip-172-31-22-77(configure/redundancy/group/node)# connect-via 172.31.26.146ip-172-31-22-77(configure/redundancy/group/node)# node-type message-routing-nodeip-172-31-22-77(configure/redundancy/group/node)# exitip-172-31-22-77(configure/redundancy/group)# create node ha-demo-backupip-172-31-22-77(configure/redundancy/group/node)# connect-via 172.31.26.208ip-172-31-22-77(configure/redundancy/group/node)# node-type message-routing-nodeip-172-31-22-77(configure/redundancy/group/node)# exitip-172-31-22-77(configure/redundancy/group)# create node ha-demo-monitorip-172-31-22-77(configure/redundancy/group/node)# connect-via 172.31.22.77ip-172-31-22-77(configure/redundancy/group/node)# node-type monitor-nodeip-172-31-22-77(configure/redundancy/group/node)# exitip-172-31-22-77(configure/redundancy/group)# exitip-172-31-22-77(configure/redundancy)# authenticationip-172-31-22-77(configure/redundancy/authentication)# pre-shared-key key c29sYWNlaXNhZ3JlYXRldmVudHBsYXRmb3Jtd2hpY2h5b3VzaG91bGR1c2Vmb3JhbGx5b3VyZXZlbnRpbmduZWVkcw==ip-172-31-22-77(configure/redundancy/authentication)# exitip-172-31-22-77(configure/redundancy)# no shutdown
Once you are done configuring, you can run the following command on any of the nodes to confirm that all three nodes are Online and part of your HA group:
ip-172-31-26-146> show redundancy groupNode Router-Name Node Type Address Status----------------- -------------- ---------------- ---------ha-demo-backup Message-Router 172.31.26.208 Onlineha-demo-monitor Monitor 172.31.22.77 Onlineha-demo-primary\* Message-Router 172.31.26.146 Online\* - indicates the current node
That’s it! You now have a functional HA group with your primary and backup brokers and monitoring node.
Note that by default, guaranteed messaging is disabled in HA group and can only be enabled once you have an HA group setup. It is recommended that you enable guaranteed messaging but for the purpose of this post, I will leave it as disabled.
More info on your HA group
You can get more information about your redundancy settings by running this command:
ip-172-31-26-146> show redundancyConfiguration Status : EnabledRedundancy Status : UpOperating Mode : Message Routing NodeSwitchover Mechanism : HostlistAuto Revert : NoRedundancy Mode : Active/StandbyActive-Standby Role : PrimaryMate Router Name : ha-demo-backupADB Link To Mate : UpADB Hello To Mate : DownPrimary Virtual Router Backup Virtual Router---------------------- ----------------------Activity Status Local Active ShutdownRouting Interface intf0:1 intf0:1Routing Interface Status UpVRRP Status InitializeVRRP Priority 250Message Spool Status AD-DisabledPriority Reported By Mate Standby
You can get even more information by running this command: show redundancy detail (I am not going to show the output here).
I hope you found this post useful. For more information, visit PubSub+ for Developers. If you have any questions, post them to the Solace Developer Community.
The post Configuring PubSub+ Event Broker for High Availability in AWS appeared first on Solace.

Top comments (1)
Great thanks for sharing. The article is fully supported by images, snippets, and tools. Here one thing to add, no doubt, your mentioned tool for base64 encoding is great. But also check that tool url-decode.com/tool/base64-encode where you find dozens of other tools, that will really help you out, in future projects.
Regards