
Code generation is no simple feat. There are a lot of complexities when it comes to generating useful application code. In this post, I am going to walk you through generating your own microservices using Spring Cloud Stream and the AsyncAPI Code Generator. These tools should help to simplify things when defining and implementing your asynchronous applications. I explained the same idea in a video you can watch here, and all of the artifacts are available in GitHub.
AsyncAPI: What Is It?
Before we dive into code generation let’s start with the basics – what is AsyncAPI? Over the past few years, AsyncAPI has emerged as the industry standard for defining asynchronous, event-driven APIs; you can think of it as OpenAPI for the asynchronous world. It is an open source initiative that provides both a specification to describe and document your asynchronous applications in a machine-readable format, and tooling (such as code generators) to make life easier for developers tasked with implementing them.
I’m not going to go into great detail about the specification, but for context you should know that it defines metadata about your asynchronous API, the channels available for sending/receiving messages, and components – such as schemas – that define the messages that are being exchanged. For more information about the specification you can read about it here.
Defining the Application That You Want to Develop: The AsyncAPI Document
The first step in doing code generation with AsyncAPI is obtaining an AsyncAPI document that defines the application that you want to develop. Per the specification, this document is represented as JSON objects and must conform to the JSON standards. YAML, being a superset of JSON, can also be used. There are two main ways of going about obtaining this document: manually create the document or use an event portal.
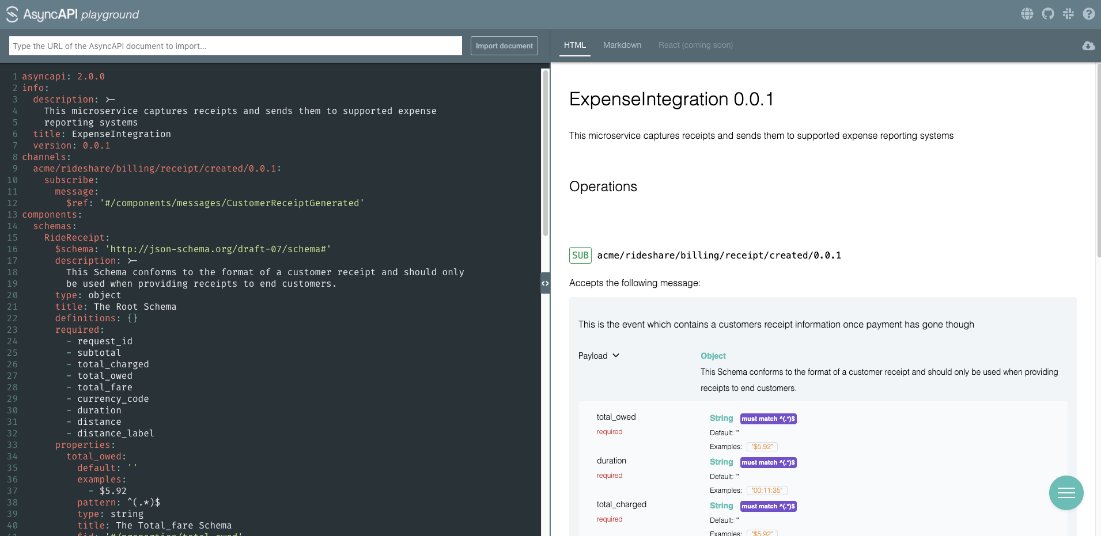
If you decide to manually create the document after familiarizing yourself with the specification, don’t worry – you won’t be starting with a blank slate. The AsyncAPI initiative has provided a handy, interactive tool called the AsyncAPI playground to make this easier. On the left side of the playground you can familiarize yourself with the specification and make changes to a real AsyncAPI document, and as you do so the right side of the screen updates to show how the document is parsed into a more human-readable format.
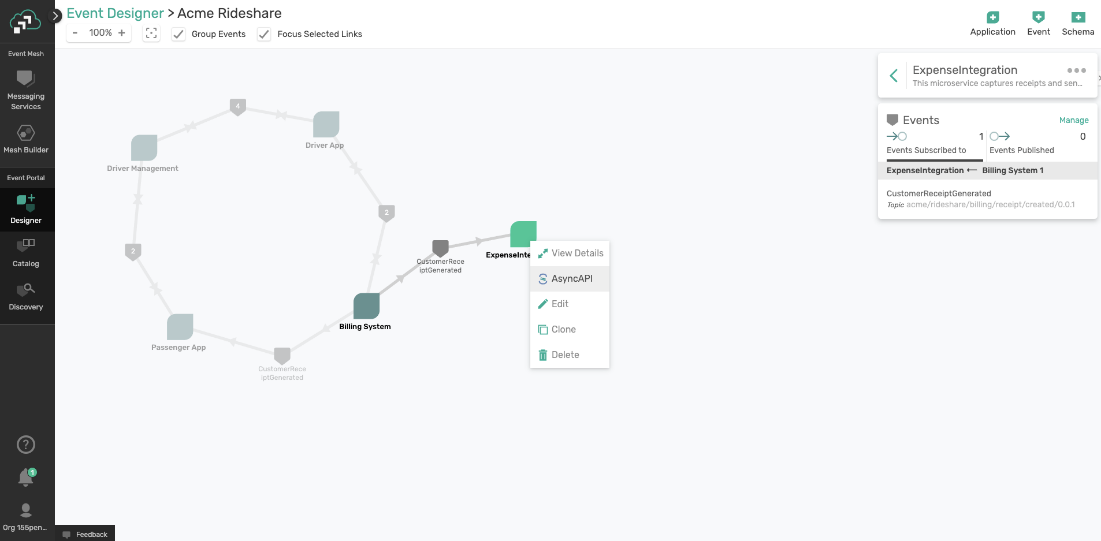
The second way is to use an event portal. Solace PubSub+ Event Portal, for example, allows for architects and developers to collaborate using a GUI to design your event-driven architecture. The team would define the applications that exist in the system, as well as the events that are exchanged and the schemas which define them. Having a catalog of well-organized channels and events for reuse will also save you both time and headaches while collaborating, instead of having to comb through a bunch of files in various locations.
Once the design is in place, PubSub+ Event Portal allows the developer to choose the application they are responsible for developing and download the AsyncAPI document in JSON or YAML.
* *
*
Create Event-Driven Microservices Using Spring Cloud Stream Without Learning Messaging APIs
Now that we have our AsyncAPI document that describes our application it’s time to develop the application. The AsyncAPI Code Generator supports templates to generate code for a variety of different languages and protocols, but for this example we’re going to use the Spring Cloud Stream template. One should note that the template generates a Maven project.
The Spring Cloud Stream framework provides an easy way to get started with event-driven microservices by providing binders that allow the developer to create their microservices without having to learn messaging APIs.
Download and Run the AsyncAPI Generator
The first step is of course to install the AsyncAPI generator itself. If you have NodeJS installed this takes just one easy npm command as seen below. You can find the required versions in the Code Generator on github.
npm install -g @asyncapi/generator
Once you have the generator installed you can run it using the ag command. At a minimum you must specify the AsyncAPI document to run it against and the template to use as shown below.
ag ~/AsyncApiDocument.yaml https://github.com/asyncapi/java-spring-cloud-stream-template.git
In most cases you’ll want to take advantage of the parameters and specification extensions that are specified by the template being used. For example, the Spring Cloud Stream template that I’m using in this example allows me to configure many options, including the Spring Cloud Stream binder I want to use – for example, the Solace binder.
Other parameters include:
- Maven information:
artifactIdandgroupId - Java package:
javaPackage - Broker connection Info:
host,username,passwordandmsgVpn
Using these options, my ag command might look something like this, where -o specifies the output directory:
ag -o ExpenseIntegration -p binder=solace -p view=provider -p actuator=true -p artifactId=ExpenseIntegration -p groupId=acme.rideshare -p javaPackage=acme.rideshare.expense -p host=localhost:55555 -p username=default -p password=default -p msgVpn=default ~/Downloads/ExpenseIntegration.yaml @asyncapi/java-spring-cloud-stream-template
After running, the output will look something like this:

Add Your Business Logic
At this point the generator has created an ExpenseIntegration directory that contains the Maven project. We can use the IDE of choice and import the Maven project to add business logic.
As seen in the image below, once imported, the project looks like a regular Spring Boot Java project with generated classes under the javaPackage that was defined earlier and an application.yml file for configuration. Generated classes under javaPackage include Plain Old Java Objects (POJOs) defined from the schemas in the AsyncAPI document and Application.java which contains the actual Spring Cloud Functions where we’ll add our business logic.

The generated POJOs, like RideReceipt in the image above, define your data model per the schemas included in the AsyncAPI document. These POJOs contains variables with getters and setters for each attribute defined to allow both for developers to get coding quickly without having to manually create the objects themselves, but also for Spring Cloud Stream to automatically convert messages directly to POJOs.
Then we have the Application.java class, which can be renamed using the javaClass parameter. The generator will add functions to handle messages delivered on the channels defined in the AsyncAPI document as described in the template.
In the example below we can see a single java.util.function.Consumer bean since our AsyncAPI document describes our application as a subscriber to messages whose payload is defined by the RideReceipt schema. Note the comment that states // Add business logic here; this is where the developer can add their business logic.
@SpringBootApplicationpublic class Application {private static final Logger logger = LoggerFactory.getLogger(Application.class);public static void main(String[] args) {SpringApplication.run(Application.class);}@Beanpublic Consumer<RideReceipt> acmeRideshareBillingReceiptCreated001Consumer() {// Add business logic here.return null;}}
You might say: “Marc, that’s great, but how the heck is that function actually binding to the messaging channels!?” This is where the application.yml file comes into play.
The generated application.yml file defines several things as specified in the AsyncAPI document or from the parameters passed into the generator. First, it defines the list of functions it wants Spring Cloud Stream aware of under spring.cloud.stream.function.definition. Second, it tells Spring Cloud Stream which channels to bind those functions to under spring.cloud.streams.bindings. Lastly, it contains connection information to the messaging system. The connection info is specified by different parameters depending on the binder you choose but, in this case, it’s defined under solace.java.
spring: cloud: stream: function: definition: acmeRideshareBillingReceiptCreated001Consumer bindings: acmeRideshareBillingReceiptCreated001Consumer-in-0: destination: acme/rideshare/billing/receipt/created/0.0.1solace: java: host: 'localhost:55555' msgVpn: default clientUsername: default clientPassword: defaultlogging: level: root: info org: springframework: info
Note that all of this was done for the developer so they didn’t have to track down which SCSt parameters needed to be set, map the functions to the bindings, etc. They just have to add their business logic in place of the project and hit run! In this case since it’s a Spring Boot project you can “run as a Spring Boot app” in your IDE or even run from the command line using mvn spring-boot:run.
Helpful Parameters and Specification Extensions for Creating Microservices Using the AsyncAPI Spring Cloud Stream Template
As I mentioned, there are a lot of complexities when it comes to generating useful application code from a microservice. Because of these complexities, I thought I’d call out some tips, tricks, and painpoints of using the AsyncAPI Spring Cloud Stream template.
There are a bunch of different parameters and specification extensions that you should consider when generating your code. All of them can be found here, but I’ll go over a few of the parameters that I use quite often:
-
The
binderparameter allows you to specify the Spring Cloud Stream binder that you’d like to use. Currently the generator supportskafka,rabbitandsolace. -
The
info.x-viewspecification extension can be set at the info level in your AsyncAPI document. This extension allows for you to define how the document should be viewed from an application perspective. By default an AsyncAPI specification takes aclientview where operations (publish/subscribe) defined in a document represent what an application accepts (or how you would communicate with that application). However, for code generation you may want to generate what an application actually does. This is where setting theviewparameter comes in. If you setviewto a value ofproviderthe operations defined in the document will be treated as what an application actually does. Note that this extension can also be set using theviewparameter on some generator templates, such as the Java Spring Cloud Stream one. -
The
operation.x-scs-function-namespecification extension can be set on yourpublishorsubscribeoperations in the AsyncAPI document, allowing you not only to name the generated function, but also tie two operations together to form a function that subscribes to one channel and publishes to another when the same name is used. For example, if your AsyncAPI document looked like the image below ajava.util.function.Functionbean called “calculatePercentage” would be generated which subscribes to the input channel and publishes to the output channel.
channels: 'input': subscribe: x-scs-function-name: calculatePercentage message: $ref: '#/components/messages/CovidTracking\_SingleStateCurrentDataUpdate' 'output': publish: x-scs-function-name: calculatePercentage message: $ref: '#/components/messages/CovidTracking\_SingleStateTestPercentagesUpdate'
-
The
x-scs-destinationspecification extension can be specified on asubscribeoperation, allowing you to override the default destination value which usually matches the channel. This is useful when you are using the Solace binder and you are following the Solace pattern of publishing to topics and consuming from queues. In this case thex-scs-destinationvalue would be treated as the name of the queue which your microservice will consume from and the channel name in the AsyncAPI document will be added as a topic subscription to that queue. -
The
x-scs-groupspecification extension can also be specified on asubscribeoperation, allowing for the addition of agroupto the generated Spring Cloud Streambinding. This allows for the use of consumer groups and will end up in a durable queue being created when using the Solace binder.
Tips For Using The Code Generator To Create Event-Driven Microservices Using Spring Cloud Stream
Besides configuration options there are a few more things to keep in mind when using the generator to create event-driven microservices using Spring Cloud Stream.
-
Make sure generated POJOs have the Java types you would expect for generated variables! For example, if your JSON schema defines an attribute type as a
numberorintegerthose are being mapped to aDoubleorIntegerin Java respectively. If you would like another type, such as a float or long, you’ll want to make that change. It is also important to make sure you pay close attention to data that represents dates and/or times as those will likely end up just being represented by aStringby default. - Dynamic topics are not yet supported by the AsyncAPI SCSt Code Generator. We’ll be looking to enhance them both to support dynamic topics in the future but for now you’ll want to remove dynamic pieces of the topic from your channels in the AsyncAPI document and add them into the code afterwards.
-
When creating a Spring Cloud Stream microservice that does not contain a
java.util.function.Supplierinclude a web server so the microservice continues running and listening for messages to process. This can be done by including the-p actuator=trueparameter to include Spring Actuator functionality which itself requires a web server, and also provides some cool management and monitoring capabilities. Alternatively, you can just add thespring-boot-starter-webstarter to your pom after it’s been generated. Note this is not an issue with the AsyncAPI generator template, but just a bug with the Solace Spring Cloud Stream binder which will be relevant to people using the generator.
I hope those tips are helpful and save you some troubleshooting time!
Conclusion
I hope this post was useful and you’re able to quickly dive in to generating your own event-driven microservices using Spring Cloud Stream and the AsyncAPI Code Generator after exploring the example described above.
You can get started right away and use the Solace PubSub+ Event Portal to generate your AsyncAPI document for FREE by signing up for a new cloud account!
If you have more questions or want to share your experience with the tools, you can let us know in the Solace Community Forum or consider joining us in contributing directly to the AsyncAPI initiative.
The post AsyncAPI Code Generation: Microservices Using Spring Cloud Stream appeared first on Solace.

Top comments (0)