Laravel is arguably the most popular PHP frameworks and that’s unlikely to change any time soon. Developers love it because of its ability to handle complex tasks with ease—plus, it operates at a high speed and has excellent security features. As you might expect, it’s also really easy to set up for email testing.
Today, we discuss three great methods for email testing in Laravel. We explain what you can expect from each and how to set them up easily.
Building an example email app in Laravel
We assume that you already have a Laravel app that you want to use to try email testing capability. Launch it now, open the terminal and enter the following:
php artisan make:mail JustTesting
This will create a new mailable class in app/Mail directory. If you haven’t created one before, it will also set up the directory.
Now we can go ahead and build our test message:
public function build()
{
    return $this->from('hello@mailtrap.io')
                ->to('bonjour@mailtrap.io')
                ->cc('hola@mailtrap.io')
                   ->subject('Auf Wiedersehen')
                   ->markdown('mails.exmpl')
                   ->with([
                     'name' => 'New Mailtrap User',
                     'link' => '/inboxes/'
                   ]);
    }
}
To spice it up a bit, let’s use a good-looking template. For that, we can use Laravel’s templating engine, Blade.
Templates represent views in Laravel, so keep the template file in the resources/views/mails directory. Then, we’ll create a ‘mails’ directory with a Blade template file ‘exmpl.blade.php’ inside.
@component('mail::message')
Hello **{{$name}}**,  {{-- use double space for line break --}}
Thank you for choosing Mailtrap!
Click below to start working right now
@component('mail::button', ['url' => $link])
Go to your inbox
@endcomponent
Sincerely,
Mailtrap team.
@endcomponent
If you’re not sure how exactly this works or want to customize a message even further, please refer to the excellent Laravel Docs for more details. Be sure to also check out our articles on sending emails in Laravel and Laravel Email Queues for more on the topic.
Testing emails in Laravel
Now, let’s try testing our message with some different available methods. If you haven’t yet, make sure you’ve configured a driver for email sending.
Using Tinker to validate individual emails
A super-simple approach to email testing is with Laravel’s built-in utility known as Tinker. Tinker is a REPL (read-eval-print loop) tool. It takes a single input (for example, a request to send an email), evaluates it, and immediately returns a detailed response afterward. You can leverage the tinker functionality for Laravel and any other PHP framework with Tinkerwell, the code runner that allows you to quickly test out any PHP code in the context of your application.
It’s really handy if you set up an integration with an ESP and need to test its efficacy. In our case, the delivery will be successful or we’ll commit one of many possible errors. These could be related to the email configuration (missing ‘From’ address, etc.) or sending errors. You may, for example, get a response about an unsuccessful authentication, failed connection, or an account that needs activation, to name a few.
To run Tinker, launch the terminal and type in the following:
php artisan tinker
Then, run the following sample code:
use App\Mail\JustTesting;
Mail::send(new JustTesting());
If everything works out, you’ll see an not-very-descriptive ‘null’ response:
>>> Mail::send(new JustTesting());
=> null
If you forgot to introduce yourself (skipped the ‘From’ field), you’ll get the following error:
>>> Mail::send(new JustTesting());
Swift_TransportException with message 'Cannot send message without a sender address'
If the SMTP authentication fails, you’ll see the following:
>>> Mail::send(new JustTesting());
Swift_TransportException with message 'Failed to authenticate on SMTP server with username "807a39dc3703e0" using 3 possible authenticators. Authenticator CRAM-MD5 returned Expected response code 235 but got code "535", with message "535 5.7.0 Invalid login or password
". Authenticator LOGIN returned Expected response code 250 but got an empty response. Authenticator PLAIN returned Expected response code 250 but got an empty response.'
And if you got creative and wanted to send your test emails to hey@hi@halo@mailtrap@io, you’re likely to encounter the following error:
>>> Mail::send(new JustTesting());
Swift_RfcComplianceException with message 'Address in mailbox given [hey@hi@halo@mailtrap@io] does not comply with RFC 2822, 3.6.2.'
Mocking emails in automated tests
Since the 5.3 release of Laravel (Aug ‘16), built-in functionalities allow for mocking certain elements of applications in automated tests. This way, you can test their performance without actually executing them. As you can imagine, it’s particularly useful for emails.
Laravel provides helpers for mocking events, facades, and other jobs so that you don’t have to process complex Mockery method calls. However, if you want to play with Mockery or PHPUnit, for example, you can do that, as well.
For emails, there’s a dedicated fake method in the Mail class that prevents emails from being sent but lets you test the sending capability. After the respective code is executed, you can call various assertions to check if an email was sent successfully.
If an assertion fails, you’ll receive an error with a possible cause, similar to what Tinker would return.
To create a test for your mailer, run the following command in the project directory:
php artisan make:test MailerTest --unit
This will generate a file called ‘MailerTest.php’ in the ‘tests/Unit’ folder of your project.
Now, modify the generated file to add some tests for your mailer:
<?php
namespace Tests\Unit;
use PHPUnit\Framework\TestCase;
use App\Mail\JustTesting;
use Illuminate\Support\Facades\Mail;
class MailerTest extends TestCase
{
   /**
    * A basic unit test example.
    *
    * @return void
    */
   public function testSending()
   {
       Mail::fake();
       Mail::send(new JustTesting());
       Mail::assertSent(JustTesting::class);
       Mail::assertSent(JustTesting::class, function ($mail) {
           $mail->build();
           $this->assertTrue($mail->hasFrom('hello@mailtrap.io'));
           $this->assertTrue($mail->hasCc('hola@mailtrap.io'));
           return true;
       });
   }
}
Now, run your test with the following command:
php artisan test tests/Unit/MailerTest.php
If your code works correctly, you’ll see the following result:
PASS  Tests\Unit\MailerTest
  ✓ sending
  Tests:  1 passed
  Time:   0.02s
If something has gone wrong, like if your code didn’t set the ‘from’ field correctly, the test run will fail:
FAIL  Tests\Unit\MailerTest
  ✕ sending
  Tests:  1 failed
  Failed asserting that false is true.
  at tests/Unit/MailerTest.php:26
            Mail::assertSent(JustTesting::class);
            Mail::assertSent(JustTesting::class, function ($mail) {
                $mail->build();
            $this->assertTrue($mail->hasFrom('hello@mailtrap.io'));
                    $this->assertTrue($mail->hasCc('hola@mailtrap.io'));
                    return true;
            });
    +1 vendor frames
  2   [internal]:0
    Illuminate\Support\Testing\Fakes\MailFake::Illuminate\Support\Testing\Fakes\{closure}(Object(App\Mail\JustTesting))
    +5 vendor frames
  8   tests/Unit/MailerTest.php:30
    Illuminate\Support\Facades\Facade::__callStatic("assertSent")
When in doubt, refer to the official Mocking documentation.
Keep in mind that this will only work with Laravel 5.3 and newer. If you still use 5.1 or 5.2 where Mail::fake() is not available, you can try a workaround. With these versions, the shouldReceive method returns an instance of Mockery mock so you can still mock the calls to the facade with the following:
<?php
Mail::shouldReceive('send')->once();
The test is not very strict, as we’re focused on testing the core sending functionality, which you can also freely adjust.
Mailtrap
A much more robust alternative to the other two is Mailtrap. In case you’re not familiar with it, it serves as a “fake SMTP,” helping you isolate the testing environment from production so that test emails never end up in your users’ inbox.
Check the video to learn more.
Mailtrap not only lets you verify whether emails are sent, but it also captures them for easy previewing and debugging. You can quickly fix any visual errors, spot HTML/CSS issues, check the spam scores of emails, click-through links, and more.
Mailtrap is particularly helpful when you have complex sequences of emails to test. You can go through entire workflows and try different edge cases. One by one, the respective emails will land in your Mailtrap inbox. And if they don’t, you’ll know precisely where the problem lies.

Mailtrap is also great for teams. With the auto-forwarding feature, a manager or a client can test any staging workflows just as they would on production. They can, for example, click through an order confirmation process and get the respective emails delivered right into their inbox. On top of that, a copy of each email goes to your Mailtrap inbox for easy inspection.
There’s a lot more that only Mailtrap can do. If you haven’t yet, get an account right away, and let’s see how it works with Laravel.
How to set up Mailtrap for email testing in Laravel
Mailtrap is Laravel’s default SMTP server, so it’s very easy to integrate with. Log into your account, click on Demo Inbox, and pick ‘Laravel’ from the drop-down list of integrations. You’ll see two, ready-to-use configurations with your credentials. To integrate, follow the instructions.
A sample configuration that you would insert into .env file of your root directory would look as follows:
MAIL_MAILER=smtp
MAIL_HOST=smtp.mailtrap.io
MAIL_PORT=2525
MAIL_USERNAME=87e040e5d367c7
MAIL_PASSWORD=ceaf7b94c8dbfb
MAIL_FROM_ADDRESS=from@example.com
MAIL_FROM_NAME=Example
Of course, feel free to insert your own email address and name into the last two lines of code.
Now, let’s send some emails that will then land in our Mailtrap inbox. For the following example to work, you’ll need to be on the 5.8 release of Laravel (or newer), so make sure you upgrade if necessary before getting started.
Once we have the configuration done, let’s finally send an email. Make sure you’ve specified the route in routes/web.php file.
<?php
use App\Mail\JustTesting;
use Illuminate\Support\Facades\Mail;
Route::get('/send-mail', function () {
    Mail::to('newuser@example.com')->send(new JustTesting());
    return 'A message has been sent to Mailtrap!';
});
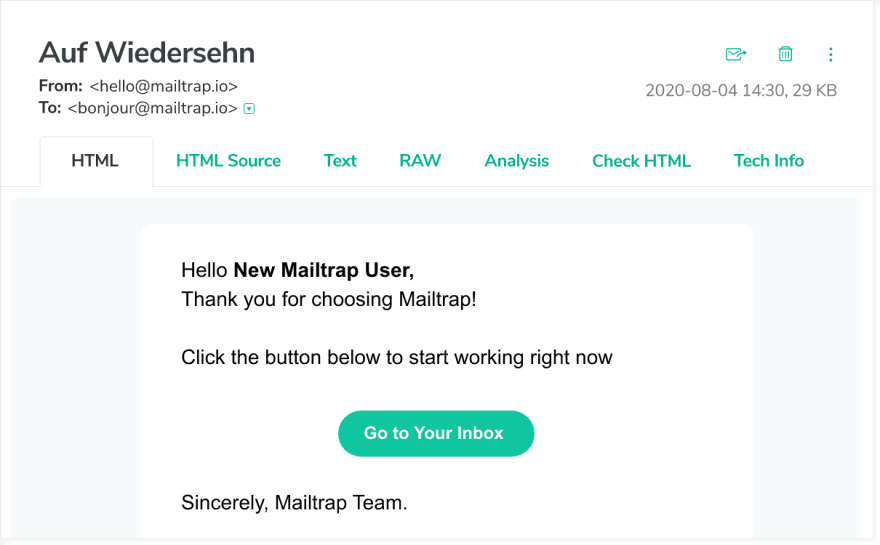
Now, start the application and access/send-mail path in your browser. This will send a test email. Shortly after, you’ll see the following output in your Mailtrap inbox:
Alternatively, you can integrate your Laravel app with Mailtrap via Mailtrap API and automate your email testing process. For details, refer to the API documentation.
Wrapping up
Each of the tools we described can be helpful in some way. Tinker is really handy if you’ve already set up an integration with an ESP and wish to quickly try it out. The error messages are quite descriptive and can help you pinpoint the errors you may have missed before. Mocking also offers similar functionality, but is more suitable for automated tests.
Still, there’s a lot more to email testing than all that. If you want to see precisely what your platform sends, quickly debug errors, and report with ease on your progress, you need a dedicated environment.
There are plenty of reasons why thousands of Laravel developers have trusted Mailtrap. If you haven’t yet, get an account right away and see how easy email testing can be.
That's it! Thanks for reading our guide on testing emails in Laravel to prevent issues with sent emails that was originally published on Mailtrap Blog by Piotr Malek.


Top comments (0)