✔Step1:- Create Virtual Private Network On AWS
If we want to do customize practical then we also need our own VPC. So here we are going to create a VPC on AWS cloud with Internet Gateway subnet, security group & Routing Table and we will put our cluster instances in this VPC.
Steps to create VPC:-
1) Create a Virtual Private Network
2) Creating a VPC Internet Gateway
3) Creating the Subnet On that VPC
4) Create a Security Group
5) Create a Routing Table
And to create this setup we are taking help from Ansible, So to setup above things I am going to use ansible role for VPC.
below is a command and path used to create ansible role for VPC---->

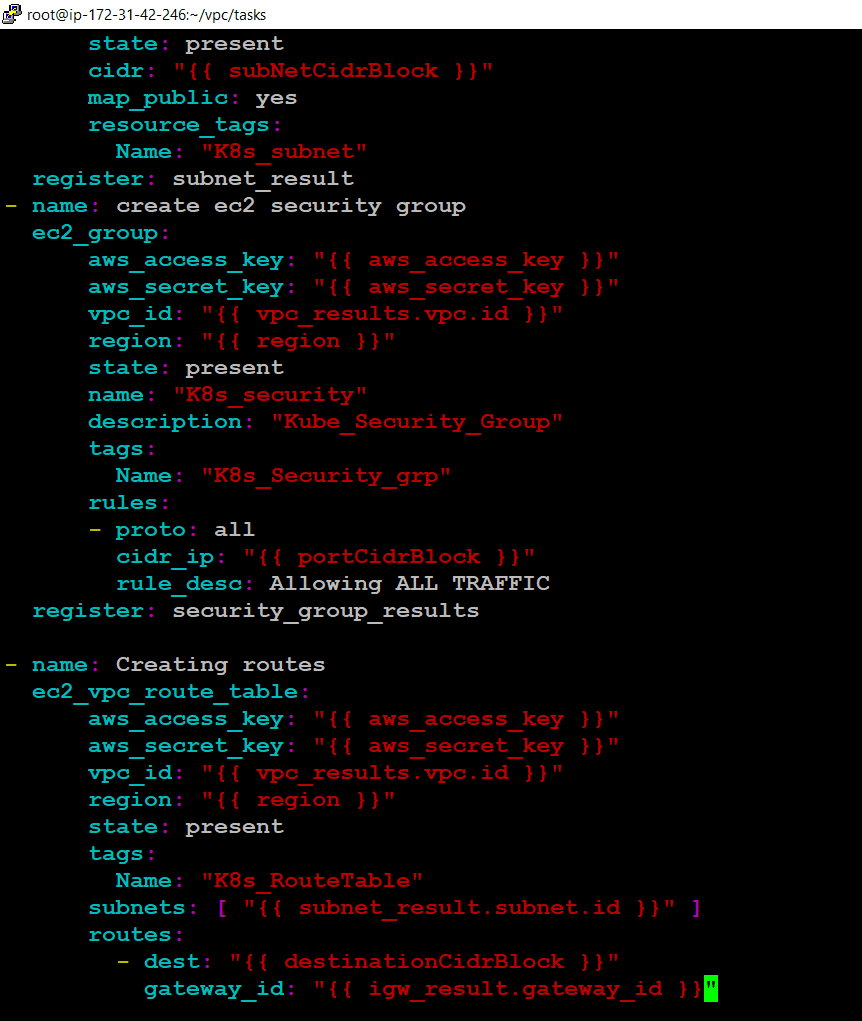
Now write a ansible playbook for VPC in main.yml file-------->

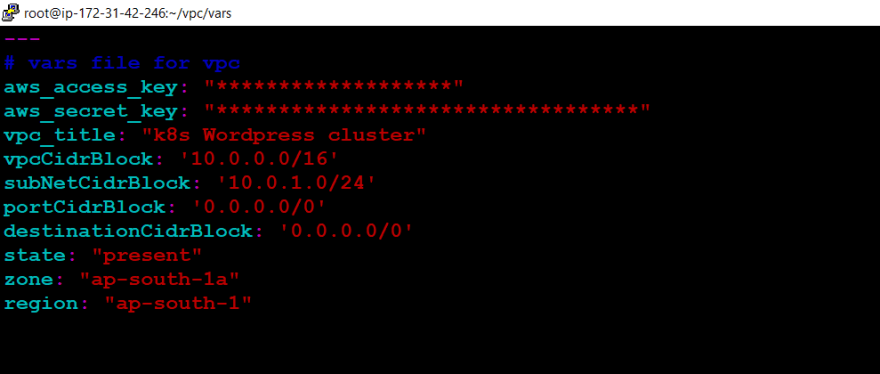
In this playbook I have added some variables to create a dynamic playbook , so below is a "vars" file for VPC role---->
Now Run this ansible playbook using below command---->

Here we can see our playbook run successfully. Now let's check this setup on AWS Portal

VPC
Internet Gateway
Subnet
Security Group
Routing Table
Here we can see our VPC setup is done successfully
✔Step2:- provisioning EC2 Instances On AWS Cloud
Here I am going to launch 3 Instances 1 for master node and 2 instances for the slave node. So let's create a ansible role for provisioning the instances using below command------>

Now let's write a ansible playbook for provisioning the instances on AWS cloud
Now let's run this playbook using below command----->

here we can see our playbook is run successfully now let's check our setup on AWS portal
here we can see our all three instances launched successfully and also in running mode

✔Step3:- Configure Master Node
To form a kubernetes cluster we have to first configure a Master Node. Here I am using a ansible role to configure a master node.
command to create role for master:-
ansible-galaxy init
eg:- ansible-galaxy init kube_master
Following are all steps to configure the master node-------->
Installing docker and iproute-tc
Configuring the Yum repo for kubernetes
Installing kubeadm,kubelet kubectl program
Enabling the docker and Kubernetes
Pulling the config images
Configuring the docker daemon.json file
Restarting the Docker service
Configuring the Ip tables and refreshing sysctl
Starting kubeadm service
Creating .kube Directory
Copying file config file
Installing Addons e.g flannel
Creating the token
Store token in a file
Now lets involve all this steps in your playbook
In this above playbook I also added variables to make a playbook more dynamic So, below is a "vars" file for this role
here we done with our coding part & our playbook is now ready to run------->
here we can see our master node is configured successfully------->
✔Step4:- Configure Slave Node
Now we also have to configure the slave nodes so that our cluster is completed.
So first create a ansible role for slave node using following command---->
command:-
ansible-galaxy init kube_slave
Following are all the steps required to configure slave node:-
Installing docker and iproute-tc
Configuring the Yum repo for kubernetes
Installing kubeadm,kubelet kubectl program
Enabling the docker and Kubernetes
Pulling the config images
Configuring the docker daemon.json file
Restarting the Docker service
Configuring the Ip tables and refreshing sysctl
Copy the join command which we store while configure master.
Run join command.
Now create a ansible-playbook which includes all the above steps----->
Now let's run the above playbook---->
Now let's check our cluster status on Master node by running below command
here we can see our all 3 nodes are in Ready phase it means our cluster is running successfully
✔Step5:- Lunching WordPress Using MySQL Database on Cluster
Here we have to create a role for wordpress which also link to MySQL Database
In this role we configure below things:
Launching WordPress application
Launching MySQL application
Exposing the WordPress application
So let's add all this things in our playbook----->
Here we can see our playbook run successfully. It means we successfully deploy the WordPress and MySQL on the cluster.
The MySQL-WordPress playbook is written in such a way that it will show the IP and Ports of database while running.
No alt text provided for this image
Here we can see our Database host ip note this ip so that we can use this ip further while login to wordpress
✔Step6:- Now let’s take the IP of any node and port which is given here and check the output..
No alt text provided for this image
when we put the Ip and port no of our wordpress application this page will open. In this page we have to put some information like Database name , Username, Password for database & IP address of Database Host
After submitting this page next page will come up---->
In this page also we have add some credentials and then we have to click on "Install Wordpress"
Here we can see our Wordpress launched successfully


Top comments (0)