
Ahoy there! Let's automate deploying our Web App! We'll be using React for this. Don't worry, because react or angular or vue, that's not important. The core concept is same for all! Also we'll be going from level 0. So even if you don't know React or any of these, just hop on!!
It is a part of my future DevOps and automation blogs. So stay tuned for more amazing stuff!!
Step 0: Let's create a React App
To deploy an app, we need an app, right? So let's create one. But if you don't like React, go with Angular, Vue or whatever you like.
First create a github repo (assuming you have a github account, if not, create one and then create a github repo) and then clone it onto your computer. Open it in your favorite text-editor (mine VS Code). Then type the following command to create a react app.
npx create-react-app client --template typescript
(It'll create a React App named client in TypeScript. Replace client with your own app name, I prefer client but you can name it anything)
Now, type the following command to go inside it
cd client
And then type this to start your react app
npm start
Voila! Wait a while and it'll start the development server and open the React App in your browser. It should look something like this:

Now let's get into the fun stuff. Let's deploy the app!
Step 1: Deploy App
Type this command
cd client && npm i -D gh-pages
It'll go inside client folder and then install that "gh-pages" package.
("npm i -D X" is the shorthand for "npm install --save-dev X")
Now open the package.json file of client folder and add the "homepage" property, and also add the following "deploy" and "predeploy" scripts, something like this:
{
  ...your other package.json stuff

  "homepage": "http://{YOUR_GITHUB_USERNAME}.github.io/{YOUR_APP_NAME_HERE}",

   "scripts": {
    "start": "react-scripts start",

    "predeploy": "npm run build",
    "deploy": "gh-pages -d build",

    "build": "react-scripts build",
    "test": "react-scripts test",
    "eject": "react-scripts eject"
  },

  ...your other package.json stuff

}
Now open your terminal, and type this:
cd client && npm run deploy
It'll start deploying your app. Wait for it to complete. Once done, go to the homepage URL that you specified and you'll see your app live.
Your URL: "http://{YOUR_GITHUB_USERNAME}.github.io/{YOUR_APP_NAME_HERE}"
Step 2: Automate Deployment
Yes, we deployed our app, but that's not what we want right? We want to make it all automated. So let's do this.
Open a new terminal and type the following command on the root level of your repo (NOT inside client folder).
mkdir -p .github/workflows
It'll create a ".github" folder in the root level and create another folder inside it named workflows. I mean, create "workflows" folder inside ".github" folder which is on the root level of our project (at the same level as "client" react app folder).
[NOTE: "mkdir" bash command create a directory/folder. The "-p" flag creates them recursively. In other words, if you pass this flag, you can create nested folders, even if they did not exist. Otherwise, it would've thrown a "Directory does not exist" error]
Now, create a yaml file inside that "workflows" folder named "Deploy.yml" by typing the following command.
touch .github/workflows/Deploy.yml
[NOTE: touch bash command creates a file]
Fill this Deploy.yml file with these following content. Also PRO TIP: Read the comments to understand what each word and each line does.
# By SilvenLEAF

# Let's create a basic automated deployment
# It'll work something like this:
# Whenever push our code to "main" branch,
# We'll check if it's deployable (I mean, the app works and does not break)
# If so, we'll deploy it
# And everything will be done automatically

name: DevOps Deploy # This is the name of our Action, you can name anything, I just casually gave this name

# Controls when the workflow will run
on:
  # We'll be triggering the workflow on push event but only for the main branch
  push:
    branches: [ main ] # You can have any branch or multiple branches, if you want to add more branches, add them in this array

# A workflow run is made up of one or more jobs that can run sequentially or in parallel
jobs:
  # This workflow contains a single job called "testAndDeploy"
  testAndDeploy:
    # The type of OS that this job will run on. I chose ubuntu, you can choose anything, windows, mac, anything at all
    runs-on: ubuntu-latest

    # Steps represent a sequence of tasks that will be executed as part of the job
    steps:
      # Checks-out your repository under $GITHUB_WORKSPACE, so your job can access it
      - uses: actions/checkout@v2

      #  Runs a single command using the runners shell
      - name: Install packages
        run: cd client && npm install

      # Runs a set of commands using the runners shell
      # Notice I gave "CI=false" command. It's because normally when we build react app, there's always a lot of warnings
      # And Github action by default has "CI=true", and because of that, it treats warnings as errors
      # So, it'll fail the job (because if there is any error, the job fails)
      # That's why we set "CI=false" so that it can ignore the warnings
      - name: Build
        run: |
          echo started Building
          cd client && CI=false && npm run build

      # if there are errors or bugs in our app, then the build will fail
      # which will also cause the Deployment to fail as well
      # because in order to deploy, it has to pass all steps successfully
      - name: Deploy 🚀
        uses: JamesIves/github-pages-deploy-action@4.1.5
        with:
          branch: gh-pages # The branch the action should deploy to. You can choose any branch
          folder: client/build # The folder the action should deploy. Here the build folder is inside client with respect to the root
Now commit all your changes and push! Voila! You just automated your deployment. Now let's test it.
Step 3: Testing Deployment
Now go inside client/src/App.tsx, and replace everything with this:
// By SilvenLEAF
import React from 'react';

function App() {
  return (
    <div className="App">
      <h1 style={{ textAlign: "center", color: "#d00" }}>SilvenLEAF</h1>
    </div>
  );
}

export default App;
Now commit you changes and push it with this command
git commit -am "Testing Deployment" && git push origin main
(git commit -am "lorem ipsum" is the shorthand for git add . && git commit -m "lorem ipsum". Also, "X && Y" in bash, runs X and Y command one after the other)
So after pushing your updated codes, go to your repo in your github. And go to the "actions" tab.

Then you'll see your action "DevOps Deploy" and the running "Testing Deployment" commit workflow.

Click on that ongoing "Testing Deployment" workflow, and you'll see all it's jobs that's running.

We had only one, so you'll see only "testAndDeploy" job. To see all its details and steps, click it
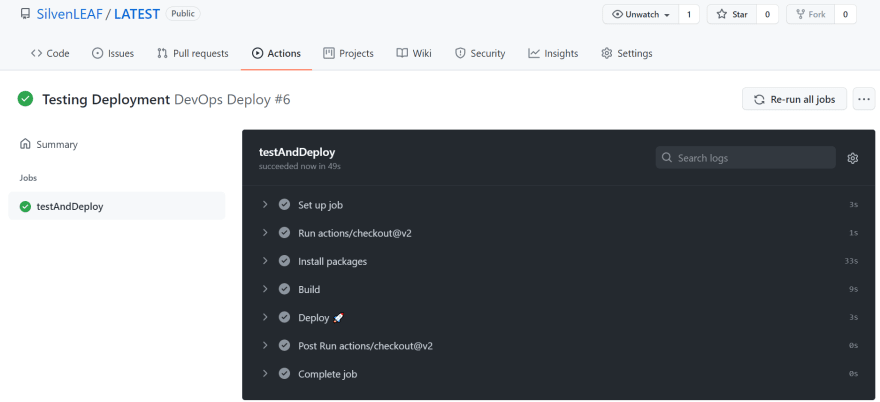
Once all of the steps are done, and it successfully finished. Go to your website and see it updated live!

Now every time you make changes and push to main branch, it'll automatically test if it's good and doesn't have any errors, if so, will deploy it. You have to do nothing!
Amazing right? But that's just the beginning of the story my friend! Because we'll learn some more amazing DevOps and Automations stuffs and advanced github actions too! So stay tuned!
What's NEXT?
1. How to deploy in the Cloud (Azure VMs)
2. Learning DevOps with Github Actions
3. Improved AI BOT that can do anything
4. Insane stuff with JavaScript/TypeScript
5. Debugging TypeScript with VS Code Debugger
6. Sequelize Hooks
7. How to create an Android APP with NO XP
(including apk generating)
Got any doubt?
Drop a comment or Feel free to reach out to me @SilveLEAF on Twitter or Linkedin
Wanna know more about me? Come here!
SilvenLEAF.github.io


Top comments (0)