This series is meant to give a deeper look into the challenges you are likely to encounter if you decide to turn a maker project into an actual Internet of Things product. It's based on my experience over the past two years of creating a product from scratch. If you missed parts 1-3 you can find them at the following links.
- Part 1: Hardware is Hard...And Expensive
- Part 2: Firmware Troubles
- Part 3: Connecting to WiFi Can Be a Daunting Task
One of the things I never saw coming while creating my product was the bankrupting cost of creating an enclosure. It's not something you usually bother with on maker projects. In fact, you love that your device is open air, on a breadboard, with wires everywhere. I mean, it looks super cool and techy like that. On a rare occasion you'll 3D print an enclosure that somebody else designed for something like that Raspberry Pi you bought. Now that you're serious about making a product though you need an enclosure of your own. Let's talk about it.
Buy a 3D Printer (Or Find a Friend With One)
It's almost certain your product will be on a custom PCB that you created back in part 1. It's one of a kind and unless you designed it to fit in an off-the-shelf enclosure you're going to need a custom enclosure designed specifically for your product. You can try this yourself but unless you really know what you are doing I'd recommend against it for reasons we'll get into in a minute. So be prepared to spend money right out of the gate on an enclosure design. Having a 3D printer to test designs and create a quick feedback loop with the designer is super valuable. If the couple hundred dollar price tag of a 3D printer scares you then it's time to press the abort button because we're just getting started. A 3D printer will give you a very quick way to test different enclosure designs. It will ultimately save you money because ordering 3D printed enclosures is going to cost about $20-$50 a pop. Just a few runs and the printer pays for itself.
Design for Manufacture
If you've never heard the term "Design for Manufacture" or DFM then you definitely need someone else to design your enclosure. DFM is a common term that you will hear in many aspects of creating an electronics product. The basic premise is not only whether your enclosure is possible but whether it will be possible to produce in high volume and at what cost. Just because you can get your (or your friend's) 3D printer to print it doesn't mean you're ready to have molds made up and begin production. You need to know about standard wall thicknesses and how to size screw holes for screws that are readily available in large quantities. How is your enclosure going to seal? Can it be glued shut? Who is going to glue it and with what? Does it need to be water resistant? All things you need to have answers for.
What's a Gate/Ejector Layout?
For my product I had the enclosure designed by a pro. Because I still wanted to be involved in the process I personally submitted the order for the injection mold. After the mold house took my $3400 I received an email with the following.
Your order confirmation and the proposed gate and ejector layout for your part are detailed in the link below. The yellow cylinders represent the ejector pins, and the yellow and red rectangle shows the location of the gate.
Please approve this layout by clicking on "Approve Layout" or identify any issues by replying to this email.
Here are the images that accompanied the email:
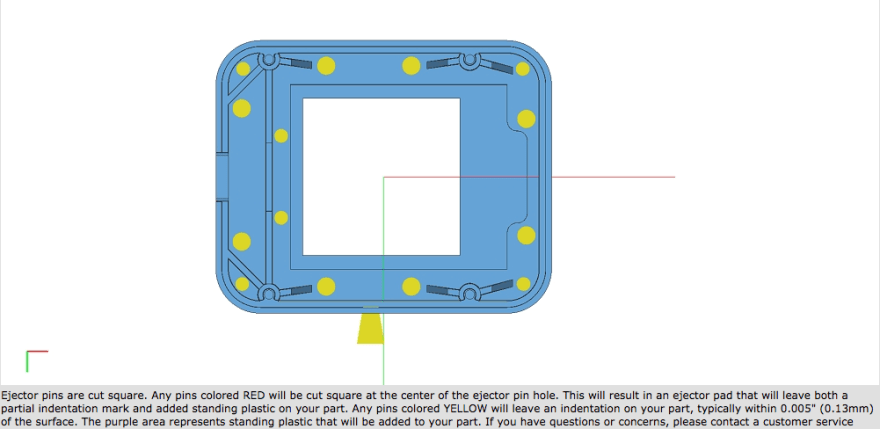
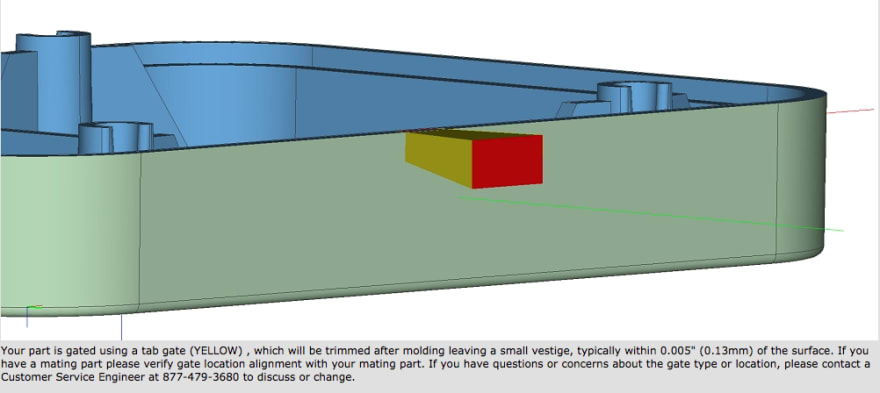
So, what do you think? Should I approve it? Do you understand the physics of how molten plastic will flow when injected into a mold and how pushing on certain parts of your enclosure during ejection can affect it? This was all completely new territory to me. I didn't know the answer to this question. I didn't even know what a gate or ejector pins were. Luckily I had access to the company that designed it. When you are asked for a go/no-go decision on a $3400 dollar mold purchase you better have the right answer the first time. Mistakes will sink you.
Injection Molding Costs Will Make You Cry
If the price of this journey hasn't scared you off yet it may be about to. Enclosure molds are expensive. Really really really expensive. My product enclosure had two parts. I only ordered a plastic injection mold for half of it because the other half was concealed in an outer enclosure so it didn't need a polished plastic finish. For just half of my 1.75" x 2.00" enclosure I paid $3400 for the mold and then $2.48 for each enclosure half created from the mold.
Why didn't I get a mold for the bottom?. Well, good question. The answer is simple, I was running out of money and it was cheaper to have the first pilot run 3D printed for the bottom. The bottom mold would have cost an additional $4000 and close to the same cost per unit. For my pilot run I only needed 110 enclosures and the cost to 3D print the bottom of the enclosure came out to just under $1500. That's a BIG difference. So, wait, why didn't I just 3D print the top of the enclosure as well? Another great question. I needed the top of the enclosure to have a specific polished plastic look (Black ABS with an SPI-C1 finish to be exact). It's not possible to obtain that finish with a 3D printed part.
But the mold is a one time cost. After that you just pay the two fifty for each part right? Well, not really as it turns out. Depending on who you use for your molds you are likely going to pay a mold retrieval or setup cost each time you order more runs. For me that turns out to be $500 per order just for them to pull the mold off the shelf and set it up for another run. It's a real gut punch and frankly not something they made clear up front. So make sure you ask this question of any company you are looking to use for mold creation. I also learned that while the mold is technically mine because I paid for it, you can't really BYOM (bring your own mold) if you decide you want to change injection molding outfits. For a nominal fee ($500 + shipping) they will send you the mold you paid for. You will then be told by every other injection molding company that they will not use it and that if you want to work with them they will have to make their own molds for you. You know, because the processes are...different.
Navigate this part of the process carefully and shop around. Look for companies that are willing to work with you. This is an area where I definitely pulled the trigger too early and paid dearly for it. Don't make the same mistake.
Summary
I was floored when I learned about the cost of injection molding. Make absolutely sure that your enclosure design is finalized before paying for molds. Once you have molds there is no going back or tweaking. If you want to change something you have to pay the piper again. This is where that $300 3D printer pays for itself over and over again. Use it.
This part of making a product is one that can be a show stopper solely because of the price tag. There just aren't a lot of options for saving money here. As always, it helps to know this is coming and you can plan for it appropriately. Maybe you start by printing your own enclosures to get some revenue coming in to fund molds. If you're an incredible negotiator or you have a large volume order you might be able to work a deal out with the mold company. Most likely you aren't even big enough yet to have them return your calls for quotes. I'm not talking from experience or anything. 😞
Wrapping Up The Series
That's going to do it for our series. I want to reiterate that the items covered in this series do not constitute a comprehensive list at all. There are many land mines I encountered on the road to having a shippable product that I haven't covered. That's not meant to scare you off but to help calibrate your expectations and emotions. The quick victories of being a weekend maker are great at clouding our view of what really lies ahead when you take the product plunge. This leads to people giving up because those wins are few and far between the further you get into the journey. I think that's why a lot of people give up. I don't want you to give up. I want you to have the right expectations so that when these things arise you can be prepared to face them and know that they are part of the journey.
It's absolutely possible to turn a maker idea into a product. I'm living proof of that. It's very rewarding and it's easier and cheaper than it's ever been. But it's still an enormous amount of work and takes a lot of determination, time and money. If you have the right expectations going into the process you'll have a much better chance of seeing it through to the end and succeeding.
I would love to connect with anyone else out there that's on a similar journey or thinking of starting their own. Reach out to me anytime in the comments or via the social media links in my profile.

Top comments (0)