Lightsail
In this post I am going to explain how easily we can deploy any application to Lightsail instance. The aim of this post is to explore Lightsail instance. We will do everything with bash using AWSCLI which can further be use in creating CICD pipeline.
Check here to know more about Lightsail - [AWS Lightsail]
Here’s how we will implement:
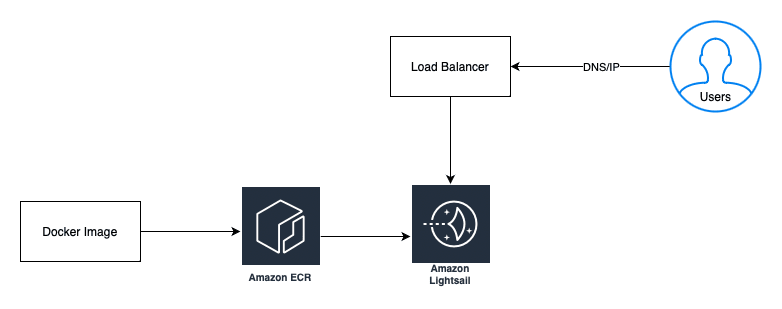
First step will be to deploy our application to the instance. Once you deploy to the we have two option depends on your use case - you can use either static IP or Lightsail load balancer. Refer the image below for better understanding.

Prerequisite:
- AWS account
- IAM access and secret key with access to Lightsail and EMR.
- AWS CLI
- Docker
Steps 1: Download AWSCLI.
You can follow the following steps if you are with me and using Ubuntu OS.
curl "https://awscli.amazonaws.com/awscli-exe-linux-x86_64.zip" -o "awscliv2.zip"
unzip awscliv2.zip
sudo ./aws/install
If you are on different OS, you can take help from here: AWSCLI
Step 2: Configure AWSCLI in your local
- Open terminal and run
aws configurecommand, it will ask access key and secrets key.
shubham@Shubham~ % aws configure
AWS Access Key ID [****************aaaa]: aaaaaaaaaaaaaaaaaaaaaa
AWS Secret Access Key [****************bbbb]: bbbbbbbbbbbbbbbbbb
Default region name [eu-central-1]: eu-central-1
Default output format [None]:
Step 3: Pull Grafana Image in your local system using the following command. You can also create your own Dockerfile as per your need.
docker pull grafana/grafana-enterprise
Step 4: Create ECR repo in AWS
- Goto ECR console.
- Click on create repo.
- As a best practice you should select Visibility settings as private.
- Give your repo name. In my case I have given
lightsailas repo name. - Keep rest as default configuration.
- Click on create and it will create a repo for you.
Step 5: Push grafana image to ECR.
- Login to your ECR using the following command
docker login -u AWS -p $(aws ecr get-login-password --region <region_name>) <aws_account_number>.dkr.ecr.<region_name>.amazonaws.com - Build your image with tag as lightsail
docker build -t lightsail . - After the build completes, tag your image so you can push the image to this repository:
docker tag lightsail:latest <aws_account_number>.dkr.ecr.<region_name>.amazonaws.com/lightsail:latest - Run the following command to push this image to your newly created AWS repository:
docker push <aws_account_number>.dkr.ecr.<region_name>.amazonaws.com/lightsail:latest
Now you pushed your Grafana image to ECR repo which we will pull from the instance and use for the deployment.
Step 6: This is most important step for our implementation. We are creating a bash script to pass user data with instance creation.
Create sh file with the following code
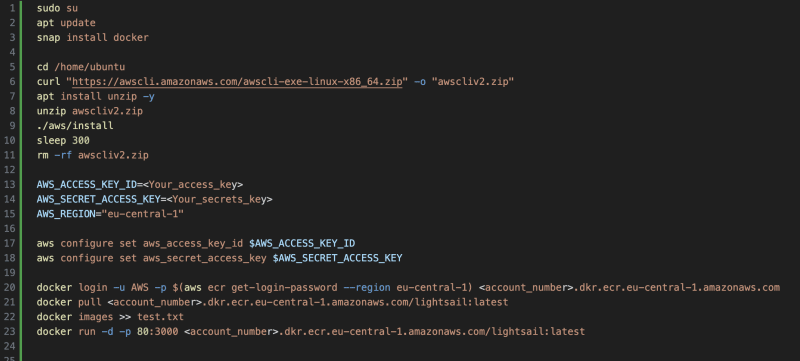
Explanation of the above code for better understanding:
As a prerequisite we are installing docker and awscli in the instance. AWS lighsail doesn't allow role based access. Hence, we are using AWS access and secrets key with just ECR pull access to pull image from ECR in the instance. As a final step we are running this docker image on the port 80.
Step 7: Create Lightsail Instance using the following command:
aws lightsail create-instances --instance-names grfana --availability-zone eu-central-1a --blueprint-id ubuntu_22_04 --bundle-id nano_2_0 --user-data file://instance.sh
Explanation of the above command:
To create a lightsail instance 2 important parameter that we need to pass is: blueprint-id and bundle-id.
blueprint-id is basically the selection of platform, which application or which OS you want to configure in your instance. In my case I am going with ubuntu. You get check all the available value of blueprint-id by using the following command:
aws lightsail get-blueprints
And, bundle-id is the instance type for your Lightsail instance. You can get all available value of bundle by using the following command:
aws lightsail get-bundles
One important flaw is --user-data - here, we are instructing Lightsail to execute some sort of commands with instance creation. So, basically what ever script we mentioned in the above steps is going to be executed with your instance creation.
Step 8: Allow port on which your application is running to Lightsail to accept traffic on the given port. In my case it's 3000 port.
aws lightsail open-instance-public-ports --port-info fromPort=3000,toPort=3000,protocol=TCP --instance-name grfana
Step 9: Create Load balancer and attach your instance to this load balancer.
aws lightsail create-load-balancer \
        --load-balancer-name "<load_balancer_name>" \
        --instance-port "<instance_port>"

aws lightsail attach-instances-to-load-balancer --load-balancer-name "<load_balancer_name" --instance-names "<instance_name>"
Step 10: Access you application from the browser with Load Balancer DNS.
CICD pipeline:
We can automate the entire process for complete CICD pipeline.
I have created the pipeline using GitHub action. You can check code here:
Thank you for reading. Hope this will help you.

Top comments (0)