Imagine you are looking at a website and you see some really nice data that you would love to use to build an app or integration for. After furiously googling for an API providing this data, you come up short. This is when you need to make use of a web scraper.
A web scraper is an application or program that fetches HTML from a web page, parses it, and stores the data in a human readable format for future reference.
Web scrapers are very useful for things like automation, social media scraping, statistics and monitoring for changes on a web page such as prices or products.
Today, I’m going to show you how to convert a website into a serverless API using NodeJS running in Amazon Web Services. We’re going to scrape the UFC Stat Leaders Site, which contains statistics for the top 10 fighters of all time in a whole host of different categories.
We want to scrape the results for each fighter in every section and set up a REST API that allows us to query for a fighter by their name. This will return the list of statistics for which that fighter is in the top 10 of all time, including:
- The statistic (eg. Total fights, wins)
- The value for that statistic (eg. 12)
- The position in the leaderboard they sit (eg. 2)
Let’s get into it.
How?
At a high level, here are the main problems we need to solve to complete our web scraper.
- Trigger a scrape the UFC website by performing an HTTP request
- Store the data from the scrape in a database
- Provide a way to query data out of the database via an HTTP request
- Deploy everything above to the cloud in a simple, self-contained way.
AWS Cloud Development Kit
In order to perform the above steps, we are going to make use of the AWS Cloud Development Kit.
The AWS Cloud Development Kit (AWS CDK) is an open source software development framework to model and provision your cloud application resources using familiar programming languages.
The AWS CDK lets us describe all of our cloud resources using code, and deploy them to AWS easily. This is useful for developers because it allows us to group our resources together. This enables us to tear down or update everything related to the scraper (database, API) at once, reducing the chance of potential mistakes. Another benefit of the CDK is the ability to version control your infrastructure and roll back to an old version if something goes wrong. This makes it a powerful tool for teams.
Creating your AWS Account and IAM User
If you haven’t already got an AWS account, you will need to create one and configure your security credentials.
Getting Started with the AWS CDK
Now we are all set up with our AWS credentials, we can get set up with the CDK. The AWS CDK is developed at Amazon with TypeScript, so we can install it globally from NPM.
npm install -g aws-cdk
You can then create a new AWS CDK project by invoking cdk init in an empty directory. Since we will be writing our Lambdas in JavaScript, we’ll use the JavaScript CDK language option as well. The AWS CDK also supports several other languages such as Python, Java and C#. Let’s run the following to set up our project.
mkdir aws-cdk-scraper
cd aws-cdk-scraper
cdk init app —language javascript
cdk bootstrap
That’s it! The CDK will create some files and directories for us, as well as set up the relevant config in AWS and we are ready to start building. We’ll come back to the CDK whenever we are ready to start deploying our resources in the cloud, but now it’s time to..
Design our Scraper
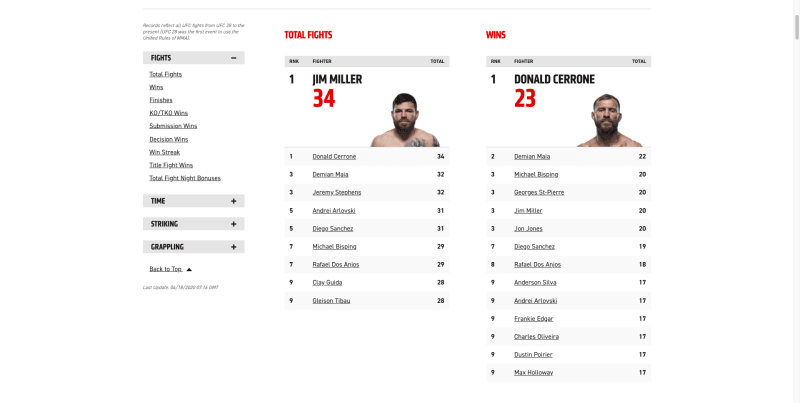
When programming any web scraper, it is imperative that you know the structure of the HTML of the webpage that you are trying to scrape. You can see this by using the developer tools in your preferred browser.
If you look at http://statleaders.ufc.com/ you will see it looks like this:
We want to scrape each section of this site and populate our database with the data inside each section. Let’s break it down:
-
Get the title of the section (Total Fights, Wins, etc)
- Iterate through the top 10 fighters for that section
- Write each fighter into the database with their name, statistic, leaderboard position, and value for that statistic. For example:
{ name: “Donald Cerrone”, statistic: “Wins”, value: 23, position: 1 }
We know our steps. Let’s write our scraper!
Coding the Scraper
In order to build our scraper, we will need to install some modules from NPM.
cheerio
Cheerio is a library that parses markup and exposes a simple, jQuery-like API. It’s a very popular choice for web scraping with JavaScript. We will be using it to parse the HTML we fetch from the UFC website.
node-fetch
We need to make an HTTP GET request to fetch the HTML from the UFC website so we can parse it. Feel free to use your library of preference here, or even the native node http module. We will be using node-fetch in this tutorial for our code examples.
We will store our scraper code in a src directory in the root of our project. Let’s create that and install the modules above. We need to install these modules in the src directory so that they will be available in the AWS Lambda environment when we deploy our code to the cloud.
mkdir src
cd src
npm init -y
npm i —-save cheerio node-fetch
Next up, we can create a scraper by defining the src/scraper.js file with the code below. Please take some time to read the comments and understand the control flow.
// src/scraper.js
const cheerio = require("cheerio");
const fetch = require("node-fetch");

const TABLE_NAME = process.env.TABLE_NAME;
const SCAPER_URL = "http://statleaders.ufc.com/";

exports.scrape = async function (event, context) {
    // fetch the HTML from the UFC website
  const response = await fetch(SCAPER_URL);
  const html = await response.text();
  const $ = cheerio.load(html);

    // get each section
  const resultsGroup = $(".results-group");

  const fighterStatistics = [];

     // iterate over the sections
  resultsGroup.each(function (i, result) {
      // get the name of the statistic (“Total Fights”, etc)
    const statistic = $(result).find("header > h3").text();

      // find each row in the table for that statistic
    $(result)
      .find(".results-table--tr")
      .each(function (i, row) {
        const result = $(row)
          .find("span")
          .map((i, el) => $(el).text())
          .get();

          // get the data from each table row
        const [position, name, value] = result;
        const isHeaderRow = result.length > 3;

        if (!isHeaderRow) {
          fighterStatistics.push({
            name,
            statistic,
            value,
            position
          });
        }
      });
  });

    // let’s print the results for debugging purposes
  fighterStatistics.forEach(console.log);
};
Let’s test it out.
node src/scraper
Looking good! The scraper has scraped the UFC stats website and printed out a list of our results.

Deploying Our Scraper to AWS
Our scraper is now working locally, but we want to get it up and running in the cloud. As mentioned before, we are using the AWS CDK to create the cloud resources we need for our scraper. Let’s dive in.
Creating a Serverless App with the CDK
The scraper will be composed of several components and AWS services:
- AWS Lambda functions for the scraper and our API written in NodeJS
- An API to expose our lambda functions over HTTP using AWS API Gateway
- A DynamoDB database to store and query our data

Let’s start by installing all the necessary dependencies in the root of our project so we can create these resources with the AWS CDK.
npm install @aws-cdk/aws-apigateway @aws-cdk/aws-lambda @aws-cdk/aws-s3 @aws-cdk/aws-dynamodb
Creating Our DynamoDB Table and Serverless REST API
We can now create our dynamoDB table. Update /lib/aws-cdk-scraper-stack.js with the following code.
const cdk = require("@aws-cdk/core");
const dynamodb = require("@aws-cdk/aws-dynamodb");
const lambda = require("@aws-cdk/aws-lambda");
const apiGateway = require("@aws-cdk/aws-apigateway");

class AwsCdkScraperStack extends cdk.Stack {
  /**
   *
   * @param {cdk.Construct} scope
   * @param {string} id
   * @param {cdk.StackProps=} props
   */
  constructor(scope, id, props) {
    super(scope, id, props);

    // Create our DynamoDB table
    const fighterStatsTable = new dynamodb.Table(this, "FighterStatsTable", {
      partitionKey: {
        name: "name",
        type: dynamodb.AttributeType.STRING
      },
      sortKey: {
        name: "statistic",
        type: dynamodb.AttributeType.STRING
      },
    });

    // Create our lambda
    const scraperLambda = new lambda.Function(this, "scraper", {
      runtime: lambda.Runtime.NODEJS_10_X,
      code: lambda.Code.asset("src"),
      handler: "scraper.scrape",
      timeout: cdk.Duration.seconds(20),
      environment: {
        TABLE_NAME: fighterStatsTable.tableName,
      },
    });

    // Create API Gateway API
    const api = new apiGateway.RestApi(this, "ufc-scraper-api", {
      restApiName: "UFC Stats Scraper",
      description: "UFC Stats Scraper API.",
    });

    // call our lambda when someone makes a GET request to /scrape
    const scrape = api.root.addResource("scrape");
    const scraperIntegration = new apiGateway.LambdaIntegration(scraperLambda);
    scrape.addMethod("GET", scraperIntegration);

    // allow the scraper lambda to write to dynamoDB
    fighterStatsTable.grantWriteData(scraperLambda);
  }
}

module.exports = { AwsCdkScraperStack };
As with all software development, it’s usually a good idea to test incrementally. Let’s deploy these resources to the cloud and test that our scraper and shiny new REST API are working by sending an HTTP request to the /scrape endpoint we’ve just created. Deploying with the CDK couldn’t be simpler - just run
cdk deploy
AWS will do its thing - creating your Lambda, DynamoDB table, and API Gateway REST API. When done, you should receive some output in your console with the URL for your new API! Copy the URL to your clipboard.

Before we move on - let’s test our new scraper API with curl.
curl -H ‘Content-Type: application/json’ -H ‘Accept: application/json’ <your-api-url>
You should now see the results of the scrape in your terminal. 🥳
Interacting with DynamoDB
Okay, our scraper is working, but it isn’t really that useful yet. We need to store the data from our scrapes in our database, and provide a way to query this data.
We will be using dynamoDB to store each of the fighters statistics keyed by their name so we can fetch all of the areas where a fighter ranks in the UFC top ten by passing their name to our API. This is not recommended in production apps because a persons name is not always unique.
Writing the Scrape Result into Dynamo
To write the array of results from our scrape into DynamoDB, we must use the AWS SDK for node. We are going to use the DynamoDB DocumentClient which is a nice wrapper for interacting with Dynamo.
We will need to update src/scraper.js to write our scrape results to the FighterStatsTable in DynamoDB.
const AWS = require(“aws-sdk”);
const cheerio = require(“cheerio”);
const fetch = require(“node-fetch”);

const TABLE_NAME = process.env.TABLE_NAME;
const SCAPER_URL = “http://statleaders.ufc.com”;

const client = new AWS.DynamoDB.DocumentClient();

exports.scrape = async function (event, context) {
  // fetch the HTML from the UFC website
  const response = await fetch(SCAPER_URL);
  const html = await response.text();
  const $ = cheerio.load(html);

  // get each section
  const resultsGroup = $(“.results-group”);

  const fighterStatistics = [];

  // iterate over the sections
  resultsGroup.each(function (i, result) {
    const statistic = $(result).find(“header > h3”).text();


    // find each row in the table for that statistic
    $(result)
      .find(“.results-table—tr”)
      .each(function (i, row) {
        const result = $(row)
          .find("span")
          .map((I, el) => $(el).text())
          .get();

        // get the data from each table row
        const [position, name, value] = result;
        const isHeaderRow = result.length > 3;

        if (!isHeaderRow) {
          fighterStatistics.push({
            name,
            statistic,
            value,
            position
          });
        }
      });
  });


  try {
    // Write all the fighter statistics into DynamoDB
    await Promise.all(fighterStatistics.map((result) =>
      client
        .put({
          TableName: TABLE_NAME,
          Item: result,
        })
        .promise()
    ));

    return {
      statusCode: 200,
      headers: {
        “Content-Type”: “application/json”,
      },
      body: JSON.stringify({
        results: fighterStatistics,
      }),
    };
  } catch (error) {
    return {
      statusCode: 500,
      body: JSON.stringify(error),
    };
  }
};
Let’s test this out.
curl -H ‘Content-Type: application/json’ -H ‘Accept: application/json’ <your-api-url>
If you check your DynamoDB console in AWS , you should be able to see the results from the updated scraper which is now successfully persisting to our database!
Querying DynamoDB
Now that we have results in Dynamo, we now want to query these results from our Fighter Statistics Table. Since we've used a composite key, this enables us to query using a fighters name, and get back all the statistics for which they are in the top 10 of all time in the UFC. Let’s start by creating a lambda at src/queryStats.js that will query the results from Dynamo.
const AWS = require("aws-sdk");

const TABLE_NAME = process.env.TABLE_NAME;

const client = new AWS.DynamoDB.DocumentClient();

exports.query = async function (event) {
  if (event.body) {
    const body = JSON.parse(event.body);
    const result = await client
      .query({
        TableName: TABLE_NAME,
        ExpressionAttributeNames: { "#column": "name" },
        KeyConditionExpression: "#column = :name",
        ExpressionAttributeValues: { ":name": body.name, },
      })
      .promise();

    return {
      statusCode: 200,
      headers: {
        "Content-Type": "application/json",
      },
      body: JSON.stringify(result.Items),
    };
  } else {
    return {
      statusCode: 400,
      headers: {
        "Content-Type": "application/json",
      },
      body: JSON.stringify({
        message: "No Fighter Name Provided.",
      }),
    };
  }
};
Creating our new API in AWS
Now that we've written the code to actually query the database, we need to deploy it to AWS and put it behind API Gateway so that we can send HTTP requests to it. Update your lib/aws-cdk-scraper-stack.js to create our lambda and attach it to API Gateway at the /fighter path, meaning we can POST to that endpoint to query our data in Dynamo.
const cdk = require("@aws-cdk/core");
const dynamodb = require("@aws-cdk/aws-dynamodb");
const lambda = require("@aws-cdk/aws-lambda");
const apiGateway = require("@aws-cdk/aws-apigateway");

class AwsCdkScraperStack extends cdk.Stack {
  /**
   *
   * @param {cdk.Construct} scope
   * @param {string} id
   * @param {cdk.StackProps=} props
   */
  constructor(scope, id, props) {
    super(scope, id, props);

    // Create our DynamoDB table
    const fighterStatsTable = new dynamodb.Table(this, "FighterStatsTable", {
      partitionKey: {
        name: "name",
        type: dynamodb.AttributeType.STRING,
      },
      sortKey: {
        name: "statistic",
        type: dynamodb.AttributeType.STRING,
      },
    });

    // Create our lambda
    const scraperLambda = new lambda.Function(this, "scraper", {
      runtime: lambda.Runtime.NODEJS_10_X,
      code: lambda.Code.asset("src"),
      handler: "scraper.scrape",
      timeout: cdk.Duration.seconds(20),
      environment: {
        TABLE_NAME: fighterStatsTable.tableName,
      },
    });

    const fighterApiLambda = new lambda.Function(this, "fighterApi", {
      runtime: lambda.Runtime.NODEJS_10_X,
      code: lambda.Code.asset("src"),
      handler: "queryStats.query",
      environment: {
        TABLE_NAME: fighterStatsTable.tableName,
      },
    });

    // Create API Gateway API
    const api = new apiGateway.RestApi(this, "ufc-scraper-api", {
      restApiName: "UFC Stats Scraper",
      description: "UFC Stats Scraper API.",
    });

    // call our lambda when someone makes a GET request to /scrape
    const scrape = api.root.addResource("scrape");
    const scraperIntegration = new apiGateway.LambdaIntegration(scraperLambda);
    scrape.addMethod("GET", scraperIntegration);

    const fighterApi = api.root.addResource("fighter");
    const apiIntegration = new apiGateway.LambdaIntegration(fighterApiLambda);
    fighterApi.addMethod("POST", apiIntegration);

    // allow the scraper lambda to write to dynamoDB
    fighterStatsTable.grantWriteData(scraperLambda);
    // allow the api lambda to read from dynamoDB
    fighterStatsTable.grantReadData(fighterApiLambda);
  }
}

module.exports = { AwsCdkScraperStack };
Now run cdk deploy again to deploy this latest stack.
Querying our API
We can query our new API using an HTTP POST request, with a request body containing the name of the fighter we want to query for. For example, if you wanted to see all the statistics where Jon Jones ranks in the top 10 of all time, you would perform the following curl request.
curl <your-api-url>/fighter -X POST -H 'Content-Type: application/json' -H 'Accept: application/json' -d '{ "name": "Jon Jones" }'
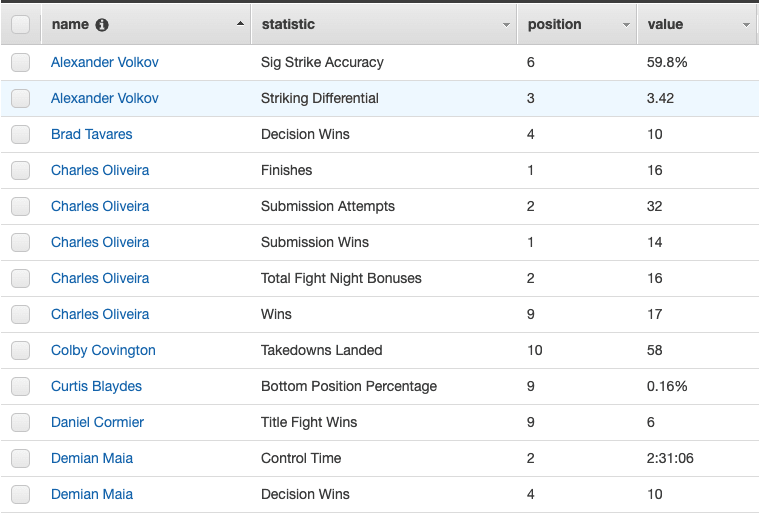
You should get back the following results:
[
    {
        "value": "0.08%",
        "statistic": "Bottom Position Percentage",
        "name": "Jon Jones",
        "position": "3"
    },
    {
        "value": "10",
        "statistic": "Decision Wins",
        "name": "Jon Jones",
        "position": "4"
    },
    {
        "value": "1463",
        "statistic": "Sig Strikes Landed",
        "name": "Jon Jones",
        "position": "6"
    },
    {
        "value": "95.0%",
        "statistic": "Takedown Defense",
        "name": "Jon Jones",
        "position": "2"
    },
    {
        "value": "14",
        "statistic": "Title Fight Wins",
        "name": "Jon Jones",
        "position": "1"
    },
    {
        "value": "5:40:15",
        "statistic": "Total Fight Time",
        "name": "Jon Jones",
        "position": "9"
    },
    {
        "value": "13",
        "statistic": "Win Streak",
        "name": "Jon Jones",
        "position": "2"
    },
    {
        "value": "20",
        "statistic": "Wins",
        "name": "Jon Jones",
        "position": "3"
    }
]
Nice one! Looks like everything is working as expected 😃
Wrapping Up
We scraped the UFC website in this particular case, but these concepts are applicable to any web scraping you may want to do. Feel free to check out the full code for this tutorial here on GitHub or reach out to me on Twitter.
Thanks for reading!

Top comments (0)