
Real-life problem: Mosquitos enter your bedroom at night, but electrical Mosquito killers consume electricity (and cartridges) all day. So let's put a smart plug in the middle and schedule the Moskito killers to run in the evening only.
If that's all you want, you can do it from an App. In the Hue App, you can create a zone for your mosquito killer and create an automation like this:

But we're programmers! So if you want finer control or create automations with devices from different IoT manufacturers, you can control individual plugs with node-red. It comes pre-installed on raspbian, or you can install it locally or in the cloud. I've used a Philips Hue smart plug because I've played around with Hue lights and node-red before. If you're using a different manufacturer, you can search the extensive library for a node.
Installing packages in node-red
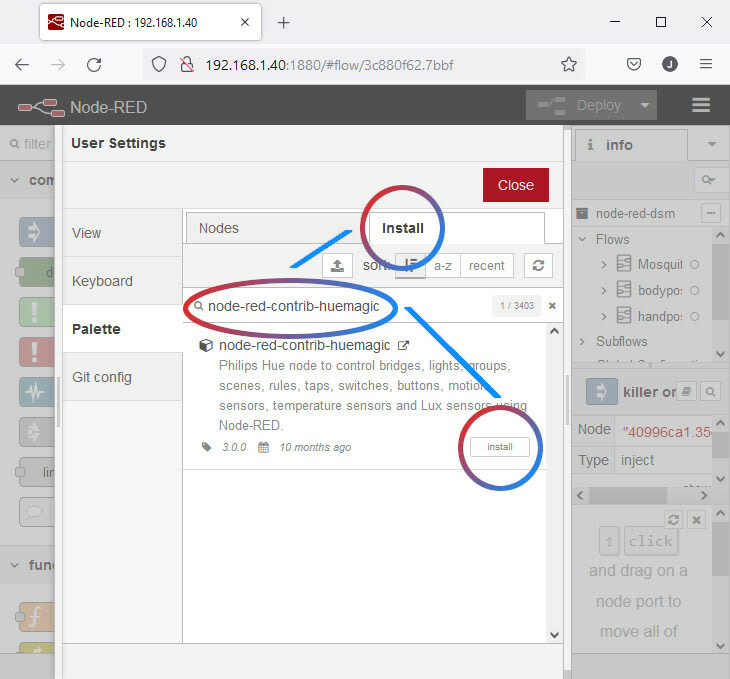
Navigate to the URL of your node-red installation, which is http://localhost:1880 if you've installed it locally. Note that the port 1880 is most often also the port when you run it on a Raspberry Pi or NAS on your network. Head to "Manage palette" in the side-menu on the right.

Here you can see which nodes are available in your installation, in which package they come, or you can install new packages. The nodes for the Hue lights can be found in the node-red-contrib-huemagic package. When you click "install" the package will be downloaded and the nodes in it will be available shortly afterwards in the palette on the left of the main screen.
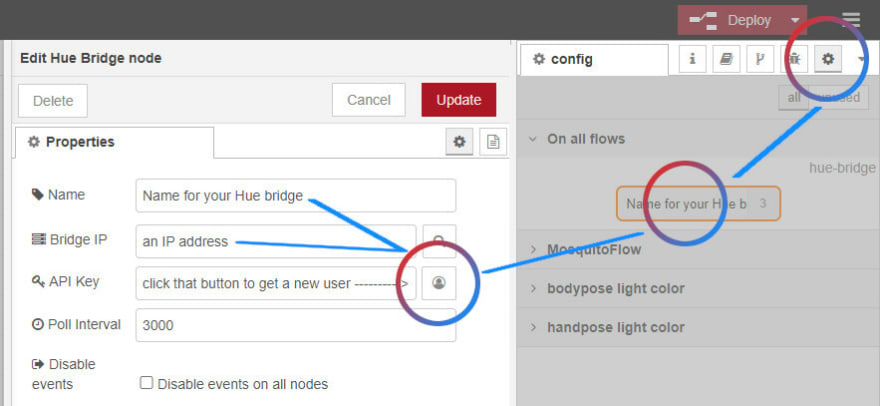
Connecting node-red with the Hue Bridge
Before we can use them, we need to configure the connection to the hue bridge, which is accessible from the "config" tab in the menu. A click on the "search"-icon will look on the local network for an available hue bridge, so you don't have to manually enter the IP. Once you have the IP, you can generate an API key by clicking on the "user" icon, and pressing the bridge's button within 20 seconds.
Adding and connecting nodes to send messages
From the panel on the left we drag and drop two inject nodes for testing the smart plug. Clicking the little rectangle to the left of the node will send a message into the flow, but for now the nodes are unconnected. Double-clicking the flow opens a property panel. The inject node which has msg.payload set to false switches the plug off, the node which has msg.payload set to true switches the plug on. The Name is just for yourself to tell the nodes apart.

Accessing a node's documentation
How do you know what msg.payload should be? That depends on the node that receives the messages. The smart plug can be controlled with the "Hue light" node (because switching on/off is the same behaviour for lights and for switches). To receive messages from the inject nodes, it needs to be connected. All messages flow left to right, so with the "Hue light" having one on the left and one on the right, it means that this node can also send messages. The current state "turned off" is displayed on the bottom. To find out what goes in and out of the "Hue light" node, we can look at the documentation, which you can find by clicking on the book icon.

Debugging a flow
From the documentation we can learn that the "Hue light" node has a "simple" and "extended" way of interpreting msg.payload. In the simple mode it takes a boolean (true/false, 1 or 0), in the "extended" mode a JSON object. The output always has the form of the "extended" JSON object, which you can try out by using a debug node, and checking the output in the "debug" tab. As a plus, if you have several debug nodes, hovering over a debug message will highlight the corresponding debug node in the flow.

The Mosquito Schedule mixed with our schedule
Now I don't know when exactly Mosquitos are active, but I roughly know mine (Sometimes I have the feeling they're active all night). It's not always regular and sometimes I'm not at home, so it would be great if the plug switched off then as well.
So as a basis a time-based schedule is necessary, and there are some options: You can install a scheduler-package that's configured inside the flows, or you could try out a dashboard scheduler. You can then still combine that with other nodes. With one of the schedulers and the HueMagic nodes alone we could set up a combined logic including a motion-, temperature- or brightness sensor. But with this article you should have the basics of setting up your very own Mosquito Killer Smart Home Defender™🤺🛡️ ... Let me know what you've built! 😊
While researching for this post I found...
This is also not the only way to protect yourself from mosquito bites. There are repellants and there's even
research about which type of bug is attracted by which type of light. So dimming your LEDs red apparently makes your home less attractive to blood-sucking mosquitos, but may attract other creatures of the night 😉.
Photo credits for part of the header go to:
Wolfgang Hasselmann


Top comments (0)