Overview
In this blog post, we are going to talk about what is Bastion Host and why do we need one. Afterward, we are going to deploy a proof of concept using AWS CloudFormation.
Bastion Who?
Although toil is highly discouraged, sometimes we need to ssh into an instance in order to do some kind of debugging. As a result, we need to expose that instance to the whole internet and that is no bueno. One way to prevent this from happening is to implement a Bastion Host.
A bastion host is a server whose purpose is to provide access to a private network from an external network, such as the Internet.
Why do we need one?
The idea of implementing this is being able to reduce the attack surface of our
infrastructure by doing 2 things:
- Removing the application instances (could also be a database instance) or other servers that are not meant to be open to the world.
- Being able to harden one machine (the bastion) and not each and every other server in our infrastructure. So, in this case, the m̶o̶r̶e̶ less the merrier.
Another benefit that the Bastion Host can have is logging in order to prevent repudiation. This works because engineers have their own key pair. As a result, you can keep track of what Alice and Bob did during their last session.
What are we going to deploy?
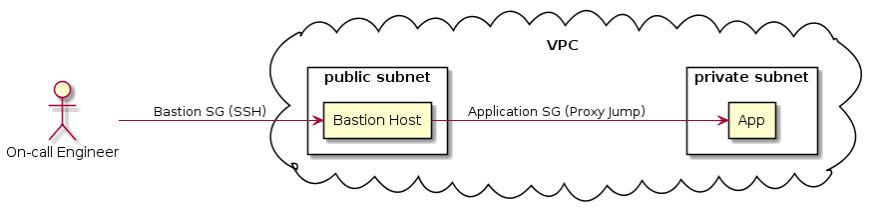
The idea is that our on-call engineer will ssh her way into the App Instance via Bastion Host. In order to replicate this setup, we need to deploy 15+ AWS resources, but let’s focus on the ones that are in the diagram:
VPC
We need one so we can create the virtual network where our instances will run
Private Subnet
We need a network that can only receive internal traffic (we only need a private IP address)
Public Subnet
We need a network that can receive traffic from the Internet (we need a public IP address)
Bastion Security Group (SG)
We need it to make sure the Bastion Host Instance can receive traffic from port 22 (SSH).
Application SG
We need to make sure our App Instance can receive traffic from our Bastion Host SG.
Bastion Host (EC2)
We need a server that we can use as a Bastion Host
App Instance (EC2)
We need a server that is not exposed to the internet
Getting Started
You can find the relevant files in GitHub.
Prerequisites
- Make sure you have an AWS account
- Make sure you have a user with the appropriate roles
- Create a key pair in the us-east-1 availability zone. We will use the keys to connect to our instance.
main.yml
We can divide this file into 3 sections:
- Parameters: Where we import variables from deploy.sh (more about it coming next) so we can use them with our resources’ attributes.
- Resources: Where we define all the AWS resources that we need for this setup.
- Output: If everything goes according to plan, we want to import the IP addresses from our created instances.
Remember: Although this is a simple setup, we need at least 15 AWS resources to make the desired implementation work. For example, we need an Internet Gateway so our Bastion Instance can talk to the internet and we need a Route Table to direct network traffic.
Set up the vars
# deploy.sh
STACK_NAME=bastion-poc
REGION=us-east-1
CLI_PROFILE=<your-aws-profile-with-an-appropiate-role>
EC2_INSTANCE_TYPE=t2.micro
KEY_NAME=<your-key-pair-name>
Run the deployment script
In this script, we set up our credentials and we run a command to deploy the main.yml template to AWS. If everything goes well, you should expect 2 IP addresses: One from the Bastion Instance (public) and one from the App instance (private).
Go to your terminal and run the following:
./deploy.sh
Note: If you want to debug or see what happened, go to the respective
CloudFormation stack in the AWS console.
Config your ssh config file
Now that we have our implementation we are ready to pray to the demo gods and test our implementation. But before ssh’ing anywhere, we need to do one more thing.
Go to ~/.ssh/config and add the following hosts:
...

### The Bastion Host
Host bastion-host-poc
 HostName <public-ip-from-output>
 User ec2-user
 Port 22
 IdentityFile ~/.ssh/<your-key-pair-private-key>\### The App Host

### The App Host
Host app-host-poc
 HostName <private-ip-from-output>
 User ec2-user
 IdentityFile ~/.ssh/<your-key-pair-private-key>
 ProxyJump bastion-host-poc
SSH’ing your way in
If everything went well (and if we prayed to the demo gods) we should be able to
ssh to the App Instance.
Go to your terminal and ssh into it:
ssh app-host-poc
Voilà. You are inside a machine that is running in a private subnet. Isn’t it
cool?
Wrapping it up
Remember, this is just a Proof of Concept. For example, the Application Instance
can still send traffic to the whole world (do you really want that?). Similarly,
the Bastion Instance has yet to be hardened.
Implementing a Bastion can be useful for your current processes, especially if
you have some instances exposed to the world and/or you want to control
who can ssh into your infrastructure.
Although you probably have a more sophisticated setup, a Bastion Host might be
the right solution for you and this could be the kickstart of your
implementation.
Also published on Medium.
Resources
Amazon EC2 key pairs and Linux instances
How to Record SSH Sessions Established Through a Bastion Host
Diagrams were made using: https://www.planttext.com/


Top comments (0)