![Cover image for Point to Site (P2S) VPN Connection & Gateway Transit [Azure]](https://media2.dev.to/dynamic/image/width=1000,height=420,fit=cover,gravity=auto,format=auto/https%3A%2F%2Fdev-to-uploads.s3.amazonaws.com%2Fuploads%2Farticles%2F3va1xeg1bff276d2kptw.png)
Introduction to Point to Site VPN Azure:
- A Point-to-Site (P2S) VPN connection helps to create a secure connection tunnel to your virtual network (VNet) from an individual client computer device.
- P2S VPN is established by initiating it from the client’s computer device. This solution is useful for WFH (Work From Home) employees who want to connect to Azure VNets from a remote location.
- P2S VPN is also a useful solution to use in place of S2S VPN when you have only a few clients that want to connect to a VNet. **
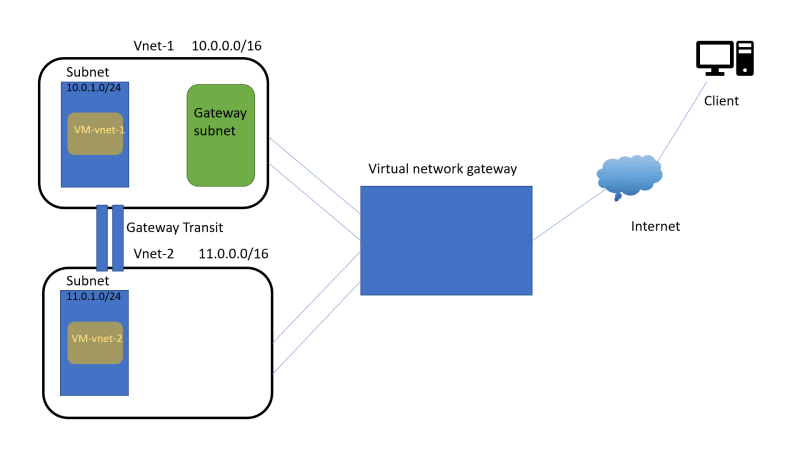
Layout Diagram
LAB WORK
Ist of all create your Resource in the Resource Group

RG-name-Resource.
Central-us

After That Create Two Virtual network naming Vnet-1 and Vnet-2 inside your Resource.

Inside Vnet-1[10.0.0.0/16] create a subnet[10.0.1.0/24]

Inside Vnet-2[11.0.0.0/16] create a subnet[11.0.1.0/24]


Now we Have Two Virtual Networks

Inside VNet-1 , Create a virtual machine

Name= VM-Vnet-1
Central-us


Public ip =none.

Similary Inside VNet-2 , Create a virtual machine
Name= VM-Vnet-2
Central-us


Public ip =none.


Now Create a Gateway subnet inside your Virtual network Vnet-1


*Search For Virtual Network Gateway And create it
Go to Virtual Network Gateway service from Azure portal and click on create to fill the data
*

_Virtual-network-gateway as gateway name, now select the region of your Virtual Network, after that Virtual Network will automatically appear into the Virtual Network Section, SKU as VpnGw1 (includes max 250 connections with 640 Mbps throughput) and keep other options as the default shown in below Screenshot.
_
Name- Virtual-network-gateway
central-us
SKU-VPNGW1
Virtualnet-Vnet-1

Provide the gateway subnet range or else it will automatically create based on CIDR,
public-ip-adress-name-Virtual-network-gateway-ip


** Its will take 25-30 minutes to deploy.**
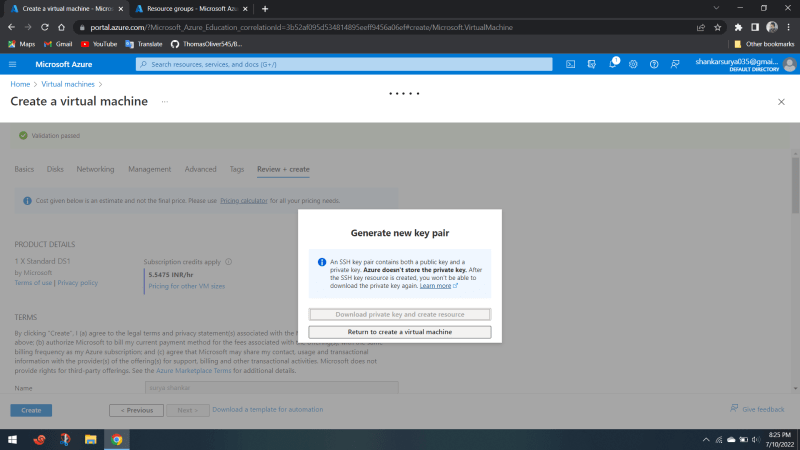
Create and Export Certificates
Generate a Root Certificate
Now open PowerShell and Run as administrator from your local machine to create root and client certificates. Execute the below script in PowerShell to create a root certificate. Once created will be installed in the user certificate app

Create a self signed Root Certificate

Now we need to create a client certificate. Execute the below script in PowerShell. The below script will create a ChildCert certificate and install it in the user certificate app.
Create a Self signed Child certificate

Copy this command and paste it in powershell.

After that Go to Manage user certificate

Click on personal -->  certificate -->P2SRootCert --> Export

[Right-click on root cert inside certmgr console. Click on Export]

Select Base-64 encoded X.509(.cer)


Now go to P2SChildCert --> Export[Right-click on root cert inside certmgr console. Click on Export] --> Yes,export the private key --> password - (any password)

now it will imported to your folder

Configure Point to site Connection
Now open the newly created Virtual network Gateway. To define the Address pool from that end users will get IP. Click on the newly created VPN gateway connection.
-> From the left side Scroll bar click on Point-to-site configuration

-> After that, click on Configure Now
Now provide IP address range for VPN address pool. I will be using 172.25.100/24. In Tunnel Type use SSTP(SSL). IKEv2 VPN can be used to connect from Mac devices. SSTP is only supported on Windows devices. Under Authentication type Select Azure Certificates.
-> No under Root certificates. Under root certificate name type the certificate name and under public certificate data, paste the root certificate content. Open root certificate with notepad. Do not copy —–BEGIN CERTIFICATE—– and —–END CERTIFICATE—– text from the file.
After filling in the information click on Save

**
click on Download VPN client**

Then extract the downloaded file. Check the version of your system for example: 32bit or 64 bit and use file accordingly and click on Run anyway and Yes for install VPN client[Before that install child certificate]


Click on connect. A new pop-up will open Click on Connectthere also. Now if you have followed the above steps properly the connection will be established successfully


In Point-to-site Sessions also, a new session is initiated. Check the IP received from the address pool we specified in configure now tab
Now try to connect to your virtual machine


as per screenshot its showing sucessfully connected
Try to ping another virtual machine in another vnet as created previously.. You will not able to connect..

So to establish a connection we need gateway transit.
Gateway Transit ?
Gateway transit enables you to use a peered VNet’s gateway for connecting to on-premises instead of creating a new gateway for connectivity.
As you increase your workloads in Azure, you need to scale your networks across regions and VNets to keep up with the growth.
Gateway transit allows you to share an ExpressRoute or VPN gateway with all peered VNets and lets you manage the connectivity in one place. Sharing enables cost-savings and reduction in management overhead.

Go to Vnet-1 --> peering --> Add

This Virtual network
Name it and under virtual netork gateway select : use this vnet gateway
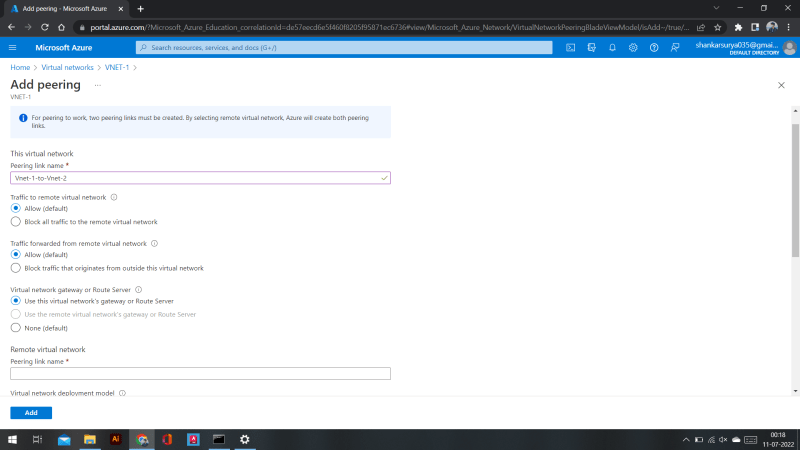
*Remote virtual network
*
- Name it
- under virtual network select Vnet-2
- virtual netork gateway select :use the remote vnet gateway.

After that you will see a gateway enable status
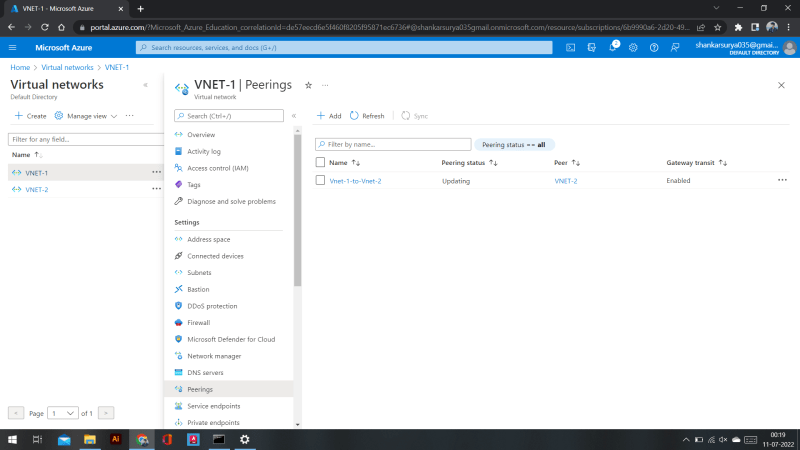
Now you can able to ping another network machine


Top comments (0)