
Why use Amazon RDS?
Amazon RDS is a fully managed service for running relational databases on Amazon Web Services (AWS). It has support for six different database engines, including commercial options such as SQL Server and Oracle.
With Amazon RDS, your database operations are managed by AWS, leaving your team free to focus on innovation. Amazon RDS handles instance failover, data backups, and software updates, so you can enjoy the efficiencies of the AWS Cloud for a fast and reliable database option.
AWS Database Migration Service (AWS DMS) is a cloud service that makes it easy to migrate relational databases, data warehouses, NoSQL databases, and other types of data stores. You can use AWS DMS to migrate your data into the AWS Cloud or between combinations of cloud and on-premises setups.

Steps
- • First of all create a client database using SQL schema , which will be
- present inside
- on premise server or inside client local computer.
- • Create your own VPC [Network] and SUBNET [Sub-Network] on AWS.
- • Attach a Internet gateway to VPC.
- • Create routes table and subnet association.
- • Create a Amazon Linux server with SQL configuration [Source server]
- inside your Subnet.
- • Attach a volume to that server.
- • Copy that database to your Linux server.
- • Create a RDS [Target].
- • Now create a Database migration service.
- 1. Create a Replication Instance
- i. Initiates the connection between the source and target databases.
- ii. Processing power to migrate data from source database to target.
- 2. Specify Source and Target Endpoints
- I. The source and target data stores can be on an Amazon EC2 instance,
- an Amazon RDS DB instance.
- 3. Create a Task
- I. Create new tables, tables to migrate.
Source Server
Create an Instance [Sql server standard edition]

Here I have used t3xlarge type
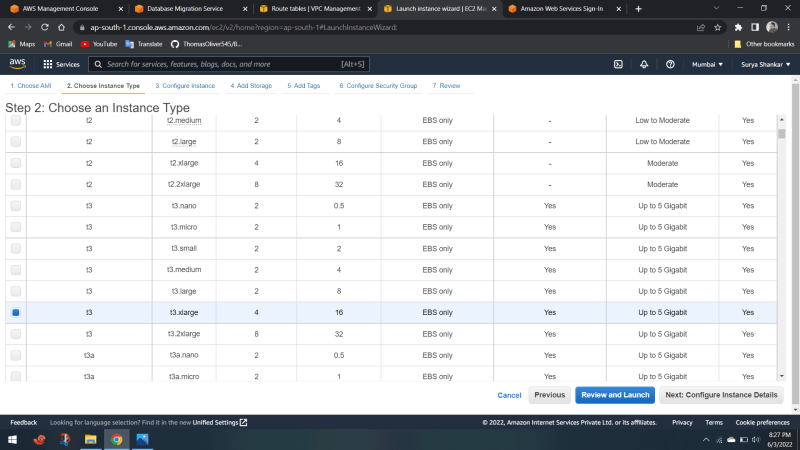
After that create a volume and attached to that server.

When you’ve successfully connected to the Linux EC2 instance running SQL Server, execute the following so you can run commands using the root user account:
sudo su
To view volumes and devices you’ve added to the Linux instance, run lsblk to see a list of all Amazon EBS volumes that you attached during launch.
Because this AMI includes SQL Server 2017, you reset the SA password for the SQL Server instance. To do this, first stop the SQL Server instance by using the following command:
sudo systemctl stop mssql-server
Then run the following mssql-conf script to reset the SA password:
sudo /opt/mssql/bin/mssql-conf set-sa-password
Format the volume of your choice to use the ext4 file system using the following:
sudo mkfs –t ext4 /dev/devicename
For example: sudo mkfs -t ext4 /dev/xvdc

Create your directory. This example uses /SQLServerData:
sudo mkdir /SQLServerData
Mount the volume to the /SQLServerData directory using the following (we use the /dev/xvdc volume for this example):
sudo mount /dev/xvdc /SQLServerData
Change the owner and group of the directory to the mssql user:
sudo chown mssql /SQLServerData
sudo chgrp mssql /SQLServerData
To change the settings, use the following steps (the example uses /SQLServerData as the default data directory):
sudo /opt/mssql/bin/mssql-conf set filelocation.defaultdatadir /SQLServerData
After you complete the preceding step, SQL Server needs to be restarted to apply the new settings. Before you do so, let’s also mount a different volume to a directory specifically for database log files.

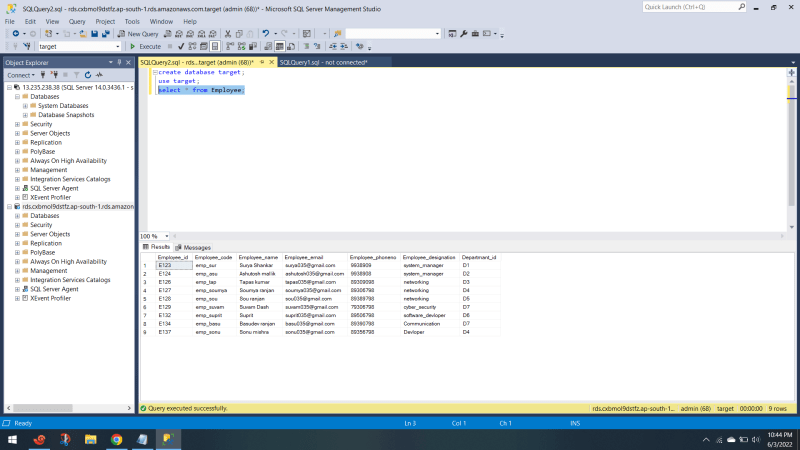
Now connect to mysql using server public ip,username & password

Create a sql database

Now our Source server is ready
1)Lets create AWS RDS [Target server]

Make your rds public as we have to connect it to my sql
If you create it as private then your have to setup openvpn to access it.
Before that create your subnet group

Here create a database.
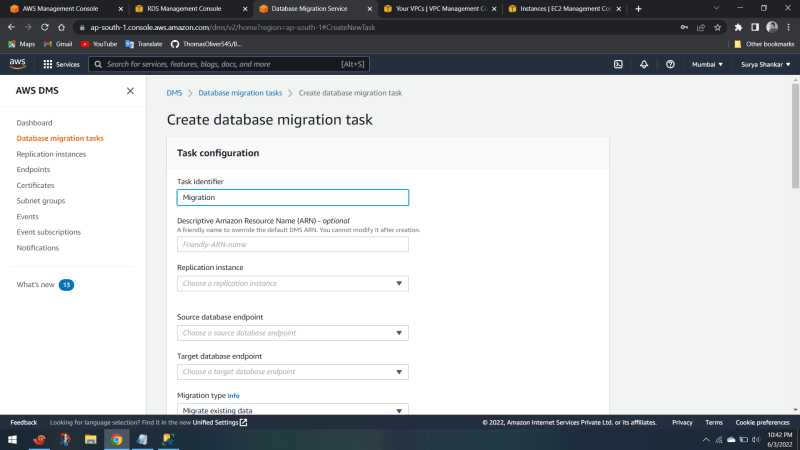
2)Create a replication instance in AWS database migration services


3) Create a source and target endpoints for your data migration


4) Create a Replication in AWS DMS[Data migration task]


After 100% status you can see your whole data got migrated to RDS

Top comments (0)