The identification of users is the second pillar of behavioural tracking, together with the understanding of events.
Identifying users precisely makes you able to track the complete journey of any user to understand why exactly (s)he signed up or goes away, making you able to uncover hidden causes that you can improve or use to improve your KPIs and your bottom line.
But the identification of users is not so simple as it may seem at a first look.
What does it mean “Identify customers”
This is something you simply cannot do with Google Analytics as it explicitly prohibits you to do this kind of profiling as it has deep GDPR implications (of which we will speak later in another post).
This is the core functionality of each behavioural analytics tool: identify customers and their journeys using your app.
This is logically the next step in your journey (  ) to instrumenting tracking on your SAAS application.
Identifying users is a complex thing: many scenarios may happen in the real world, and to some of them maybe you didn’t think too much.
Amplitude sums up the troubles very well:
Tracking unique users is a complex process because users can log in and out of your product, browse anonymously, and use multiple devices.
It also offers a good starting list of possible scenarios:
- No User ID is assigned;
- The user ID is assigned after anonymous events;
- Same User ID on multiple Device IDs, with no anonymous events;
- Multiple User IDs on the same Device ID;
- Same User ID on multiple Device IDs, with anonymous events.
As told, this is only a starting list and Amplitude explains them in detail in the linked page.
In general, the track happens for users and for devices.
Woopra explains, too, the challenges we will face in understanding who did what on our website or in our native app:
The Woopra system needs to be able to tell which person profile performed an incoming tracked action (or property update.) The problem is that people in Woopra can exist in a number of different levels of being identified. They could be a first-time anonymous visitor to a website, or a long time paying customer.
Sometimes a person will make a few visits to your site anonymously over a year leading up to the time they decide to sign up for your newsletter, giving you their email. Sometimes this can even mean that what was previously considered to be two different people in Woopra, is now known to be a single person–perhaps originally from two devices–requiring a merge of the two profiles.
[…]
Another issue is that if you want to track anonymous behavior, and even attribute it to known people in the future as they identify themselves to you–a key value proposition in the Woopra system–then using a single id value per person become more complex.
Similarly, if you want to track behavior across channels–another key value proposition of Woopra–then it is basically impossible to maintain the database ID for the profile between your website, and, say, your email marketing automation service.
[…]
The GoalWoopra needs to be able to take whatever information is available about a person performing the action in an incoming track request, and use it to determine with the highest accuracy possible, which other actions this person has performed, and thus to which profile the incoming actions belong.
If a user is coming anonymously to your website, all you have is a cookie, which is conceptually, a device ID pointing to that browser on that machine. It will be the same next time the person visits your site from that machine and that browser, but if they visit from a different browser, or on their phone, for instance, you will have a new cookie. So Woopra needs to be able to use multiple cookies to eventually refer to one person, assuming that one day you find out who that person is and can associate all their devices with them.
Similarly, you may have an incoming “Email Sent” event from your email marketing tool that is not from a browser and has no cookie. This event has an email address–another major identifier. Woopra needs to eventually (when the person signs in with that email address on their browser with that cookie they had in the past) be able to consider the actions performed by cookie 1, cookie 2, and email 1 all to belong to the same profile.
So, the edge combinations are
- Same user on different devices on one side;
- Different users on the same device on the other side.
A third factor to take into consideration in SAAS products is the domain: in fact, very probably, you will have at least two different domains, one for the application itself, one for the documentation, the marketing pages, etc.
So, the three factors to consider are:
- Device identification;
- Domain navigated;
- User identification.
Wanting to be extremely synthetic, the real meaning of “user identification”, after all, is associating a user session with a single person and only one, or a sequence of sessions, or more sequences of sessions – oh damn, how complex is it? ? -, also cross devices ? and cross domains. ?
Why do you need to identify users one-by-one
As it is so complex to identify users one-by-one, it is helpful to understand the “Why”: why are we lavish all these energies in something so complex?
The answer is simple: knowledge!
The Customer is the foundation of every business on the Earth and knowing them better than themselves is fundamental to grow your business.
Knowing them with such degree of details opens up possibilities that you do not even imagine:
- You can understand exactly why each of your customers didn’t upgrade to a premium feature;
- You can understand which have in common the customers who upgraded to a premium feature;
- You can understand which features are most used by which customers and what they have in common;
- You can understand why a customer downgraded (maybe (s)he didn’t found a helpful article in your knowledge base after having navigated it for a lot of time?);
- You can send custom messages to them (MixPanel has a built-in tool for this).
Obviously, those are simple examples: the limitations are tied only to the detail degree of your implementation, your imagination and the current necessities of your application.
Using the words of Amplify, identifying users concretely means this:
Products that have some kind of login system can track users even if they switch devices. Though assigning User IDs is optional, we recommend that products with a login system or a UUID (unique user identifier) system assign a User ID.
With a User ID, Amplitude can match events across multiple devices under the same user (same User ID). Furthermore, a User ID does not need to be assigned immediately. A user’s event data will be merged on the backend so that all anonymous events up to the point of User ID assignment will be connected to the assigned User ID (assuming the Device ID is consistent).
Basic concepts of Device Identification
All the tools that track users use the same identical approach.
There are basically two main categories of devices on which you track users:
- A browser
- A native application.
In Tracking Unique Users, Amplitude explains in details how the device identification happens.
This is what they say about:
Device ID: We will pull the IDFV or generate a random alphanumeric string that ends with the letter ‘R’ for Device ID and is stored locally in the browser’s cookie or mobile device. However, there is a flag that you can toggle to use the Identifier for Advertiser (IDFA for iOS) and the Advertising Identifier (AdID for Android) as the Device ID.
- iOS: If the Device ID is set to the IDFA, then it will persist across installs. Note: iOS users have the option of resetting their IDFA on their devices at any time. As of iOS 10, if a user limits ad tracking, then this would send an IDFA of all zeros. Amplitude will instead set Device ID as IDFV or a randomly generated string.
- Android: If the Device ID is the AdID, then it will persist across installs. Note: Android users have the option of resetting the AdID on their devices at any time.
- Web: The Device ID will be set to a randomly generated UUID by default. It will persist unless a user clears their browser cookies and/or is browsing in private mode.
So, let’s recap.
IDFV: IDentifier For Vendor. This is a unique identifier available only on Apple devices. Used for tracking in-app. This can be changed to a new one by the user if they want to, but only if they actively change it. This remains the same if the user, for example, resets the device.
IDFA: IDentifier For Advertiser. This is a unique identifier available only on Apple devices. Now it is called “Advertiser IDentifier”, but this is practically irrelevant as the behaviour stays the same. Used for tracking in-app. This ID changes if the user resets the phone. It is equal to a series of zeroes if the user opts out from the tracking. If received as all zeroes, the tracking software generates a random string.
AdID: Advertiser IDentifier. This is a unique identifier available only on Android devices. Used for tracking in-app. If the user opts out from the tracking, this ID is a simple random string that changes every time, making the tracking impossible.
So, in conclusion:
- the tracking in web browsers is done through a random string set in cookies;
- the tracking in native apps is done using the identifiers provided by the vendors of the device (or a random string if the identifier is not available).
IDFV, IDFA, AdID or a random string stored in a cookie are used to uniquely identify any single device from which your site is being visited or your app is being used.
Those identifiers can change over time if the user decides to change them or if (s)he doesn’t want to be tracked anymore by anyone.
This means that if they are anonymous (you haven’t identified them) you cannot track them if they don’t want you to do (technically you continue to track, but you have a lot of unique visitors also if concretely you have only one visitor).
But, once they identify themselves on your system, you can start tracking them again using the User ID you set and associate with their tracking profile the previous anonymous events they fired (More about the User ID – and other ways of identifying users – in a bit).
Coming to names:
- Amplitude call this ID “Device ID“;
- MixPanel call this ID “Distinct ID” (read also this);
- Woopra calls this with various names, depending on the context.
Basic concepts of cross-domain User identification
Identifying unique users across your domains is crucial as this permits you to follow the journey of your users between all your properties, making you able to understand if a user, for example, becomes a customer after (s)he read a piece on your support site.
It is common for a SAAS product to have more than one domain or more than one subdomain.
At TrustBack.Me, for example, we have the main app on www.trustback.me while other subdomains like aiuto.trustback.me or ciao.trustback.me contain the documentation or the marketing site.
The same we do also here at SerendipityHQ.com: io.serendipityhq.com contains posts about our R&D, www.serendipityhq.com contains our marketing site and there are other sub-domains that contain other kinds of information.
Woopra explains very well the importance of cross-domain tracking:
The importance of cross-domain tracking is to not only store your data in a single project, but to also maintain a visitors session when they explore unique domains. The events of previously identified visitors should be monitored and associated with the same customer profile, regardless of the domain they visit. This is the key to providing a comprehensive customer journey.
When a visitor visits an alternate domain, the cookies associated with that visitor are inaccessible, which causes split profiles in your Woopra project. Without the cookie to associate to the visitor, Woopra has no way of knowing that the visitor on the new domain is the same as the visitor from the previous domain. Woopra would require the visitor to again identify themselves by signing up to an email list or logging in to the platform.
This is the problem that cross-domain tracking solves. When configured correctly, Woopra will attach the cookie value to the url of all specified domains, allowing it to associate that cookie with the visitor from your previous domain.
The main concepts are those:
- Use only one project to track all domains of interest;
- Pass the User ID from one domain to the other using the query string.
Really simple.
Here is the relevant information about cross-domain tracking with each of the three tools:
Understanding when a User is identified
The first thing you should understand when thinking of Users’ identification is to find the exact moment in your app that permits you to be sure the User is a specific person.
The starting point is always your app as, after all, is your app that identifies Users and so is its responsibility to tell the tracking tools when it finds the person behind the data collected.
At a first look, you may think that your identification happens when you have an email.
But this is not always the case.
If you think deeper at the email, you realize that this is a variable ID: practically every application, in fact, permits to change the email address.
This means that you cannot rely on it to track a user across sessions, domains and devices, as, if (s)he changes the email in your app, then you lose the link between subsequent events (s)he performs in your app and all the previous ones, making the reporting difficult in the best cases, impossible in the worst ones.
So, you should not rely on email for identification.
Instead, you should use your unique ID: when you create a new user in your app, you always assign it a new unique ID: this is the identifier you have to use.
If your app doesn’t have a unique ID assigned to the users (for whatever reason), then the things get a bit more complex and sometimes you have to simply deal with this fact and take it into consideration when reporting and analyzing data.
Amplitude offers two important recommendations about setting User IDs:
- Do not set User ID if there isn’t one. For example, setting a User ID to the string ‘None’ to multiple users will group all events under that ‘None’ User ID together (e.g. any user with the ‘None’ User ID is assumed to be the same single user). You can always set the User ID later, and Amplitude has a built-in logic that will merge the anonymous events to the later identified user (see Example 2).
- Do not assign a User ID that might change. If someone’s email can change within your app, then it is not a good idea to set it as a User ID as Amplitude will mark the person as a new user if they change their email.
This told, let’s see which is the default user journey that makes him/her pass from the status of “anonymous visitor” to the status of “identified user”.
The easiest user’s journey: no cross-domain nor cross-device tracking
Let’s start simple and consider the simplest journey that any user follows on any app or website:
- Lands on one of the pages of the website or opens the app;
- Signs up;
- Logs in;
- Uses the website or the app;
- Logs out.
This is the default journey of any user on any app or website.
Nothing complex to understand here: we are considering the use of a single device and the navigation of a single domain/app. No cross-device or cross-domain tracking.
We will start with this scenario analyzing how it is handled in each of the three tools we are considering.
We will call this the “Default User’s journey”.
Once we will have understood how to handle this Default User’s Journey, then we will go one step further and will analyze how to take into consideration cross-domain and cross-device tracking.
What do we want to track in the Default User’s Journey
Before making our hands dirty, let’s better understand what we are trying to accomplish.
- We want to create a user profile on our tracking tool once the Visitor signs up (step 2);
- We want to link with this user profile all the events (s)he fired while (s)he was anonymous (step 1);
- We want to track all subsequent events, linking them to the User profile we created (step 3 and 4);
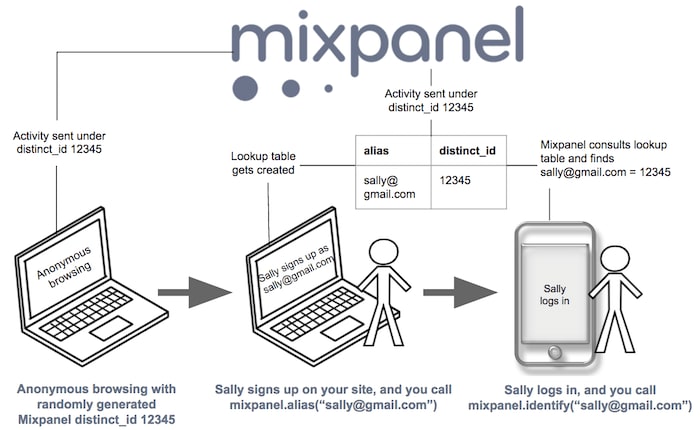
MixPanel has a great illustration that explains exactly what we are trying to accomplish.
We will leave apart the last step: login. In fact, this requires to explain some more things and for the moment we want to leave things easy.
We will address the login problem later.
Let’s start!
Note: All the three tools offer a wide variety of SDKs to make you able to integrate your app into whatever language it is written in.
In those examples, we will use the Javascript SDKs as the examples take into consideration the implementation in a web app.
Anyway, the examples can be adapted to be used in any other language.
How to track the Default User’s Journey in Amplitude
In the Javascript Documentation of the Amplitude’s SDK, there is a section named Setting Custom User IDs.
The process to identify a User is really simple: use the setUserId('USER_ID') method:
amplitude.getInstance().setUserId('USER_ID');
How to track the Default User’s Journey in MixPanel
MixPanel has an overview video you can watch to understand how generally the identification of visitors works on their platform.
MixPanel has two main methods for identifying visitors:
-
mixpanel.identify(); -
mixpanel.alias().
For the moment we will ignore the second method mixpanel.alias(): we will use it later in this post, when we will understand how works in MixPanel the merging of users and visitors.
So, for the moment, we will focus only on the first method: mixpanel.identify(), also if the example from MixPanel uses the second one, too.
How to track the Default User’s Journey in Woopra
In the Javascript Documentation of Woopra, they say we need to call the method identify().
But there are some things to consider:
In order to identify a customer, you need to send their
identify()does not send anything to Woopra, in order to send the properties and identify the visitor, you need to calltrack()after youidentify(), or if you do not wish to track an event, you may callwoopra.push()to send a call strictly with identifying information.
Woopra, too, as Mixpanel did, suggests us to use the email as the identifier: we continue to prefer to use our internal UUID and send the email attached as a User property (more on this debate later).
How to concretely track the users: code example
Now that we know how to identify a user with each of the three tools, let’s make our hands dirty and identify users.
But… there is a thing to consider first: how is your login system structured?
Maybe you have not thought at this too much, but if you do, you can discover that there are three main flows for the login:
- With an intermediate logged in page (where you say something like “Hello [User], you are now logged in. We are redirecting you to [page requested | you user profile]”);
- Without an intermediate logged in page BUT WITH a refresh;
- Without an intermediate logged in page AND WITHOUT a refresh (Single Page Applications – SPA).
Do you understand what I’m saying?
The first flow, shows you a form (on a dedicated login page or in a form on any page): once you have provided your credentials, the system first redirects you to another page where it shows you a “You are now logged in message” and then, maybe, it redirects you to the page you were browsing or to your profile.
The second flow shows you a form for the login: if it is on the page you are browsing (maybe in the top-right part of the page), it refreshes the page and logs you in; if you log in from a dedicated page, it usually redirects you to your profile or main dashboard.
The third flow has any of the steps of the previous flows: whether you use a form on the browsed page or a dedicated page, no refresh happens as all is handled in front-end by a JS library like React or Angular that simply make the call to the login API you implemented and then, once the login is confirmed, update the DOM, all without any refresh nor redirect.
Why are we speaking about this?
Because each flow has its own implementation details: the only constant is the fact that you have to call the method to identify the user.
So, starting from the first flow, this is the easiest to track: simply call the method identify() in the page that confirms the login.
Jumping to the third flow, this case is easy, too: before you update the DOM you need to call the methods to identify the user.
When exactly you call those methods depends on your concrete implementation and framework of choice: unfortunately, I cannot help you more than this.
The most tedious approach to track is the second: no intermediate page and a refresh.
This is the most problematic as you practically have no concrete page where to call the the methods to identify the visitor: after the click on the “Login” button, the user is redirected to another page, but usually this doesn’t render anything and simply send a header to the browser to redirect it to the page from which the “login” button was clicked.
There are many possible ways to identify the user that logs in following this flow:
- Call the methods to identify the users on all pages by simply checking if the user is logged in or not: if (s)he is, then identify him/her;
- Call the
identify()method using the server-side SDKs: the controller that logs in the user, other than set the cookie, calls the APIs of the tracking software, too; - Use a query string parameter to mark a page visited just after a login;
- Use the session to store a parameter to read on successive page load: if present, then identify the user.
The first approach is horrible and I have no intention of talking about it further.
The second one is possible, but it requires another dependency in your server-side code base, probably a break of the SOLID principle (unless you use events, but this means other unit tests, more code to maintain, handling possible failures in communicating with the tracking APIs, possible delays waiting a response and the list can continue).
The third can be easy to implement, but if the user refreshes the page, it will be identified again: nothing so bad, but anyway a duplication.
TrustBack.Me is built on top of the Symfony framework and it has a convenient feature called flash messages:
You can also store special messages, called “flash” messages, on the user’s session. By design, flash messages are meant to be used exactly once: they vanish from the session automatically as soon as you retrieve them. This feature makes “flash” messages particularly great for storing user notifications.
This really seems the best approach:
- It is clean;
- Doesn’t have refresh issues of doubled identifications;
- Automatically handled by Symfony;
- No stress.
Let’s use it!
Step 1: Create the flash message after the user logs in
To create the flash message we need to create a subscriber that listens for the event security.interactive_login: during the login, in fact, Symfony fires some events that we can listen for.
We need to use this as
When a provider authenticates the user, a
security.authentication.successevent is dispatched. But beware – this event will fire, for example, on every request if you have session-based authentication. Seesecurity.interactive_loginbelow if you need to do something when a user actually logs in.
So, this is our subscriber:
// src/Subscriber/LoginAnalyticsSubscriber.php

<?php

declare(strict_types=1);

/*
 * This file is part of the Trust Back Me Www.
 *
 * Copyright Adamo Aerendir Crespi 2012-2019.
 */

namespace App\Subscriber;

use Symfony\Component\EventDispatcher\EventSubscriberInterface;
use Symfony\Component\HttpFoundation\Session\Session;
use Symfony\Component\Security\Http\Event\InteractiveLoginEvent;
use Symfony\Component\Security\Http\SecurityEvents;

/**
 * Subscribes to the event `security.interactive_login` and
 * sets a flash message that marks the login.
 *
 * This way, in Twig, we can check for the existence of this
 * flash message and identify the user in analytics tools.
 */
class LoginAnalyticsSubscriber implements EventSubscriberInterface
{
    /**
     * {@inheritdoc}
     */
    public static function getSubscribedEvents():array
    {
        return [
            SecurityEvents::INTERACTIVE_LOGIN => 'onInteractiveLogin',
        ];
    }

    /**
     * Sets the message in the flash bag.
     *
     * @param InteractiveLoginEvent $event
     */
    public function onInteractiveLogin(InteractiveLoginEvent $event):void
    {
        /** @var Session $session */
        $session = $event->getRequest()->getSession();
        $session->getFlashBag()->add('identify', 'identify');
    }
}
Step 2: Read the flash message in the Twig template
In our template we use this:
<!DOCTYPE html>
<html lang="{{ locale }}">
    <head>
        ...

        {% if is_granted('IS_AUTHENTICATED_FULLY') or is_granted('IS_AUTHENTICATED_REMEMBERED') %}
            {% for label, messages in app.flashes(['identify']) %}
                {% for message in messages %}
                    <script type="text/javascript">
                        console.log('identifying the user.')
                        amplitude.getInstance().setUserId('{{ app.user.id }}');
                        mixpanel.identify('{{ app.user.id }}');
                        woopra.identify({id: '{{ app.user.id }}'});
            amplitude.getInstance().logEvent('Login');
                        mixpanel.track('Login');
                        woopra.track('Login');
                    </script>
                {% endfor %}
            {% endfor %}
        {% endif %}
    </head>
    <body class="site">
        ...
As you can see, after having set the User ID I also immediately log a “Login” event.
This is for two reasons:
- It’s a good thing to track the logins as this gives you the measure of the engagement of users with your app;
- You can see Users profiles only after having sent at least one event after the ID setting (more on this in a bit).
Note that I’ve inserted a console.log() message to have a feedback in the Javascript Console: I will obviously remove it in production, once I’ve checked the user identification works as expected.
Now that we have our identification in place, let’s go to see what happens in Amplitude, MixPanel and Woopra.
What happens in Amplitude when a user is identified
In Amplitude, Click on the “New” blue button

Then click on “User look-up”

Et voilà, here there is the list of all your users

If you click on the ID of any user, you will see his/her details
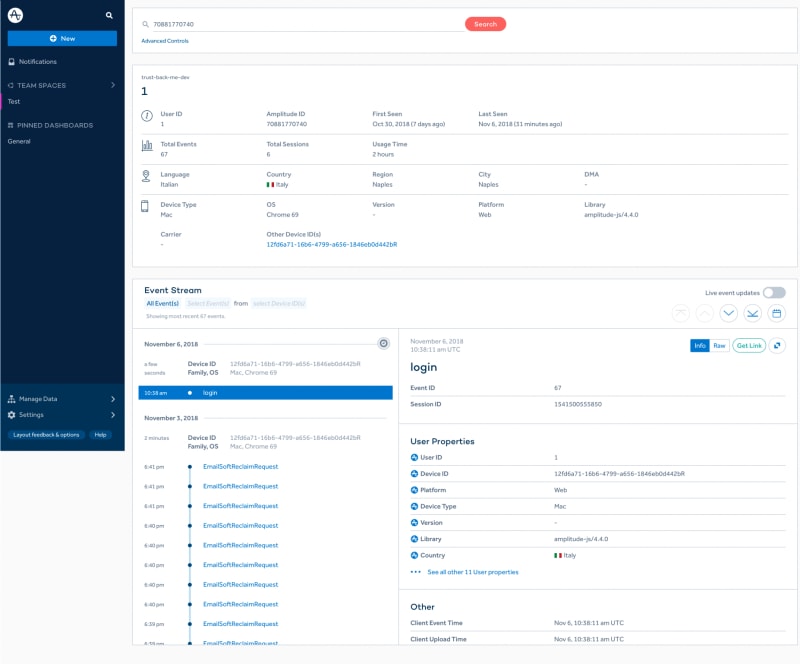
As you can see, all the previous events I triggered in the app, before I logged in, are now merged with my profile.
This means that, once you identify a User, you can see what (s)he did on your app, so rebuilding his/her full journey.
You can find more information about the User activity tracking in the dedicated page in the Amplitude documentation.
What happens in Woopra when a user is identified
In Woopra:
- Click on “People” in the top horizontal menu;
- In the report configuration, click on “New Column” pink button;
- Select the column “Visitor Schema > id”;
- Apply the changes (not shown in the image);
- Click on the “Run” green button in the upper right corner of the page.
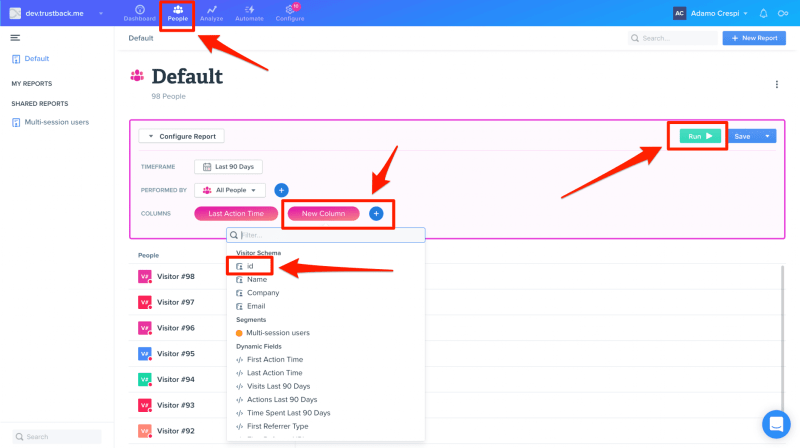
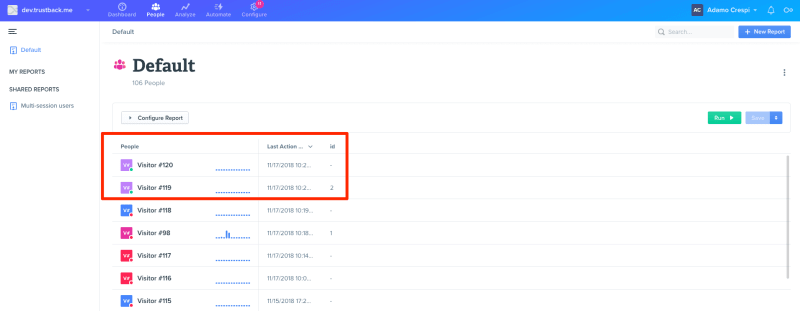
You will get the list of visitors that interacted with your website: click on the ID:
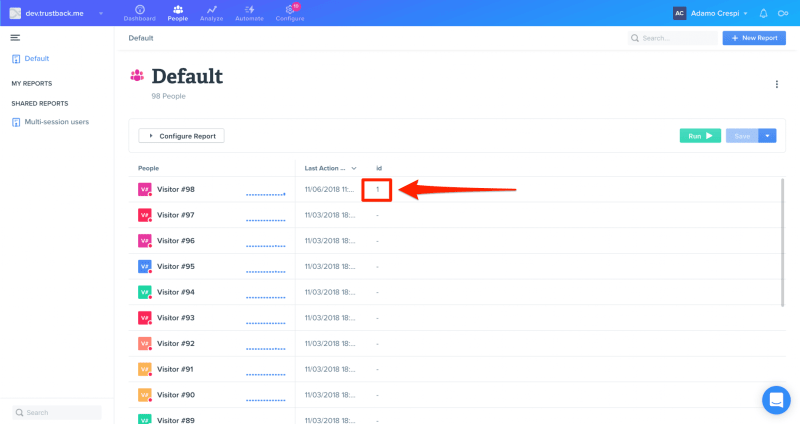
And those are the details of the user we have just identified:

Woopra is able to merge all previous anonymous events with the user profile once (s)he is identified. This way you can build the full user journey, no matter where it started and no matter how many time it was first an anonymous user that was then identified.
What happens in MixPanel when a user is identified
In MixPanel only one small thing happens: the random generated distinc_id is now changed to your custom distinct_id. Nothing more, nothing less: past events are not linked with the new distinct_id nor a user profile is created.
To link anonymous events with the identified user (and so, with his/her new distinct_id) you need to call mixpanel.push().
To create a user profile, you need to call mixpanel.people.set().
Nothing happens automatically in MixPanel.
So, we need to understand how to link the anonymous events fired by the user before (s)he is identified with the events (s)he fires when (s)he is then identified.
Building the full default user’s journey in MixPanel
As mentioned, when we call mixpanel.identify() the only thing that MixPanel does is to change the distinct_id from the randomly generated one to the custom one we set.
This call doesn’t link the past anonymous events (tied to the randomly generated distinct_id) with the new custom distinct_id making impossible to get a clear picture of the user journey in the reports.
More, MixPanel doesn’t even create a User profile where we can read all the User’s Properties we set nor where we can see all the events (s)he performed.
To solve this problem we need to call mixpanel.alias().
They use a fictional user to explain how to use mixpanel.alias() in conjunction with mixpanel.identify():
- Sally comes to your website for the first time. Mixpanel assigns Sally a randomly generated ID, which is known as a Mixpanel
distinct_id.- Mixpanel assigns Sally the
distinct_id“12345”. Now all her actions are tied to thatdistinct_id.- After clicking through a few pages, she successfully signs up for an account.
- The signup confirmation page calls the
mixpanel.alias()method and passes Sally’s email address as an argument. For example,mixpanel.alias(“sally@gmail.com").- The
mixpanel.alias(“sally@gmail.com")method doesn’t change her Mixpaneldistinct_id. It adds the ID “sally@gmail.com” to a Mixpanel lookup table and maps it to the original Mixpaneldistinct_id“12345”.- Now Mixpanel calls the
mixpanel.identify("sally@gmail.com")method and passes the IDsally@gmail.comto all subsequent pages and logins whenever Mixpanel sees data for “sally@gmail.com”.- Mixpanel remaps her original
distinct_idof “12345”. So all actions Sally takes – whether on your site, in your app, or anonymously before she signed up for her account – maps to her.
Just a note: MixPanel, as you can see, uses the email address: don’t follow their example and use the unique ID you assign on your system to avoid breaks in your data if you make possible for your users to change their email address!
If you want to have the email at hand when consulting reports, add it as a property of the user object.
So, summing up:
- The visitor lands on your website or opens your app: (s)he is anonymous and has a randomly generated
distinct_id(“12345”). (s)he navigates your website or app and fires some events that are tied to thedistinct_id“12345”. - The visitor signs up: now (s)he is identifiable and you need to assign her (she’s Sally!) a custom
distinct_id, usually the ID your system assigned her. As in this moment MixPanel still recognizes her by the randomly generateddistinct_idit assigned her (“12345”), you need to tell MixPanel that from now on you want to recognize her also using your customdistinct_idthat isSALLY_CUSTOM_USER_ID. So you call the methodmixpanel.alias('SALLY_CUSTOM_USER_ID'). Now MixPanel knows that if it finds in the events it collects thedistinct_id“12345” or either thedistinct_idSALLY_CUSTOM_USER_ID, it has to link them together considering them as fired by the same person. This is done internally using a cross-table that links the twodistinct_ids - Now Sally logs in: you call
mixpanel.identify('SALLY_CUSTOM_USER_ID'); - Sally continues to navigate your website or your app and continues to fire events: those events are tied to the
distinct_idSALLY_CUSTOM_USER_IDbut MixPanel knows that previous events tied to thedistinct_id“12345” were fired by the same person that is now identified by thedistinct_id SALLY_CUSTOM_USER_ID.
So, basically, what the other two tools do automatically, in MixPanel has to be done by ourselves making the implementation a bit more complex.
Before going to make our hands dirty with the code, we need to know another important thing.
MixPanel warns about one thing: call mixpanel.alias() only once during the life of a visitor.
They say this:
An alias can only point to one Mixpanel distinct_id.
If you’ve already mapped “sally@gmail.com” to Mixpanel distinct_id “12345”, any attempt to map sally@gmail.com to Mixpanel distinct_id 67890 fails.
This prescription is in practice a big limitation as it makes practically impossible a full tracking of a cross-device journey.
But as here we are considering the Default User Journey, I will not explain you more, postponing the question to the post about cross-device tracking.
One last thing: MixPanel requires that the call to the mixpanel.alias() method is made BEFORE using the new custom distinct_id.
Coming back to our code, we can do a simple thing: add the call to the mixpanel.alias() method directly before the call to the mixpanel.identify() call: in fact, if we call the mixpanel.alias() method more than once, nothing happens: no errors, no link between distinct_id.
So, also if technically, as developers, we always prefer to have all in order in our code, in this case, we can do an exception and rely on the behavior of MixPanel that doesn’t trigger any error in case of multiple calls to the mixpanel.alias() method: it simply does nothing when receives consecutive calls.
So, we need to only modify our Twig template and our code becomes like this:
{% if is_granted('IS_AUTHENTICATED_FULLY') or is_granted('IS_AUTHENTICATED_REMEMBERED') %}
    {% for label, messages in app.flashes(['identify']) %}
        {% for message in messages %}
            <script type="text/javascript">
                console.log('identifying the user.')
                amplitude.getInstance().setUserId('{{ app.user.id }}');

                // Add this call to the `alias()` method
                mixpanel.alias('{{ app.user.id }}');

                mixpanel.identify('{{ app.user.id }}');
                woopra.identify({id: '{{ app.user.id }}'});
                amplitude.getInstance().logEvent('Login');
                mixpanel.track('Login');
                woopra.track('Login');
            </script>
        {% endfor %}
    {% endfor %}
{% endif %}
Now we need to do one last thing: creating the User profile on MixPanel.
MixPanel says that:
A Mixpanel People profile reflects the most recent information about a user.
Mixpanel builds profiles by connecting information about a user to a distinct_id, which creates a location that collects current information about a user.
People profiles enable you to:
- Analyze how users navigate an application.
- Store and update additional information about your users.
- Use the Messages and Campaign feature.
Mixpanel People properties contain properties that describe a user and the activity feed that displays events the user performed.
You can use the Explore report to aggregate and organize a collection of People profiles.
So, to get in MixPanel the same functionalities we get automatically with Amplitude and Woopra, we need to manually create the user profile.
Doing this is as simple as adding one more call to the mixpanel.pople.set() method, again, editing only our Twig template:
{% if is_granted('IS_AUTHENTICATED_FULLY') or is_granted('IS_AUTHENTICATED_REMEMBERED') %}
    {% for label, messages in app.flashes(['identify']) %}
        {% for message in messages %}
            <script type="text/javascript">
                console.log('identifying the user.')
                amplitude.getInstance().setUserId('{{ app.user.id }}');
                mixpanel.alias('{{ app.user.id }}');
                mixpanel.identify('{{ app.user.id }}');

                // Add this call to the `people.set()` method
                mixpanel.people.set({ id: '{{ app.user.id }}'' })

                woopra.identify({id: '{{ app.user.id }}'});
                amplitude.getInstance().logEvent('Login');
                mixpanel.track('Login');
                woopra.track('Login');
            </script>
        {% endfor %}
    {% endfor %}
{% endif %}
And the User’s profile is now created in MixPanel, too:
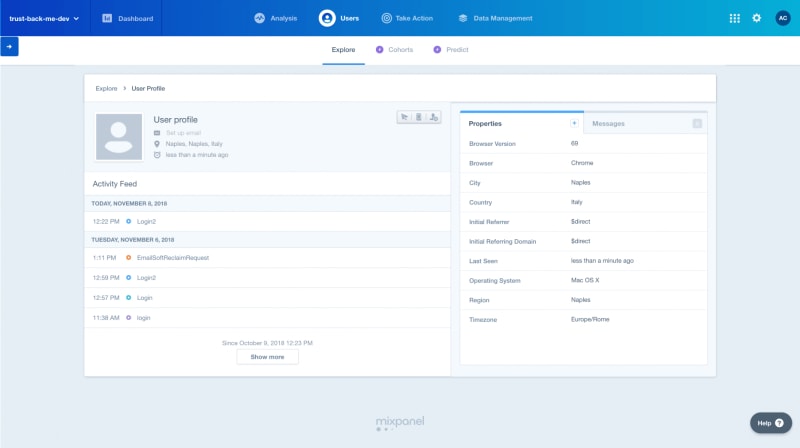
As you can see, also the anonymous event I fired EmailSoftReclaimRequest is now tied with my profile (plus some other test events ?).
Handling the logout
So you now know who is your visitor (now we can also call him/her a User!) and you can tie the events (s)he fires to his/her profile you created in your tracking software.
One last thing remains to do: handling his/her log out.
With this paragraph, we start introducing the next relevant topic: handling non-default journeys of your users.
Are you asking yourself why should you need to handle the logout?
Because one of the non-default journeys of your users is the use of the same device by different users: if my wife and I use the same device to navigate your site, you will tie our events to one profile while we actually are two different people with completely different behaviours.
This promiscuity in registering events will lead you to get wrong data, then wrong reports and, in the end, wrong conclusions.
And, more, when my wife logs out and then I log in, you will have only one profile that in the best case will get updated once with my wife’s data and then with my own data, having it changing continuously.
So, you need to handle the logout.
How to handle the log out with Amplitude
To handle the logout in Amplitude you need to do two things:
- Set the User ID to
null; - Regenerate the
device_id.
The code required to do this is the following:
amplitude.getInstance().setUserId(null); // not string 'null'
amplitude.getInstance().regenerateDeviceId();
Amplitude warns that
if you choose to do this, then you will not be able to see that the two users were using the same browser/device.
But this is not a big issue as we will anyway have two users using the same kind of browser, the same OS, etc. and this the important thing while understanding precisely that it is exactly the same device is not important (not always important, at least).
How to handle the log out with MixPanel
In MixPanel the handling of logout is simple, too, but it has some other consequences that are typical of MixPanel:
you are resetting the Distinct Id and removing all existing super properties.
While resetting users is useful if you have many users on the same device, it does have some undesirable effects. First, all events for logged out users will appear anonymous, meaning the unique user counts for these events will not be correct. In addition, because you remove super properties, you will need to again register these for each user on login.
Ultimately the tradeoff for the above drawbacks is that each profile is one unique user within your implementation. We typically only recommend implementing the above if you anticipate this scenario happening as the norm – if multiple users on the same device is not common, implementing logic on logout to handle this scenario may be more trouble than it is worth.
What do I think about this? You have to evaluate the tradeoff (yes, the exact same thing MixPanel told us ?).
In our app TrustBack.Me, we decided to implement the logout handling as we don’t know in advance if more people will use the same device but we evaluated that handling proper user tracking is more important than the effort required (that is, incidentally, not so much anyway).
So, in this MixPanel is easier to use as it requires only one call:
mixpanel.reset()
For JavaScript, calling the reset method will clear the Distinct Id and all super properties, as well as generate a new Distinct Id for the user.
How to handle the log out with Woopra
I was not able to find information about how to handle the logout of users with Woopra.
So I contacted their support that in less than 24 hours told me to use the method woopra.reset() and also to set to an empty object the user’s properties:
woopra.reset();
woopra.visitorData = {};
Concrete implementation of logout handling
For the login, we used Symfony events to mark the login.
Unfortunately, Symfony doesn’t fire corresponding events for logout.
But it permits to do two things:
- Configure a page to which redirect the user after a successful logout;
- Use a logout success handler that is simply a service implementing the
LogoutSuccessHandlerInterface.
When first implementing the logout handling, we wanted to use the same approach we used for login, setting another flash message to mark the logout:
namespace App\Subscriber;

/**
 * Subscribed to the event `security.interactive_login` and sets a flash message that markes the login.
 *
 * This way, in Twig, we can check for the existence of this flash message and identify the user in analytics tools.
 */
class AnalyticsSubscriber implements EventSubscriberInterface, LogoutSuccessHandlerInterface
{
    /**
     * {@inheritdoc}
     */
    public static function getSubscribedEvents():array
    {
        ...
    }

    /**
     * Sets the message in the flash bag.
     *
     * @param InteractiveLoginEvent $event
     */
    public function onInteractiveLogin(InteractiveLoginEvent $event):void
    {
        ...
    }

    /**
     * @param Request $request
     *
     * @return RedirectResponse
     */
    public function onLogoutSuccess( Request $request ):RedirectResponse
    {
        /** @var Session $session */
        $session = $request->getSession();
        $session->getFlashBag()->add('identify', 'logout');

        return new RedirectResponse($request->getSchemeAndHttpHost());
    }
}
As you can see we returned a RedirectResponse object as the interface obliges to return a ResponseInterface object. So we thought to redirect the User to the homepage after the redirect.
Unfortunately, the redirect resets also the flash messages and so it is impossible to mark the login.
So we have to go with the first approach.
Basically, you need to create a logout.html.twig template and implement in it the code to reset the tracking.
So the full Symfony’s configuration requires those steps:
- Create a
SecurityControllerand inside it a methodbye()that will be the route that will render thelogout.html.twigtemplate:
<?php

declare(strict_types=1);

/*
 * This file is part of the Trust Back Me Www.
 *
 * Copyright Adamo Aerendir Crespi 2012-2017.
 *
 * This code is to consider private and non disclosable to anyone for whatever reason.
 * Every right on this code is reserved.
 *
 * @author Adamo Aerendir Crespi <hello@aerendir.me>
 * @copyright Copyright (C) 2012 - 2017 Aerendir. All rights reserved.
 * @license SECRETED. No distribution, no copy, no derivative, no divulgation or any other activity or action that
 * could disclose this text.
 */

namespace App\Controller;

use FOS\UserBundle\Controller\SecurityController as FOSSecurityController;
use Sensio\Bundle\FrameworkExtraBundle\Configuration\Route;
use Symfony\Component\HttpFoundation\RedirectResponse;
use Symfony\Component\HttpFoundation\Request;
use Symfony\Component\HttpFoundation\Response;

/**
 * {@inheritdoc}
 */
class SecurityController extends FOSSecurityController
{
    /**
     * Shows the logout page.
     *
     * This page is required to reset the tracking cookies.
     *
     * @Route("/bye")
     *
     * @return Response
     */
    public function logout(): Response
    {
        return $this->render('App/security/logout.html.twig');
    }
}
As you can see, I render the template directly in the controller without using the @Template annotation: this is a Symfony’s best practice.
- Configure the security in the
security.yamlfile.
# config/packages/security.yaml

security:
    ...
    firewalls:
        ...
        main:
            ...
            logout:
                target: /bye
            ...
- Finally, create the
logout.html.twigtemplate
{# templates/App/security/logout.html.twig #}

{% extends 'App/base.html.twig' %}

{% block title %}Logout{% endblock %}
{% block metaDescription %}Mostra che sei un commerciante affidabile. Ti serve solo un indirizzo e-mail.{% endblock %}

{% block body %}
    <div class="wrapper bg-light-gray">
        <div class="container">
            <div class="row">
                Logout
            </div>
        </div>
    </div>
    <script type="text/javascript">
        console.log('logging out the user.');
        amplitude.getInstance().logEvent('Logout', null, function() {
            amplitude.getInstance().setUserId(null);
            amplitude.getInstance().regenerateDeviceId();
        });
        mixpanel.track('Logout', null, function() {
            mixpanel.reset();
        });
        woopra.track('Logout', null, function() {
            woopra.reset();
            woopra.visitorData = {};
        });
    </script>
{% endblock %}
Note: there is a call to console.log(): you can remove it once you have seen how does the logout handling work.
As you can see, I first log the Logout event, then use a callback to reset the identifiers: this is to be sure the Logout event is associated with the logging out user. Without using a callback, there is the risk of logging the Logout event after the reset, linking the event to the new anonymous randomly generated ID assigned after the reset.
What happens in Amplitude when you handle the logout of users
Click on the “New” blue button and then select “User Look-Up”: you will see the list of events fired on your website.
As you can see from the screenshot, the user is assigned a random User ID 71984668067.
Then, once (s)he logs in, the ID is changed to 1 that is the ID (s)he has in TrustBack.Me database users table.
When (s)he logs out, the Logout event is registered with the ID 1, then (s)he is assigned a new random generated ID 71984682059.
This way, when someone else logs in using the same device, (s)he will have his/her own ID and we can track all activities very precisely.

What happens in MixPanel when you handle the logout of users
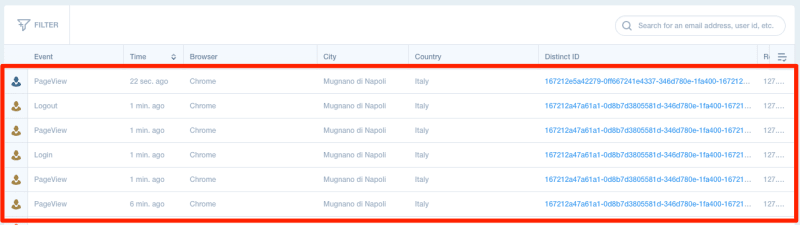
If you click on the LiveView in MixPanel, you will see the last events tracked.
As you can see, there is a user that did the login, viewed some pages and then logged out. After the logout, MixPanel correctly tracks another page view, assigning the event to a different user.
What happens in Woopra when you handle the logout of users
Woopra registers the two users: one is identified (has the custom ID 2) while the other is anonymous.
The anonymous user is actually me after the logout, so Woopra successfully resets the ID.
In Woopra I’m observing a strange behaviour: I’m expecting the Logout event being tied to the identified user.
Instead, Woopra seems to first reset the user and then log the Logout event, also if the resetting is done in a callback (and so, the code should be executed only after the tracking of the Logout event is completed – and tied to still identified user).
As we will not use Woopra in our applications here at Serendipity HQ, I will not going deeper in this behavior: if you will use Woopra, keep in mind this and, maybe, contact their support: they are very fast and exaustive!
The two images show what I’m saying.
In the image below, I expect to see also the Logout event, but it isn’t there.
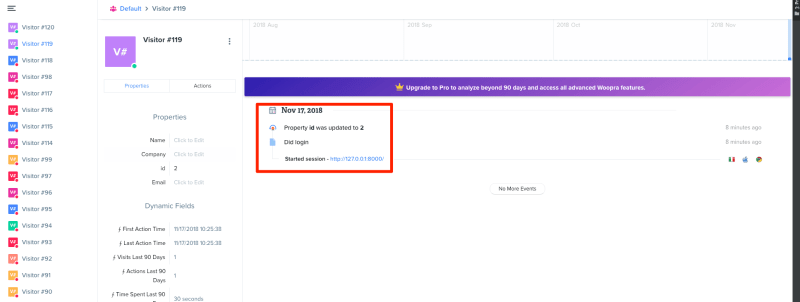
Instead, it is tied with another anonymous user, the one created after the identified user does the logout.

Conclusions
So we have completed the tracking of the default user’s journey:
- Anonymous navigation;
- Registration;
- Login;
- Navigation as a logged-in user;
- Logout.
The logout opens the first big issue we will face with tracking: handling multiple users on the same device.
This is only one of the possible issues we have to handle.
There are many others: check them out in the next post and learn how to deal with them and how to solve them.
Remember to “Make. Ideas. Happen.”.
I wish you flocking users, see you soon!
L'articolo How to track unique users with behavioural analytics tools proviene da ÐΞV Experiences by Serendipity HQ.


Top comments (0)