The easiest way to start using concretely a behavioural analytics tool is to start tracking some events.
This way you will see them registered in the behavioural analytics tool of your choice, and you can start better understanding how they work.
As told, in theory is all simple.
But the problems arise when you have to concretely decide which events to track.
How to decide which events to track
In your first attempt at identifying events, maybe you will be influenced by the “Pageview centric vision”.
This concept will be more clear in a bit.
For the moment, let’s start by understanding what is an Event in the tracking context.
Then I’ll provide you with a concrete example of a “Pageview centric vision” and how to extract events from it.
The Amplitude’s Data Taxonomy Playbook explains very well what an event is and also provides a lot of helpful considerations about them.
So, what is an event? An event is any distinct action a user can perform in your product (e.g. start game, add to cart) or any activity associated with a user (e.g. in-app notifications, push notifications). When deciding what events to track, it is helpful to think of event categories first.
Start first by determining what your product’s critical flow is. For a food delivery app it would be order placed, for a healthcare app it would be sessions started/booked. When you have your critical flow you can go through and determine what types of events you’ll need in order to best understand that critical event and the flows surrounding the event (it is not enough just to know how many people placed an order or booked a session, but also what factors were causing them to enter that flow.)
Identifying broad categories of your events will help you conceptualize the major components of your product. It also will allow you to better organize your events in Amplitude’s UI. Make sure that each category tracked will help towards accomplishing one of your business objectives. Sticking with the business objectives we defined in the above pre-work section, event categories could be:
- Onboarding
- Checkout
Once you have determined your overarching categories, start to drill down into the individual events in these groupings. Begin with the top priority events that align with your business goals.
You do not need to track every event in your product as doing so will increase noise in your project and make your taxonomy difficult to understand. We recommend instrumenting no more than 50 events in your first pass. Having fewer events enables you to think about and focus on what is truly important to track in your product. However, you do want to detail out every event in a critical path (e.g. onboarding flows, purchase funnels). Without carefully instrumenting every step, you will not be able to accurately see and analyze drop-offs.
When deciding on events to track, keep in mind the questions you want to answer and the hypotheses you want to test. While we would not expect you to know 100% of the questions and hypotheses you’ll be testing down the road, try to be as diligent as possible when selecting actions to record in Amplitude.
Common questions to consider are:
- Are my users successfully completing onboarding?
- How many of my users convert into paying users?
- How many times are my users performing Event A vs. Event B?
- What are my most engaged users doing?
- Which groups of my users are engaging with feature C?
So, there are five main steps to take to figure out what events to track:
- Determine the business goals;
- Determine the product’s critical flows;
- Identify broad categories of events;
- Formulate the questions you want an answer to from the tracked events;
- Identify the single events in each category.
The definition of business goals (first point) is an entire topic on its own and cannot be covered here.
However, as a starting point, you can think about those goals for your business:
- Increase onboarding conversion;
- Increase retention of paying users (customers);
- Increase checkout funnel conversions.
In defining the goals, you should think about the impact that their improvement has on the bottom line.
Events serve only one purpose: understanding the User Journey
This concept is explained at its best once again by Amplitude:
As you start creating your event taxonomy one important thing to think about is the end user journey as they go through your product. Your taxonomy should allow you to split your analysis into 3 different levels
- Event counters – Being able to track DAU/MAU, Total purchases etc.
- Funnels and conversions – Retention rates, Funnel conversion, Power curve chart
- Behavioural analysis – Impacts of performing actions on your other metrics
If we think of a new user we can map their journey from new to ultimately to a power user. The key here is to understand the factors that is causing a user to transition between these states and having clear events tracked for these key areas will allow you to better analyze patterns that help/hinder users from transitioning between these states.
How to concretely determine the events to track filtering them from all the possible actions a User can perform
Now we know in theory how to decide which events to track.
When coming to concrete things, however, we face a concrete problem.
Let’s explain this problem with an example.
When deciding what to track on TrustBack.Me, we decided to start simple and start tracking the Email Soft Reclaim.
The Email Soft Reclaim Journey permits any user to provide their email address to see if TrustBack.Me has any orders associated with it.
Practically, it permits to check the orders associated with any email without requiring a registration (so, no password required!).
When we tried to slice the journey, we found there are those actions:
- The user lands on the starting page of the Email Soft Reclaim Journey;
- The user fills the form with his/her email;
- The user clicks on the button to submit the form;
- The form redirects to a confirmation page that explains that an email was sent to the provided address;
- TrustBack.Me sends an email with the access link to the provided email address;
- The user clicks on the access link;
- The user lands on the access page and sees the orders associated with the email (if any);
- The user continues taking other actions (see the details of an order, a feedback (s)he released and so on).
Now, given this sequence of actions, which are the relevant events that they fire and that we needed to track?
So, at this point, we started to formulate the questions to which we want an answer from the tracked events.
The questions we formulated were these:
- How many Email Soft Reclaim requests are submitted in a defined period of time?
- How many Users, after having submitted the request, then effectively see the list of orders?
- What do they do next?
Three simple questions to which we can answer properly tracking our events.
So, the possible events we can track are those:
- View of starting page of Soft Email Request;
- Click on the submit button;
- View of confirmation page;
- Click on the access link;
- View of the access page with the list of orders.
Five actions and each one of them can be considered an event that can be tracked.
Now, let’s consider the usefulness of each of those events (spoiler: I’m starting to show you what does it mean “Pageview centric vision”).
1. View of starting page of Soft Email Request.
Do we really need to track this? Maybe we don’t. At least not in this first tracking instrumentation.
In fact, tracking this will for sure tells us how many people viewed the page and, combining this information with the last event (view of access page with the list of orders), permits us to understand the ratio between the requests and the accesses.
But this is not a relevant information, also if at a first look it seems it is.
In fact, this is not currently a business goal nor is relevant to know the drop off between the starting page views and the concrete access: the access to the initial page, in fact, can happen for two reasons:
- For curiosity, just to see what the page contains;
- For necessity, because the user really wants to see the list of his/her orders.
We need to track the performance only for the second group of people, not the first.
So, as we have other actions after this, we can use them as the starting point of our tracking.
We decided that this event is not relevant and we don’t track it.
2. Click on the submit button
This event is more close to what we want to understand from our tracking: how many people start the Email Soft Reclaim (and then, how many of the started Soft Reclaims lead to a concrete access to the list of orders).
Maybe we should track this.
Before deciding, let’s understand better the next action.
3. View of confirmation page
This action, if tracked as an event, basically offers the same information of the previous action. In fact, it doesn’t show an error if we don’t know the email (for privacy reasons: telling if we have or not the email may disclose privacy information). Tracking errors is a good thing to do, but, as told, this is not the case.
So, we need to track only one between the “Click on the submit button” action and this: tracking both is a duplication that only causes messiness in the data collected.
NOTE: If this page had also shown an error in case the email was not present in our database, then, this would have been an event to track, but not mandatory.
4. Click on the access link
This is not really an event: more probably here we should track the UTM params, setting them in a way that makes us able to recognize a user as coming from an Email Soft Reclaim access link.
But this is a topic we will cover later in another post.
5. View of the access page with the list of orders
This is the last action in the journey, so we need to track it for sure as we need it to find the end number of people who arrive at the end.
So, how many events should we track and what are them?
So, in the end, we need to track those events:
- Click on the submit button;
- View of the access page with the list of orders.
All other steps are not relevant: we only need to add also the UTM query parameters to the access links in the emails we send (again, this topic will be explained deeply in another blog post).
Event properties
Now that we have our events defined, we need to understand which information we want to record each time one of them happen.
That information is stored in the properties of the event.
The properties provide additional information that can then be used to better analyze data.
Woopra documentation explains very well the usefulness of events’ properties:
[…] wouldn’t it be helpful to know a little more about each action the customers take? In practice, when a visitor performs the action “pageview,” users can find out what page was viewed, how long the customers there, what device was used, and so on.
This is where action properties come in to play. Think of action properties as specific attributes that provide additional details for each event you’re tracking.
For example, users may want to track every time a customer makes a payment, one could send the “Payment” action to Woopra, along with associated properties such as:
- payment amount
- user plan or package
- payment option (e.g. credit card, Paypal, ACH), and so on.
Mixpanel offers another useful point of view about Events’ properties:
Event Properties are bits of extra information that you send along with your Events which describe the details of that action. They are usually specific to the Event they’re describing and don’t apply universally to other Events. Leveraging Event Properties allows you to conduct deeper analysis to better understand user behavior for a specific action.
While Event Properties generally describe the Event itself, they can also describe a user’s actions in relation to that specific Event. For example, for a Video Played Event, you may want to include a Property that lets you know if the user firing that Event finished watching the entire video or played only part of the video.
Other examples of Events and Event Properties you might send with that Event:
- Event: Page View; Property : Name of page viewed.
- Event : Video Played; Properties : Length, Artist, Genre.
- Event : Made Purchase; Properties : Item(s) purchased, Total, Did the user have a coupon or not.
- Event : Leveled Up; Properties : Level, Time to level up, Hours user played before this level up.
The difference between the Event Properties and the User Properties
In defining the properties of the events you want to track, you need to take into consideration also the difference between the properties of the events and the properties of the users you track.
Amplitude explains this difference very well:
The most general explanation of the difference between the two is that user properties are attached to users and reflect the current state of the user at the time of the event while event properties are attached to events and reflect the state of the event that was triggered.
Event and user properties can be sent along with every event to Amplitude. All of these values will be tracked with the specific event they were sent with and the user properties sent will also update the user’s user properties with the most recent values. Another way to think about user properties and event properties is that user properties apply to the user for all events going forward until they are changed, and event properties are applied only to events at the time they are sent.
So, there is no complexity in understanding what Event Properties are.
The complexities, as usual, arise when we have to decide concretely which properties to associate with our events.
At this point, it is possible that a lot of possible properties are coming to our mind.
But we are missing another important piece of information.
Tracking the relation between journeys using the Event Properties
Introducing you to behavioural analytics tools, I told you to think also about the relation between journeys:
Practically, each journey can lead to another or to more than one another journey.
How do we track these relations?
We need some links between them and those links are simply some IDs, exactly as what we do when creating the relations between our entities in the database.
Once more, Amplitude offers a great explanation of this concept:
[…] So, for this e-commerce example, we recommend having two custom event property values, ‘Property ID’ (‘Product ID’ I think they mean, editor’s note) and ‘Cart ID’. Then, use two funnels to track if a user has viewed and purchased the same product. Two examples are outlined below.
Adding Product to Cart Funnel
- Step 1: ‘Product – Page Viewed’
- ‘Property ID’ = ‘3345’
- Step 2: ‘Product – Quantity Selected’
‘Property ID’ = ‘3345’
‘Quantity’ = ‘1’
Step 3: ‘Product – Added to Cart’
‘Property ID’ = ‘3345’
‘Quantity’ = ‘1’
‘Cart ID’ = ‘1299’
Purchasing Cart Funnel
- Step 1: ‘Cart – Viewed’
- ‘Cart ID’ = ‘1299’
- Step 2: ‘Cart – Start Checkout’
- ‘Cart ID’ = ‘1299’
- Step 3: ‘Checkout – Address Added’
- ‘Cart ID’ = ‘1299’
- Step 4: ‘Checkout – Shipping Method Selected’
- ‘Cart ID’ = ‘1299’
- Step 5: ‘Checkout – Payment Added’
- ‘Cart ID’ = ‘1299’
- Step 6: ‘Checkout – Complete’
- ‘Cart ID’ = ‘1299’
So, using two IDs, PropertyID (again, I think this should be ProductID, instead) and CartID, we can understand if we can really convert a User from a product page to the checkout.
The concept of “Super Property”
The final concept we need is the one of Super Property.
The concept of Super Property is really of MixPanel, that has in place a system to make it easier to track them, but it can be helpful with every other tool you use, also if you have to track them manually.
So, as it is of MixPanel, let its documentation tell us about it:
Super Properties are a type of Event Property that you can set once to automatically attach to every Event you’re tracking. They are Event Properties that apply to all Events without having to manually include them in each
mixpanel.track()call.Because Super Properties send values associated with Events, they are useful for seeing Properties over time. For example, you could set a Super Property with all of your Events that indicates whether they were done by a free or a paid user. Then, if a user changes from free to paid, you can see over time which Events led up to that conversion and which specific Events they did as each type of user.
Other examples of Super Properties you might send with every Event:
- Organization that a user belongs to or rolls up into
- Account age or signup date
- Referring user ID or invited date
Because Super Properties are stored in the user’s cookie or in local storage, you’ll want to be relatively discerning about what you set as a Super Property so that site or app performance is not compromised.
Apart from the technical and privacy considerations, the concept is really useful if applied to our tracking of events and we should consider it.
Deciding which properties to add to tracked events
So, now you should have a more clear vision of Events and of their properties.
But, as told, the things become to get messy when we try to apply concretely the abstract concepts.
So, let’s continue with our example of TrustBack.Me and its Email Soft Reclaim.
As told, we want to track two events:
- Click on the submit button;
- View of the access page with the list of orders.
Let’s start with the first: Click on the submit button.
Defining the properties of the Click on the submit button event
Event name: EmailSoftReclaimRequest
Properties:
email
The email is the minimum required to track the event.
But going deeper, we can find other interesting properties.
For example, we may like to know which kind of user requested to access the email: is a merchant or a simple customer? Or is an anonymous user?
We cannot decide now which other properties we want to track as we still don’t know anything about how to track users other than events: this is a key distinction and we need to understand it well to have a complete tracking setup.
Understanding how to track users is really more complex than what it might appear at a first look.
I will explain the tracking of users in detail in another post.
For the moment, let’s focus on the tracking of events.
This is the code we used to track the event in all the three tools, Amplitude, Mixanel and Woopra:
...
<div class="submit">
    <script type="text/javascript">
        const eventName = 'EmailSoftReclaimRequest';
        const eventProps = {
            "email": document.getElementById("email_reclaim_email").value,
        };
        const track = function() {
            // Mixpanel
            mixpanel.track(eventName, eventProps);
            // END Mixpanel
            // Woopra
            woopra.track(eventName, eventProps);
            // END Woopra
            // Amplitude
            amplitude.getInstance().logEvent(eventName, eventProps);
            // END Amplitude
        };
    </script>
    <button id="Start" class="btn btn-lg btn-block btn-secure" onclick="track();">{% trans from 'email_reclaim' %}email.reclaim.soft.form.submit.label{% endtrans %}</button>
</div>
...
Note that I created a function called track() that is invoked when the button is clicked: this way we can send the event to all the three tracking systems (yes: currently we are using them together to understand which best fits our needs).
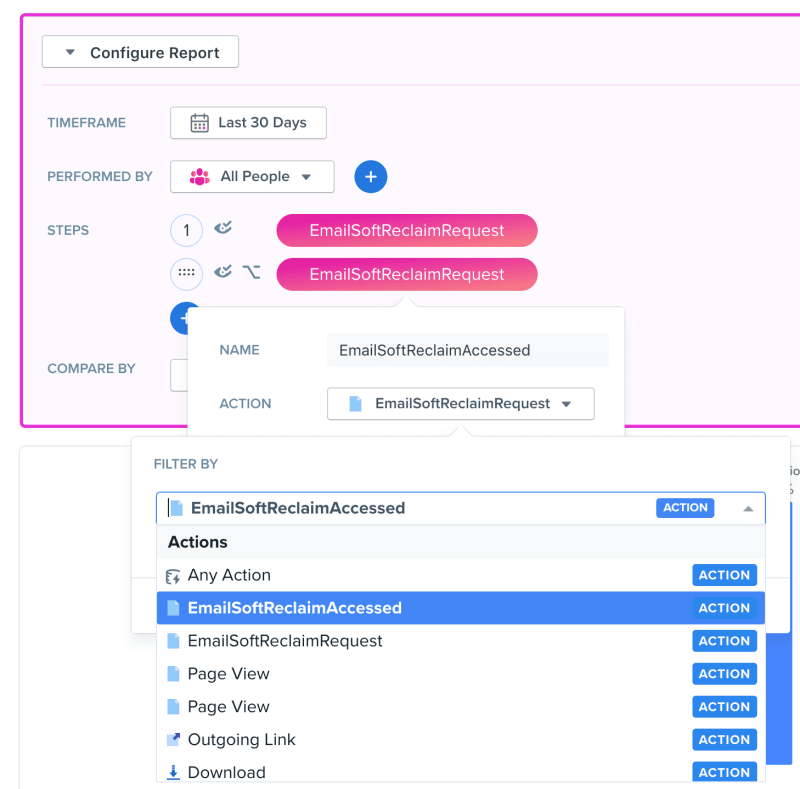
Defining the properties of the “View of the access page with the list of orders”
Event name: EmailSoftReclaimAccessed
Properties:
email
Also for this event, the email is the minimum required to make the event useful.
This is the code we use to track the event in all the three tools, Amplitude, Mixanel and Woopra:
...
<script type="text/javascript">
    const eventName = 'EmailSoftReclaimAccessed';
    const eventProps = {
        'email': '{{ reclaim.email.email.toString }}',
    };
    // Mixpanel
    mixpanel.track(eventName, eventProps);
    // END Mixpanel
    // Woopra
    woopra.track(eventName, eventProps);
    // END Woopra
    // Amplitude
    amplitude.getInstance().logEvent(eventName, eventProps);
    // END Amplitude
</script>
...
Note that here I don’t use a function as this code is outside of a form and isn’t called on the click of any button: the code is simply executed when the page is loaded.
Now that we have our two events tracked, it is time to build the reports.
Building the funnel/journey reports from the two events
As told before, we want to answer the following questions:
- How many Email Soft Reclaim requests are submitted in a defined period of time?
- How many Users, after having submitted the request, then effectively see the list of orders?
- What do they do next?
We are not able to answer the third question right now as we don’t have instrumented the events. But the first two questions can find an answer right now.
We only need to build the reports.
Building the Email Soft Reclaim Report in Amplitude
This is the list of the tracked events in Amplitude:

As you can see, we have both EmailSoftReclaimRequest and EmailSoftReclaimAccessed.
What we need to do now is to put them on the same report.
So, start by clicking on the “New” button on the upper left corner of the Amplitude dashboard:

In the new screen, select Chart > Funnel

In the new screen you can configure the funnel selecting the events you want to include in the analysis:
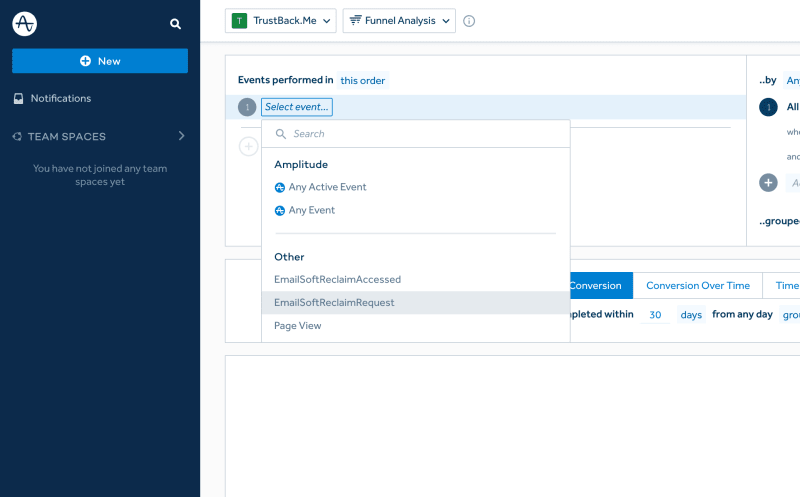
Amplitude will do the rest as you can see:
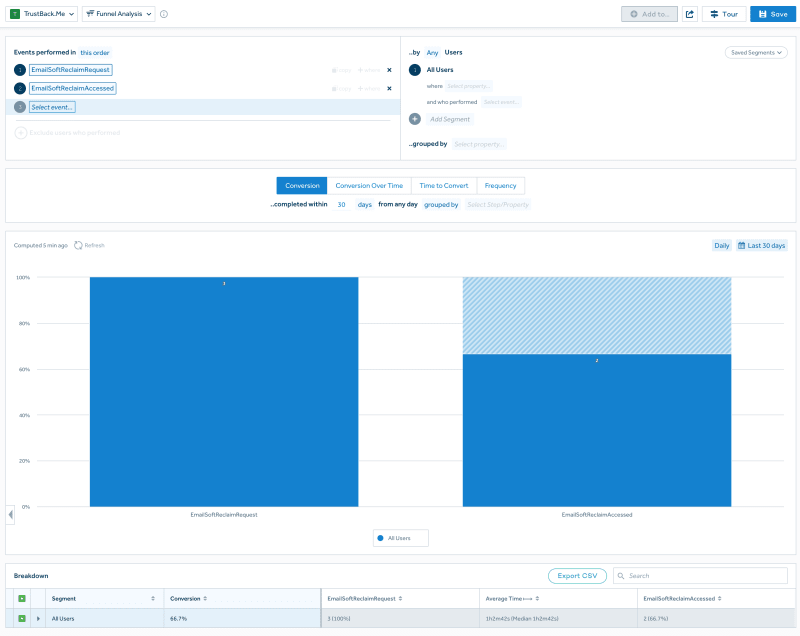
If you like the result, click on the “Save” button in the upper right corner of the page to save the report.
For more information about funnel reporting in Amplitude click here.
Building the Email Soft Reclaim Report in MixPanel
This is the list of the tracked events in MixPanel:

As you can see, in this case, too, we have both EmailSoftReclaimRequest and EmailSoftReclaimAccessed.
We now need to build a funnel report also in MixPanel
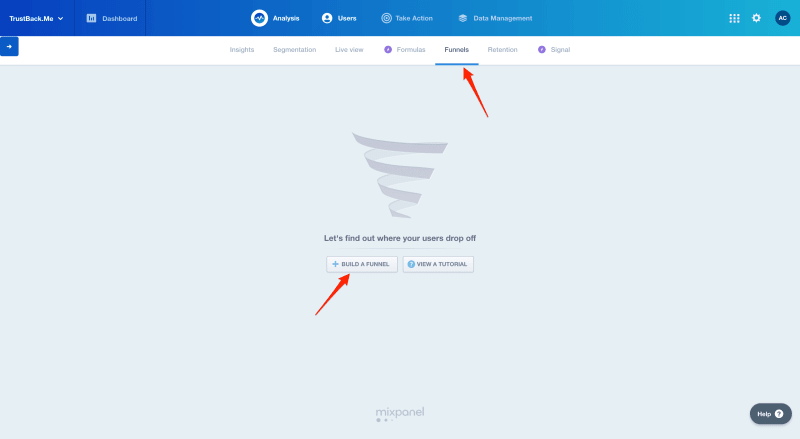
So, start by clicking on the “Funnel” tab on the horizontal menu and then click on “Build a funnel” button:
Now you can configure the funnel adding the relevant events:
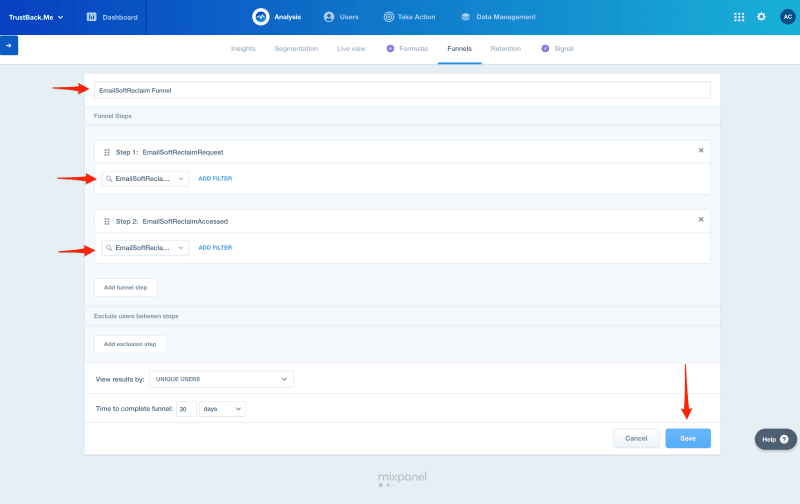
Click on the “Save” button and MixPanel will show you the funnel and the dropoffs:
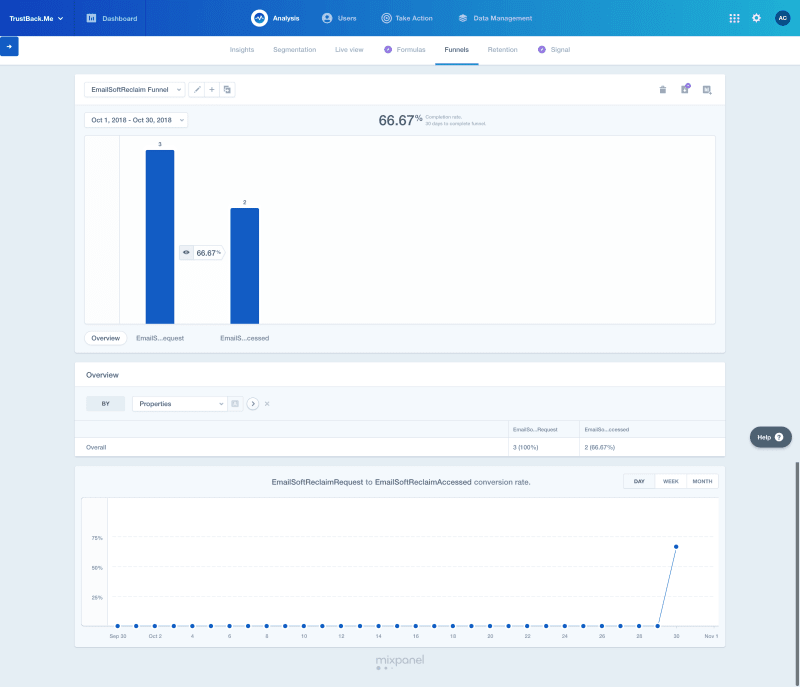
For more information about funnels in MixPanel click here.
Building the Email Soft Reclaim Report in Woopra
When you go to Woopra dashboard of your project, it doesn’t show any list of events: in Woopra, in fact, you don’t have a list of events. To see the details of each event, you need to go to the People report, then click on a visitor and you can see the list of all events fired by that person. Then, clicking on one event, you can see its details.
So, instead of showing a list of events, Woopra shows them all aggregated on the same chart:

Woopra calls a funnel report “Journey”, yes, the term we used early: we took it really from Woopra!
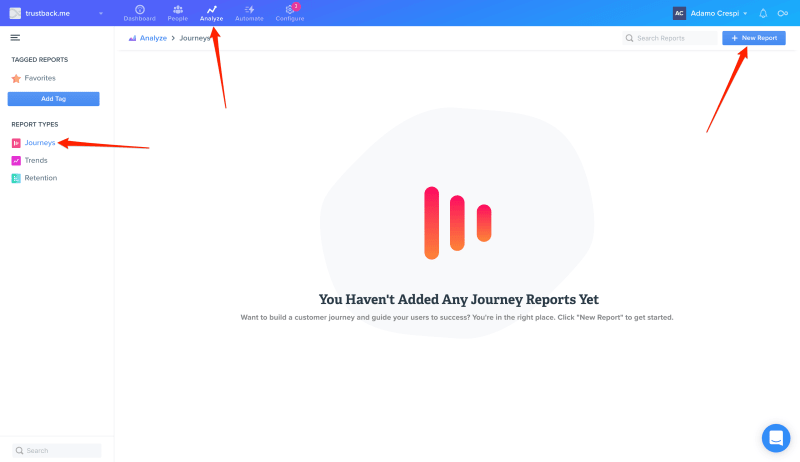
So, to create a funnel report in Woopra, you need to select the “Analyze” item in the horizontal top menu, then click “Journeys” in the “Report types” section of the left menu and in the page that loads, click finally on the “New report” button in the upper right corner:
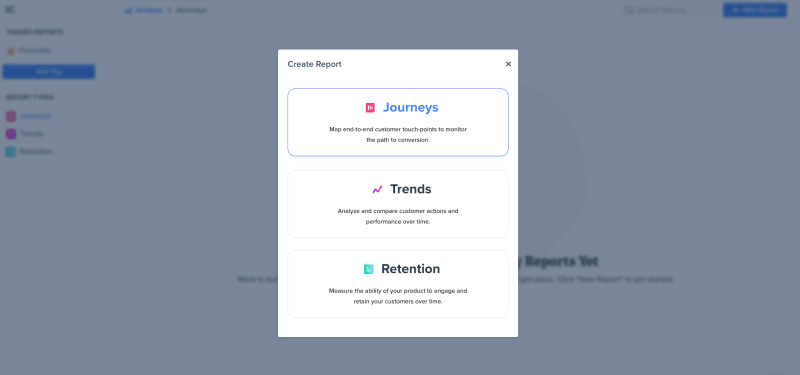
In the modal window that appears, select the first option “Journeys”:
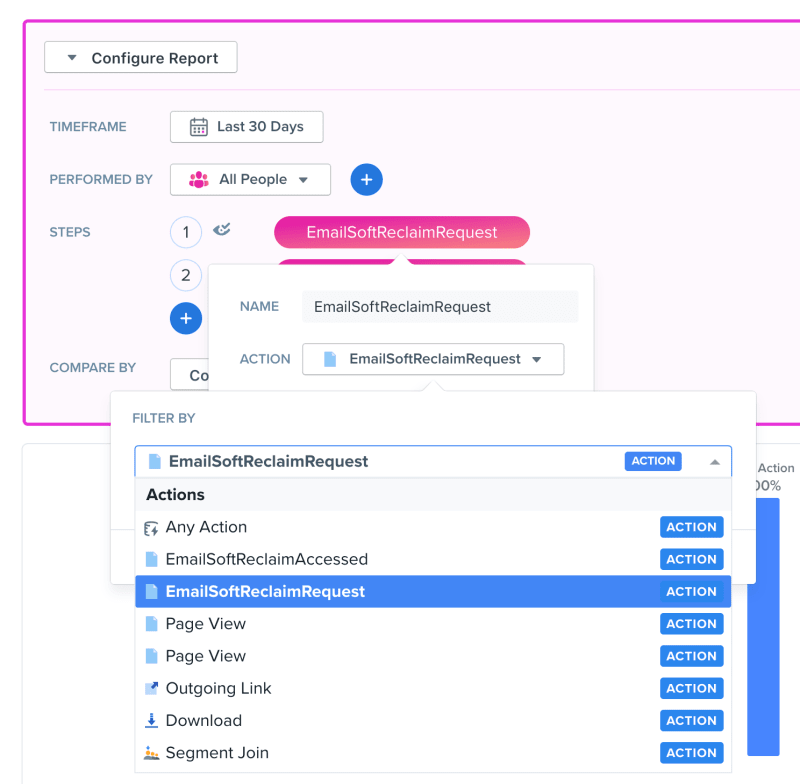
We are now ready to configure our funnel (Journey).
Add the relevant events to the journey and for each of them set also their name (yes: you need to write it manually -.-‘ – the price of flexibility?):
Then click on the green button “Run” in the upper right corner of the page and the journey is built:

As you can see, when I started to track events in Woopra, I never accessed the page that lists the orders associated with the email I provided.
If you like to know more about journeys (funnels) in Woopra click here.
Advanced funnels
A final note about Amplitude’s Funnels and Woopra’s Journeys: as I know that we as humans are visual people, I don’t want to leave you with the funnel I built that is really simplistic and ugly to see.
So, here there are more complex funnels built by the Amplitude’s and Woopra’s teams that better shows their functionalities:
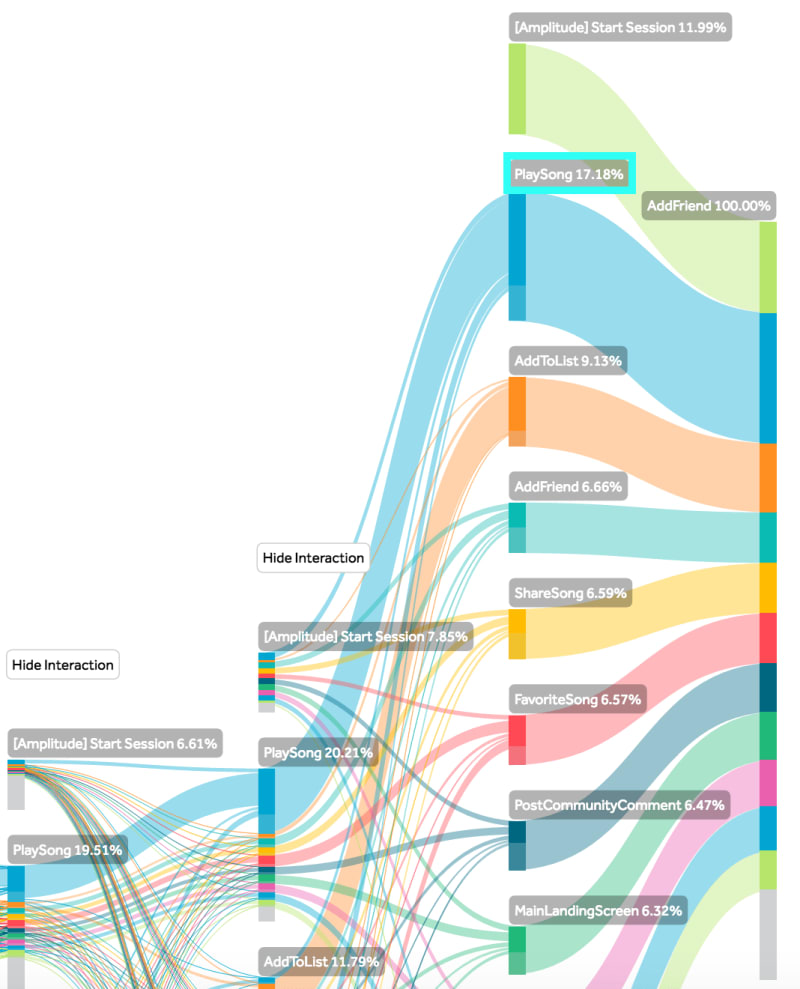

Much prettier 
NOTE: I wasn’t able to find a more advanced example from MixPanel. When I’ll find it, I will update the post.
Best Practices for events tracking
Finally, here there are some best practices from Amplitude about events:
- Only instrument properties you think you will use. Having too many properties makes analysis more difficult.
- Before you include sensitive information (email, addresses, etc.) consider if it goes against the privacy policies for your product.
- Enable the UTM and referrer user properties to better understand where you users come from on the web.
- Instrument key properties on every event in a critical path.
Others may be:
- Be consistent with names of events: don’t mix “CamelCased” and “snake_cased” names;
Woopra, instead, gives us some ideas about what events to track in a saas application.
Conclusions
Our journey in implementing a behavioural analytics tool to track our SAAS product is still at the beginning.
A lot of things still remain to understand and to implement.
But now we at least had seen some basic reports and started to grasp the surface of behavioural analytics.
I’d like to point out some important things:
- When you start implementing the tracking, focus only on a few properties and events: don’t over-track as this will make the implementation longer and the main mantra in the startup world is “Think big. Start small. Scale fast”. To follow it, you need a few events and a few properties;
- Keep particular attention to the PII you collect in your events: in the examples I provided I used the email. The email is a PII and its use in the tracking of events has really important consequences for the purposes of privacy compliance (in other words, compliance with the GDPR). Be careful!
Remember to “Make. Ideas. Happen.”.
I wish you flocking users, see you soon!
L'articolo How to track events with behavioural analytics tools proviene da ÐΞV Experiences by Serendipity HQ.


Top comments (0)