Building a WordPress theme from scratch can be a really heavy task.
But buying a stock theme may not always be an option.
The result is that you need to develop your theme from scratch.
And if you would like to use Bootstrap, the task may become very complex very fast.
Genestrap is the perfect solution: easy, fast and flexible.
And you can develop seriously, without being a mere WordPress “point-and-clicker”!
For most of the websites based on WordPress that I manage, I go to one of the stock theme websites, buy a nice theme and install and configure it.
This is a good way of making a website up and running in a very fast way.
However, when I had the necessity to build the marketing sites of TrustBack.Me (marketing, support, ecc.) I decided to use WordPress instead of reinventing the wheel and develop all from scratch with Symfony.
But buying a stock theme was not an option: making one of them match perfectly the look and feel of TrustBack.me’s app site would be a nightmare, if not impossible at all.
On TrustBack.Me I used Bootstrap on top of Twig and Symfony, but buying a Bootstrap based stock template would not have given me the flexibility of which Bootstrap is capable of.
I needed a different solution.
So I came upon Genesis framework home page: hey, this seemed the right tool for the job!
I could have added Bootstrap on top of it, use all the tools that make Bootstrap flexible, I could have continued to feel a developer, and, in the end, have a WordPress site perfectly matched with the app site of TrustBack.Me!
Something about Genesis

The Genesis Framework was the foundation on top of which was built the main theme of CopyBlogger, one of the best places on the Internet to learn about blogging and digital marketing.
Now it is developed by StudioPress, that is in turn managed by WP Engine.
StudioPress describes the Genesis Framework this way:
The Genesis Framework empowers you to quickly and easily build incredible websites with WordPress. Whether you’re a novice or advanced developer, Genesis provides the secure and search-engine-optimized foundation that takes WordPress to places you never thought it could go.
We chose the Genesis Framework as it makes us able to develop our custom WordPress theme, using the tools all the developers like us love (Git, Webpack, Gulp, Yarn or NPM, etc.), maintaining our WordPress very very fast (try to test Serendipity HQ!) and allowing us to continue to use our development workflows.
To get a full list of the features of Genesis, you can read this.
Something about Bootstrap

Bootstrap is a CSS framework originally open sourced by Twitter.
It is the foundation of a lot of websites on the Internet.
Bootstrap offers out of the box a lot of useful tools to develop the CSS of a website, offering the most used CSS elements.
The framework is highly customizable and permits to change practically everything on each installation (also if a lot of people simply download the framework as is, without any customization, making their website practically the same of many others).
We use Bootstrap on TrustBack.me as it permits us to speed up the development of the app and permits us to reach a high level of customization, too.
Why we built Genestrap

Genestrap, as the name implies, is the fusion of Genesis Framework for WordPress with the Bootstrap CSS Framework.
We use Genestrap on a lot of our projects, like TrustBack.Me (for the marketing site), here at Serendipity HQ (works also with multisite that we use for Serendipity HQ), on eCommerceRS.NET.
It is our foundation for any WordPress site we build internally or for clients when the budget allows us to use it.
We wanted to use Bootstrap on top of Genesis and as the bootstrapping work is always the same, we decided to ship it as a package to use as the starting point.
You can find the main repository of Genestrap on GitHub.
How to start developing your new WordPress theme based on Genstrap (Bootstrap + Genestrap)
We will use PHPStorm, but if you feel more comfortable, feel free to use the command line alone: we prefer PHPStorm because it will give us a lot of useful features that a command line alone (nor a simple, yet advanced and fully configurable editor like Atom) simply cannot offer.
STEP 1: Clone locally the Genestrap repository
From PHPStorm:
- Click on “Check out from Version Control” and select “Git” (or
VCS > Check out from Version Control > Git): the “Clone Repository” window opens; - Now set the URL of the Genestrap repository:
https://github.com/Aerendir/Genestrap.git; - Set the directory in which to clone the repo (we created a folder named
[ProjectName] > [GenestrapTheme]:SerendipityHQ.com > SHQ-GenestrapTheme; - Click on the “Clone” blue button and PHPStorm will start to clone the repository.
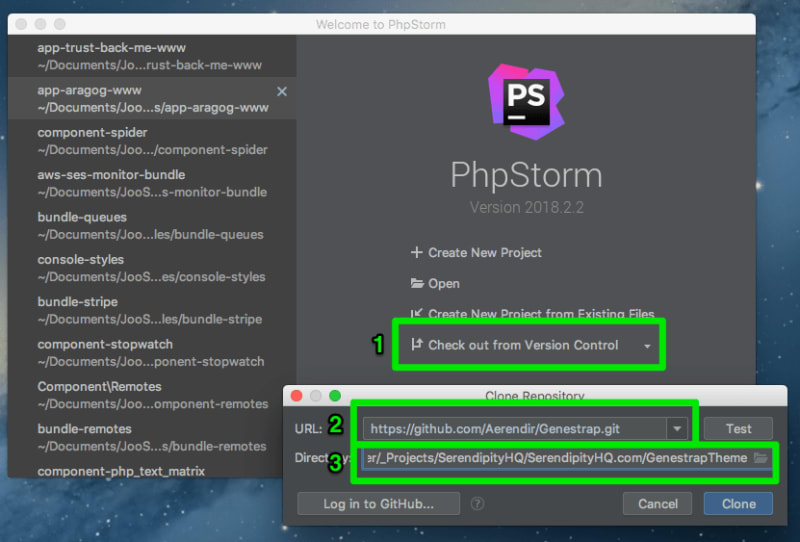
When the repository is cloned, PHPStorm will ask you to open the new project: click on “Yes” blue button.
STEP 2: Create the src/style.css file
Copy the file src/style.dist.css in a new file called src/style.css.
This is the main entry point of the theme: the Theme Stylesheet.
It will be used by WordPress to get some useful information about your theme and to show a miniature in the list of themes available for your site once you have uploaded your new Genestrap-based theme.
It is a really simple file:
/*
   Theme Name: Genestrap
   Theme URI: http://www.serendipityhq.com/
   Description: This is Genestrap, Genesis with Bootstrap
   Author: Aerendir
   Author URI: http://aerendir.me

   Version: 0.1

   Tags: Genesis, Bootstrap

   Template: genesis
   Template Version: 2.3.0

   License: MIT

   Text Domain: shq-genesis-bootstrap
*/
Customize it with your details and the details of your project.
This is how I customized our Genestrap theme for eCommerceRS.NET:
/*
    Theme Name: eCommerceRS
    Theme URI: https://ecommercers.net/
    Description: This is the Genestrap based theme of eCommerceRS.NET.
    Author: Aerendir
    Author URI: http://aerendir.me

    Version: 0.1

    Tags: Genesis, Bootstrap

    Template: genesis
    Template Version: 2.3.0

    License: MIT

    Text Domain: shq-genestrap
*/
STEP 3: Create the config.php
Copy the file src/config.dist.php in a new file called src/config.php.
This file will set some base constants used by WordPress when showing you the theme in the list of themes.
It is a really simple file:
<?php

/*
 * All the configuration required to configure the theme
 */

return [
   'CHILD_THEME_NAME' => 'Genestrap',
   'CHILD_THEME_URL' => 'https://www.serendipityhq.com',
   'CHILD_THEME_VERSION' => '0.1'
];
This is how I customized the file for eCommerceRS.NET:
<?php

/*
 * All the configuration required to configure the theme
 */

return [
    'CHILD_THEME_NAME' => 'eCommerceRS',
    'CHILD_THEME_URL' => 'https://ecommercers.net',
    'CHILD_THEME_VERSION' => '0.1'
];
STEP 4: Create the functions.php
Copy the file src/functions.dist.php in a new file called src/functions.php.
This file sets some defaults of Genestrap.
STEP 5: Create the src/scss/style.scss file
Copy the file src/scss/style.dist.scss in a new file called src/scss/style.scss.
This is the file that really defines the customizations you will make to make the Genestrap theme really your Genestrap customized theme.
It basically includes Bootstrap and defines some other custom styles used by Genestrap.
More about this in a bit.
STEP 6: Create the src/scss/bootstrap.scss file
Copy the file src/scss/bootstrap.dist.scss in a new file called src/scss/bootstrap.scss.
This file defines the Bootstrap features that will be imported in your theme: this way if you don’t need some features of Bootstrap, you can simply exclude them and your resulting css will be lighter.
More about this in a bit.
STEP 7: Install Composer packages
Simply run composer install to install all the PHP dependencies:
MacBook-Pro-di-Aerendir:GenestrapTheme Aerendir$ composer install
Loading composer repositories with package information
Installing dependencies (including require-dev) from lock file
Package operations: 5 installs, 0 updates, 0 removals
- Installing composer/installers (v1.5.0): Downloading (100%)
- Installing squizlabs/php_codesniffer (3.2.3): Downloading (100%)
- Installing wp-coding-standards/wpcs (0.14.1): Downloading (100%)
- Installing stevegrunwell/wp-enforcer (v0.5.0): Downloading (100%)
- Installing wp-bootstrap/wp-bootstrap-navwalker (v4.0.2): Downloading (100%)
wp-coding-standards/wpcs suggests installing dealerdirect/phpcodesniffer-composer-installer (^0.4.3)
Generating autoload files
This step is required as, among the others, the dependency iswp-bootstrap/wp-bootstrap-navwalker installed: it is required to make the menus work well and is copied in the theme’s package when you build it (we will see in a bit how to do this).
STEP 8: Install Javascript dependencies
You can use both NPM or Yarn to install the Javascript dependencies: we prefer Yarn, so our example will use it.
Simply run the command yarn install to install the Javascript dependencies:
MacBook-Pro-di-Aerendir:GenestrapTheme Aerendir$ yarn install
yarn install v1.7.0
info No lockfile found.
(node:22378) [DEP0005] DeprecationWarning: Buffer() is deprecated due to security and usability issues. Please use the Buffer.alloc(), Buffer.allocUnsafe(), or Buffer.from() methods instead.
[1/4] ? Resolving packages...
warning gulp-sass > gulp-util@3.0.8: gulp-util is deprecated - replace it, following the guidelines at https://medium.com/gulpjs/gulp-util-ca3b1f9f9ac5
warning popper > rijs.sync > xrs > uws@9.148.0: stop using this version
[2/4] ? Fetching packages...
[3/4] ? Linking dependencies...
warning " > bootstrap@4.0.0" has unmet peer dependency "popper.js@^1.12.9".
[4/4] ? Building fresh packages...
success Saved lockfile.
warning Your current version of Yarn is out of date. The latest version is "1.9.4", while you're on "1.7.0".
info To upgrade, run the following command:
$ brew upgrade yarn
 Done in 44.88s.
Yes, I need to update Yarn on my machine. ?
Anyway, you now have all the required Javascript dependencies installed: they are required to build the theme being able to upload it to your WordPress website.
STEP 9: Building the theme
Before starting customizing the theme, let’s finish our round up to understand the complete flow: later I will explain you how to customize it, too.
So, the next step is to build our theme.
The building process will create a folder ready to be compressed and uploaded where you like: directly in a WordPress site or on a server to make the theme downloadable by all WordPress sites that use it.
To build the theme, simply run gulp build:
MacBook-Pro-di-Aerendir:GenestrapTheme Aerendir$ gulp build
[17:59:08] Using gulpfile ~/Documents/JooServer/_Projects/SerendipityHQ/SerendipityHQ.com/GenestrapTheme/gulpfile.js
[17:59:08] Starting 'build'...
[17:59:08] Starting 'clean-build'...
[17:59:08] Finished 'clean-build' after 3.5 ms
[17:59:08] Starting 'build-css'...
[17:59:08] Finished 'build-css' after 18 ms
[17:59:08] Starting 'move-bootstrap-bundle'...
[17:59:08] Finished 'move-bootstrap-bundle' after 3.13 ms
[17:59:08] Starting 'move-php-files'...
[17:59:08] Finished 'move-php-files' after 7.67 ms
[17:59:08] Starting 'move-bootstrap-walker'...
[17:59:08] Finished 'move-bootstrap-walker' after 1.42 ms
[17:59:08] Finished 'build' after 39 ms
As you can see from the stopwatching, it requires a blink of an eye to complete.
When building is done, check the folder build: here you will find the built theme.
STEP 10: Compress, upload and activate your Genestrap based theme
At this point your theme is ready to be compressed: create an archive, then upload it to your WordPress website.
So, go to Appearance > Themes > Add theme > Upload file and upload:
- The Genesis Framework;
- Then, the just created archive.
Your list of themes will appear similar to this:

In the image, the theme is called “TrustBack.Me” as we developed it to manage its marketing site: in a bit, you will be able to customize its name, trust me!
Now, the only thing left to do is to activate the theme and go to the home page of your WordPress site to check it.
The result will be similar to this (obviously, with different posts!):
Conclusions and next steps
Creating a working theme with Genestrap is really an easy task: nothing more complex of creating a WordPress theme from scratch, but with the more heavy work already done for you.
Now it is time to do the next step: Implement a development workflow, so you can save your customized Genestrap-based WordPress theme and collaborate with others to improve it.
Remember to “Make. Ideas. Happen.”.
I wish you flocking users, see you soon!
L'articolo How to create your custom WordPress theme with Genestrap proviene da ÐΞV Experiences by Serendipity HQ.

Top comments (0)