Deploying a WordPress website to Google AppEngine is something documented by Google itself.
Anyway, this guide illustrates you in details all the steps you need to take to have a WordPress website up and running on the Google’s Platform, integrating this procedure into the bigger one of the continuous deployment of WordPress websites and extensions.
Please, if you like, feel free to comment with links or instructions that you think are useful (all comments, obviously, will be patiently and meticulously evaluated).
Configuring the local environment for Google AppEngine’s Cloud
1. Setting up the Google AppEngine Environment
- Create the local folder GoogleAppEngine in your main development directory.
- From terminal, enter into it
> cd path/to/your/devroot/GoogleAppEngine
- Sign up for a Google Cloud Platform project: http://cloud.google.com/console
- Create a new project and call it as you like. I called it “Continuous WordPress – CMS” and set “continuous-wordpress-cms” as project-ID. In the rest of this guide, substitute them with the name or the project-ID of your own Google App project.
- Install Google SDK;
- Open it and configure the project we’ve just created via the Google Dev Dashboard Set the correct path (the one pointing to the GoogleAppEngine folder). Here a new folder will be created named with your-project-ID and with some bootstrapping files into, something like
> cd path/to/your/devroot/GoogleAppEngine/continuous-wordpress-cms
> ls
app.yaml    favicon.ico main.php
You will have
> cd path/to/your/devroot/GoogleAppEngine/your-project-id
> ls
app.yaml    favicon.ico main.php
- Run the WordPress project clicking on the green button “Run”, in the Google SDK top-left side of the window. On the left of the app name you will see the icon of a clock that after a few seconds becomes a green Play icon. TROUBLESHOT. If, instead, appears an Alert icon, click on the “Logs” button: in the new window the last line of the log reports the error that caused the crash. If it is something like
raise BindError(‘Unable to bind %s:%s’ % self.bind_addr)
google.appengine.tools.devappserver2.wsgi_server.BindError: Unable to bind localhost:8080
then there is a problem with the ports.
To fix it:
- In the menù bar, click on Edit > Application Settings
- Change the “Port” param to something like 8081 (or another port number you know is free)
- Save the new configuration
- Retry to Run the Google SDK server.
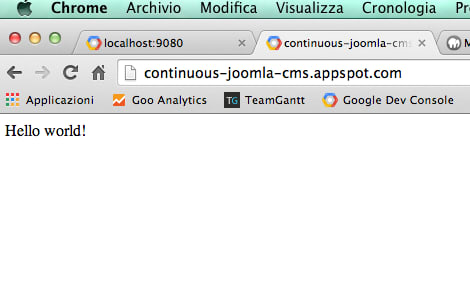
- Now click on the icon of you browser, in the same menu bar of “Run”: a new page will open and you should see something like “Hello world!”. This text is outputted by the main.php file in the folder downloaded from the Google Cloud and is a file created by Google to test that the app is working well.
2. Try to deploy a dummy app to Google AppEngine
Now, let’s try to upload those three dummy project files to the Google AppEngine Cloud.
- Open app.yaml and edit the
versionparameter, setting up it totest-1:
application: continuous-wordpress-cms [your-app-id]
version: test-1
runtime: php
api_version: 1
threadsafe: yes

handlers:
- url: /favicon.ico
  static_files: favicon.ico
  upload: favicon.ico

- url: .*
  script: main.php
Attention, please : in this code, application is set up to be continuous-wordpress-cms. If you copy and then paste this code to your app.yaml file, take care of changing the “application” param: use the application ID of your own app!
- Save the file app.yaml
- In the Google SDK, click the blue “Deploy” button, on the top-right area of the SDK
- Provide you Google credentials (the ones you use to connect online to your Google account). If you use the Google’s Two Factor authentication, you may need an app password: https://support.google.com/accounts/answer/185833
- After the deploying is complete, go to continuous-wordpress-cms.appspot.com (changing continuous-wordpress-cms with the project ID of your deployed app): if all gone well e right, you should see something like this:
- Now go to your Google Developer Dashboard, select the WordPress CMS project and go to COMPUTE > APP ENGINE > Versions: here you’ll find all deployed versions of your app.
- Go to url: http://test-1.continuous-wordpress-cms.appspot.com/. The app outputs “Hello World!”, as we know.
Let’s better understand the versioning system of the Google AppEngine Cloud Platform.
3. Understanding and Using the Google AppEngine Cloud Platform versioning system
- Edit the app.yaml file changing
version: test-1
into
version: test-2
and save the file.
- Open main.php and change its content from
<?php
    echo 'Hello world!';
to
<?php
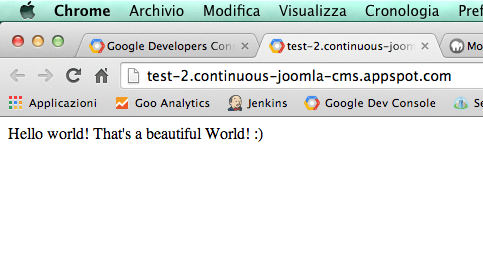
echo 'Hello world! That's a beautiful World! :)';
and save it.
- Deploy the new version of your app: in the Google SDK, click on the blue button on the right top of the window, “Deploy”.
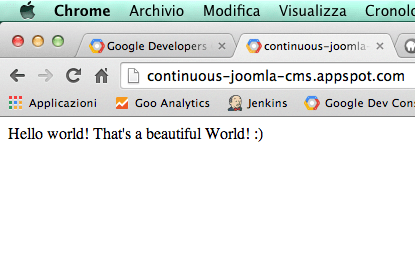
- Go to continuous-wordpress-cms.appspot.com: nothing changed o.O
- But, wait a moment… Go to test-2.continuous-wordpress-cms.appspot.com: you should see something like
 So it works!
- Ok, go again to your Google Developer Dashboard in COMPUTE > APP ENGINE > Versions: now here should be a second version, the “test-2” we’ve just deployed: it’s not yet the default public version, let’s make it the default one!
- Go again to continuous-wordpress-cms.appspot.com…
And now… let’s enjoy this moment, we’ve just touched the clouds, “metaphorically literally” speaking… mmm… let’s listen, it’s better 
Try to deploy a WordPress CMS website to the Google AppEngine Cloud Platform
Now that our dummy app is deployed and works well, it’s time to go one step further and try to make a WordPress CMS website work on the Google Cloud’s servers.
1. Set Up the Local Environment and some useful things
NOTE: You should separate all the above and put it into a general post (use aerendir as example!) and link the new post here.
Here the dev has to only create the new project in the GoogleAppEngine Launcher
- Open app.yaml and edit the version from the current
version: 1
to
version: test-1-wordpress
and save the file;
- Open the Terminal and go to the Google AppEngine folder:
> cd path/to/your/devroot/GoogleAppEngine
- Here clone the WordPress repository from GitHub:
> git clone -b 3.9-branch https://github.com/WordPress/WordPress.git
- Now clone the master branch of Google AppEngine WordPress Starter Project. ATTENTION: Take care of the –recursive flag!
> git clone --recursive https://github.com/GoogleCloudPlatform/appengine-php-wordpress-starter-project.git
Now that we have all things we need to start… let’s start installing WordPress on Google AppEngine!
Prepare the WordPress CMS for Google AppEngine
On the GitHub page of the AppEngine PHP WordPress Starter Project the README file states that there are 3 steps:
- Edit the wp-config.php file;
- Edit the app.yaml file;
- Move files into right location using one of the two provided move_files_after_editing scripts.
Once you’ve taken those 3 steps, you’ll can start the WordPress installation in the AppEngine local engine.
Let’s better understand what we should have to do: this way we can better understand the system, easier diagnose causes of problems, run any version of WordPress (and, may be, of other CMS, such as, for example, Joomla!) on Google AppEngine without having to wait for updates from Google or someone else.
Understanding the mechanisms and challenges behind this project, you will be free… more or less…
Edit wp-config.php and compare it with wp-config-sample.php
The first thing we should deserve attention to are the two configuration files: the original one from /path/to/dev/root/GoogleAppEngine/appengine-php-wordpress-starter-project/wordpress/wp-config-smaple.php and the second one provided by the Google AppEngine WordPress Project and placed in /GoogleAppEngine/appengine-php-wordpress-starter-project/wp-config.php.
For the rest of this guide, wp-config.php will be the file provided by Google, while wp-config-sample.php will be the original file of a WordPress copy.
So, let’s open the two files, wp-config-sample.php and wp-config.php.
In the wp-config-sample.php you’ll find some constants where are stored the database parameters and other info.
In wp-config.php, instead, we find ever those constants, but grouped into an if statement.
As highlighted in the code, we find also the constant WP_CACHE set to true.
This last constant (but first in the code) permits to use the cache on Google AppEngine, so, among other things, you’ll can pay less money because of the use of the cache instead of the database (because you have to pay only when you use the Cloud SQL instance, namely “the database”). But this is a topic we will cover some paragraphs below.
For the moment, let’s focus on the if statement, that is the editing of which Google speaks about in the installation instructions at “Step 2: Edit the config files“.
There, there’s a check (a control) on the environment in which the WordPress installation is running, switching parameters between the ones needed on your local environment and the ones needed on Google AppEngine.
As you can see by your own eyes, we need database info.
Set up a Google AppEngine Cloud SQL instance and the Local Database
To set up a Google AppEngine Cloud SQL instance you need to enable billing for the project and then:
- Go to your AppEngine Console, select your app and go to STORAGE > Cloud SQL;
- Click on the red button “New Instance” on the top left corner;
- Set your preferred parameters for the database:
Here the Google’s instructions suggest to use the name “wordpress” for the instance, so it is possible to use directly the edited files provided. For this guide, i will use, instead, the name “continuous-wordpress-cms-db” for the instance, so we have to get our hands dirty
 As “Billing plan”, select “Per use”, so you’ll pay only when the instance will be executed.
 - Create the new instance and wait until it is ready to use.
Done, now we have a database in the form of a Cloud SQL instance. We don’t remain other to edit the file wp-config.
Before this, however, we need to create also a local database.
To create a local database you can use the databasesetup.sql: it contains simply only one SQL instruction, the one that creates the database calling it “wordpress_db”, so you could also do this using PHPMyAdmin or whatever other tools you like.
I created mine with PHPMyAdmin and called it SandBox_GoogleAppEngine_WordPress (if you use underscores in the database names, PHPMyAdmin can do some really pretty things ).
Now we have really all done and are ready to edit the file wp-config.php
Add database parameters to wp-config.php
In the file wp-config.php you have to edit the line 22, where you have to set the local database name.
Then, to configure a Cloud SQL instance you need only the project-ID and the name of the Cloud SQL instance.
At line 26 of wp-config.php, you simply have to substitute
define('DB_HOST', ':/cloudsql/your-project-id:wordpress');
with something like
define('DB_HOST', ':/cloudsql/continuous-wordpress-cms:continuous-wordpress-cms-db');
In the else statement, you may need to change the host from 127.0.0.1 to localhost and the other settings, database user and database password. Please, consider that changing the host from the number version to the string version may cause you issues during the installation procedure (see infra, Running WordPress locally)
It’s so easy to change default parameters!
Edit the file app.yaml
In this file we need to modify only the first line, the “application” param, changing it with your App’s project-ID: I used “continuous-wordpress-cms”.
If you like, you can also change the “version”: I changed it into “test-0”.
Move files into place
To move files in the correct place, Google suggests (https://github.com/GoogleCloudPlatform/appengine-php-wordpress-starter-project/blob/master/README.md#step-3-move-files-into-place) to use one of the two provided script.
But if we try to open them, we discover something that i think should deserve some more attention: in that file you’ll find The Commands!
cp -fr wp-config.php wordpress/
cp -fr batcache/advanced-cache.php wordpress/wp-content/
cp -fr batcache/batcache.php wordpress/wp-content/plugins/
cp -fr wp-memcache/object-cache.php wordpress/wp-content/
cp -fr appengine-wordpress-plugin/. wordpress/wp-content/plugins/
rm -rf batcache/
rm -rf wp-memcache/
rm -rf appengine-wordpress-plugin/
Only the cp commands are worth of attention. The rm one only deletes “garbage”.
The -fr flags stands for -f, -force and -r, -recursive.
So, we have to move:
- Batcache;
- Memcache;
- AppEngine WordPress Plugin;
We will move those files manually, to take the occasion to learn something more about what’s happening.
After those moves, we will simply clean, deleting “garbage”. Let’s start.
Understand Batcache and Move It
The Batcache (https://github.com/Automattic/batcache) plugin is one of the many alternatives available.
It is developed by Automattic itself (the lead developers behind WordPress) and it’s perfect to be used on Google AppEngine as it does not use files to store cached pages but only the RAM, so no files are written on the disk (that is impossible on Google AppEngine) and, more and better, no calls are made to the Cloud SQL instance, and no calls means no money to pay to Google!
Batcache is a developer-only friendly plugin and to install it in your WordPress copy you have to however get your hands dirty), independently of Google AppEngine.
But, while on a traditional hosting there is also a server side to deserve, on Google AppEngine only the WordPress side is worth of attention and, in this case, the installation is pretty easy: from appengine-php-wordpress-starter-project/batcache/ folder, simply copy the two files in the correct positions in the appengine-php-wordpress-starter-project/wordpress/ folder. From the command line:
> cd appengine-php-wordpress-starter-project/batcache/
> cp advanced-cache.php ../wordpress/wp-content/
> cp batcache.php ../wp-content/plugins/
You can change the configuration directly in wp-config.php (are the last lines) and opening the file advanced-cache.php you can see other params on which you can act.
A final note on this: the plugin Batcache is activated by the constant WP_CACHE set to true on line 18 of the file wp-config.php.
The file batcache-stats-example.php write some collected stats.
To use it, in theory, you need to copy it in ..wordpress/wp-content, renaming it deleting the “-example” string (https://github.com/Automattic/batcache/blob/master/advanced-cache.php#L2-L7) and editing it to fit your configuration. This in theory.
In practice it writes file on the filesystem and, as we discovered (v. supra, in this paragraph), may be you will need a Google Cloud Storage bucket (https://cloud.google.com/products/cloud-storage/). But, no fear, we will anyway create one later in this guide (v. infra): once done, you’ll can ever come back here to go deeper in this topic, can’t you?
For the moment, let’s go deeper into Memcache, that is used by Batcache and needs to be moved, too.
Understand Memcache and Move It
Ok, some tricky thought: the provided wp-memcache plugin is a fork (https://github.com/jeremyfelt/Memcached-Object-Cache) of the original one wp-memcache, Memcached Object Cache (http://wordpress.org/plugins/memcached/), an implementation for WordPress of Memcache (http://php.net/manual/it/intro.memcache.php), a PHP server-side module that is, in turn, an implementation of Memcached, that is a
Free & open source, high-performance, distributed memory object caching system , generic in nature, but intended for use in speeding up dynamic web applications by alleviating database load.
From: http://memcached.org/
The conclusion of those tricky thought, apart from the new information and new research ideas you may now have, is that, as suggested by the author of the fork (https://github.com/jeremyfelt), you should substitute the folder wp-memcache in the cloned Google’s WordPress AppEngine Starter Project with the one downloaded from the original Memcached Object Cache plugin page on WordPress.
The instructions (http://plugins.svn.wordpress.org/memcached/tags/2.0.2/readme.txt), cited by Google, tell you simply you have to put the file /wp-memcache/object-cache.php in the /wp-content/ folder.
> cd ../
> cp wp-memcacheobject-cache.php wordpresswp-content
Understand Google AppEngine for WordPress plugin and Manually Install It
Google App Engine for WordPress enables seamless operation of your WordPress-powered site on the App Engine PHP runtime.
This plugin adds overrides to core functionality in WordPress to use App Engine infrastructure, such as the Mail functionality, and uploading media to Google Cloud Storage.
From: https://github.com/GoogleCloudPlatform/appengine-wordpress-plugin/blob/master/readme.txt#L15-L20
As you can read, it does a lot of things, too many to be covered here. Some bread crumbs:
- In the “importer” folder there’s a rewrite of the native WordPress’ import procedure to adapt it to the Google AppEngine environment and to fits its restriction;
- index.php is a placeholder to prevent direct access to folder and indexing from search spiders while appengine.php contains some functions used by the plugin and includes the “modules” files;
- The “modules” folder is the most intresting, as there there’re are the real rewrites to the WordPress core.
Postponing a deeper analysis of the Google AppEngine for WordPress plugin to a second time, for the moment limit ourselves to the installation in our WordPress copy.
Nothing more of a manual installation of a WordPress plugin (http://codex.wordpress.org/Managing_Plugins#Manual_Plugin_Installation):
> cp -fr appengine-wordpress-plugin/. wordpress/wp-content/plugins/
Clean the folders deleting “garbage” and move all files to your Google AppEngine project root folder
Now that we’ve copied all the files to the correct positions, we can also delete the source folders as they, not only simply occupy just a little bit of space on the disk and, specially, on Google AppEngine, but they, above all, create muddle in our project workspace, so, let’s delete them:
rm -rf batcache/
rm -rf wp-memcache/
rm -rf appengine-wordpress-plugin/
rm -rf appengine-php-wordpress-starter-project_build_linux_mac.zip
rm -rf appengine-php-wordpress-starter-project_windows.zip
rm -rf move_files_after_editing.bat
rm -rf move_files_after_editing.sh
rm -rf databasesetup.sql
I would let there the README.md, too, while we still need the other not deleted files.
Now that all is clean and set up, move all the files (the wordpress folder and the files app.yaml, cron.yaml and php.ini) to your Google AppEngine App’s root folder (the one you configured at the beginning of this guide, see supra).
In this new position, maybe you want to delete the file main.php as we don’t need it anymore.
Finish. Now we are ready to Run WordPress locally for the first time. Let’s try.
Run WordPress Locally
Now that all it’s in place, let’s run the project on our machine through the Google AppEngine Launcher.
- Select the “Continuous WordPress CMS” project in the Google AppEngine Launcher and click on the green button “Run”;
- Click the Browse button (or go directly from your browser to http://localhost:8080/ – please, take care of the port number, that has to be the same you configured in the Google AppEngine Launcher!) and test if all work well.
All should work well and you should be able to complete the installation procedure.

However, it is possible you’ll fall into some troubles (for me was a database connection error): in this case, the easier way to find the error is to edit the file wp-config.php again and activate the debugging functions. To do this, simply change to true the value of the constant WP_DEBUG on line 97.
If you have troubles connecting to MySQL and you’ve changed in wp-config.php the DB_HOST constant from the numbered version (127.0.0.1) to the string version (localhost), you may find this helpful: http://stackoverflow.com/questions/20600886/configuring-mysql-connection-in-google-app-engine-php-sdk-on-windows-7
If you receive a notice similar to
Notice : Undefined property: batcache::$genlock in /_SandBox/GoogleAppEngine/continuous-wordpress-cms/wordpress/wp-content/advanced-cache.php on line 510
don’t worry: it’s because the property “genlock” is not set everytime by Batcache and so, sometimes, it generates this innocuous notice.
Try refresh a few times the page as a first attempt to solve the issue. If it persists… open the file an go to the line: I’m sure there you’ll understand what’s happening
The following warning
Warning: Cannot modify header information – headers already sent by (output started at /_SandBox/GoogleAppEngine/continuous-wordpress-cms/wordpress/wp-content/advanced-cache.php:510) in /_SandBox/GoogleAppEngine/continuous-wordpress-cms/wordpress/wp-admin/install.php on line 52
is caused by the previous notice, so, for this too, do not worry… or read the code.
Deploy WordPress to Google AppEngine (and re-install)
Now that we’ve tested WordPress locally, it’s time to deploy it to the Google’s Cloud.
Let’s do it just now, so we’ll have time to say a few more things about databases and Cloud SQL in the meantime, so:
- In the Google AppEngine SDK, click on the blu button “Deploy” on the top-right corner of the window;
- Insert your credentials if asked;
- Wait until the deployment is done.
Configure the Google Cloud SQL instance
A few more words about databases and Google Cloud SQL instances:
- Like or not, you’ve installed WordPress only locally, through localhost:8080 and now you have to install WordPress again it in the Google Cloud SQL instance and through the continuous-wordpress-cms.appspot.com URL;
- Before you can install WordPress from the AppSpot’s URL, you have to create a database and you can do it only through the command line;
- To use the command line to connect to your Google Cloud SQL instance, you have to ask for an IP and configure it. NOTE from Google Dev Console: “With the Per Use pricing plan, you will be charged an additional $0.01 per hour when the instance is not running.” (but only for a few minutes, trust me, i’ll explain you this in a few moments).
We were saying…? We have to obtain an IP address for our Google Cloud SQL instance.
Assign an external IP address to your Google Cloud SQL instance
- Go to your Google Developer Console (https://console.developers.google.com/), select your app and then go to STORAGE > Cloud SQL;
- Click on your Cloud SQL instance, something like continuous-wordpress-cms:continuous-wordpress-cms-db, and click the grey/white Edit button;
- In the edit page, go to section “Assign IP Address” and check “Assign IP Address”;
- Open a new tab in your browser, or a new window if you like more, and google for “my ip”: https://www.google.com/search?q=my+ip, then click on the first useful result (usually the first);
- Copy your IP and paste it in the form on the page of the Google Cloud SQL instance you are editing;
- Save the editings (if you have some sort of troubles as i had, remember that The Zoom exists! ).
After you’ve saved, you’ll come back to the instance’s dashboard: here, copy the instance’s IP address, it’s in the properties section, is the first line.Don’t close the Console’s page because we’ll need some of its info in the next step.
With an IP assigned to our Google Cloud SQL instance, we can now create a database into it.
Create the database in the Google Cloud SQL instance
- Open the terminal and connect to your remote Cloud SQL instance by typing
google_sql.py <PROJECT_ID>:wordpress
so, it’s something like
> google_sql.py continuous-wordpress-cms:continuous-wordpress-cms-db

Google SQL Client

Type "help" or "?" for help.

Connecting to Google SQL database "continuous-wordpress-cms:continuous-wordpress-cms-db" on host None.
Using readline for history management.
Loading history file "/Users/Aerendir/.googlesql/continuous-wordpress-cms#continuous-wordpress-cms-db.hist"
sql>
- Now you can create the database
sql> CREATE DATABASE IF NOT EXISTS SandBox_GoogleAppEngine_WordPress;
Execution time: 0.677 seconds
1 row
- We can exit from the Google SQL tool, type simply
exit
sql> exit

Bye.
Saving history file "/Users/Aerendir/.googlesql/continuous-wordpress-cms#continuous-wordpress-cms-db.hist"
Disable the IP assigned to the Google Cloud SQL instance
Now that we have created the database, we don’t need an assigned IP anymore, so we can also disable it.
Remember that
With the Per Use pricing plan, you will be charged an additional $0.01 per hour when the instance is not running.
From Google Developer Console, Cloud SQL Edit page
So, it seems we can disable the assigned IP. So, go to the Cloud SQL edit page and do it now. You can find the instruction some paragraphs above (see supra, Assign an external IP address to your Google Cloud SQL instance).
Install WordPress through the AppSpot’s URL
To install WordPress, go to http://continuous-wordpress-cms.appspot.com/wp-admin/install.php.
Go directly to installation page, and not before on the root expecting a behavior like an automatic redirect: it will never happen. Go directly to the installation page.
There, start compiling the form and go through the installation process.
At the end of the installation procedure try to login going to http://continuous-wordpress-cms.appspot.com/wp-admin: if you see the WordPress dashboard, congratulations, you’ve successfully installed WordPress on the Google AppEngine Cloud platform!

If you note some errors or notices or warnings, log in again, and again, and again, for a few times: they should disappear. If they persists… Read the code
Make WordPress work on Google AppEngine after the Deployment
After you have deployed your WordPress website to Google AppEngine and have tested if it works well by logging into its admin panel, it’s time to activate some plugins (the ones we moved from the cloned WordPress on App Engine Starter Project) and configure some other small things to be sure it can perfectly work.
As first thing, activate plugins.
Activate Batcache Manager and Google App Engine for WordPress plugins
- Go to your WordPress dashboard (take care of accessing it through the AppSpot’s URL!) and then to Plugins > Installed plugins;
- Check the checkboxes of the Batcache Manager and the ones of Google App Engine for WordPress;
- From the select box “Bulk actions” on the top-left corner of the page, select “Activate” and then click on the button “Apply”.
Set up the plugin Google App Engine for WordPress
The last thing to do in order to have a fully working copy of WordPress on Google AppEngine Cloud Platform, is to configure the homonymous plugin Google App Engine for WordPress by going to Settings > App Engine.
Here, you have to configure the mail server provided by the Google AppEngine Mail Service and the static files upload into a bucket configured through the Google Cloud Storage administration panel.
Set up the Mail Service in the Google App Engine for WordPress plugin
In this section of the Google App Engine plugin, you can decide to activate or deactivate the Mail Service provided by Google (https://developers.google.com/appengine/docs/php/mail/).
If you choose to use it, you can also set an email address to use as the sender in the emails sent from your WordPress copy.
Google provides really clear information about this:
For security purposes, the sender address of a message must be the email address of an administrator for the application or any valid email receiving address for the app (see Receiving Mail). The sender can also be the Google Account email address of the current user who is signed in if the user’s account is a Gmail account or is on a domain managed by Google Apps.
If you want to send email on behalf of the application but do not want to use a single administrator’s personal Google Account as the sender, you can create a new Google Account for the application using any valid email address, then add the new account as an administrator for the application. To add an account as an administrator, see the “Permissions” section of the Admin Console. Accounts must be given “Owner” or “Developer” level access when added.
You can also send mail using a domain account by adding the domain account under “Permissions” in the Admin Console. Domain accounts are accounts outside of the Google domain with email addresses that do not end in @gmail.com or @APP-ID.appspotmail.com. You should set the SPF records for your domain to indicate that Google is a trusted source for your email. For instructions on how to do this, see SPF records in the Google Apps help articles.
From: https://developers.google.com/appengine/docs/php/mail/#PHP_Sending_mail
Set up the Google Cloud Storage in the Google App Engine for WordPress plugin
The other section, and the last one also, refers to file uploading.
As in the Google AppEngine is not possible to write files directly to the file system, WordPress needs a “thing” that permits it to store files uploaded through its interface for whatever reason.
The “thing” of which we are speaking about is a Google Cloud Storage Bucket.
To create a bucket on Google Cloud Storage:
- Go to your Google Developer Console (https://console.developers.google.com/), select your app and then go to STORAGE > CLOUD STORAGE > Storage browser;
- Click on the red button “New bucket” on the top-left corner of the window;
- Enter the name for the new bucket (i used “continuous-wordpress-cms-storage”) and copy it;
- Go back to the Google App Engine for WordPress plugin’s settings page and paste in the proper filed the Google Cloud Storage bucket’s name;
All done, congratulations! You now have a fully working copy of WordPress running on Google AppEngine Cloud Platform
A deeper test on the new WordPress installation on Google AppEngine
Now that our copy of WordPress is deployed to and fully configured to use Google AppEngine, it’s time to go into a deeper testing session.
Create a new post and upload an image to test WordPress on Google AppEngine
The first thing you should do is to create a new post and upload into it an image, then save the new post. Does the procedure work?
If something doesn’t seem to work as expected, below in this page there are some useful info (see infra, Troubleshooting: if something not works as expected). If also there you’ll not find a solution, please, leave a comment and wait for someone will try to help you as the best. And if you can help someone else, do it, please!
Register a new account to the WordPress website on Google AppEngine
The second thing you should do is to register a new account to the just deployed WordPress website on Google AppEngine to test the Mail Service.
Does the email arrive in your inbox? Which is the sender’s email?
As for the New Post Test, if something doesn’t seem to work as expected, below in this page there are some useful info (see infra, Troubleshooting: if something does not work as expected) and even the comment box.
Troubleshooting: if something not works as expected
The most cause of problems is Batcache, that generates a lot of notices and warnings around the code.
May be you have the time to help to fix them: https://github.com/Automattic/batcache/issues?state=open
Failing to save a new post
If saving the new post you find yourself in front of a notice that refers in some form to Batcache (something similar to Notice: Trying to get property of non-object in /base/data/home/apps/s~continuous-wordpress-cms/test-0-1.377307252371077596/wordpress/wp-content/plugins/batcache.php on line 42), you may have 2 alternatives:
- Simply try to save again and again and again, until you’ll success (is a cache problem, the repeated savings should could solve any problem);
- Turn off the displaying of the PHP errors et similia.
To turn off the PHP errors, you may modify the php.ini file in the root folder of your Google AppEngine project, adding a line like the following:
display_errors = Off
Unfortunately, this will not work as the displaying of errors is a precise Google’s design choice (http://stackoverflow.com/questions/23025942/cant-turn-off-display-of-php-errors-on-app-engine).
So the only solution to definitively solve the hiccup should be to fix the Batcache plugin that is the one that causes all those errors (and, actually, to me, seems also to be the smarter choice in the long run!).
Go here to see the pull requests to the Batcache repo: https://github.com/Automattic/batcache/pulls
But if you don’t have time to fix it, you should try to reload the All Posts page and open again the post you are trying to modify: you should find that your changes were anyway saved by WordPress, also if Batcache outputs some errors.
Instead, the subsequent warnings are simply a consequence of the notice: to modify headers it is required to not send output of any kind. But the notice is an output of some sort, so the Warnings jumped out
Here a sample of the errors we are speaking about:
Warning: Cannot modify header information – headers already sent by (output started at /base/data/home/apps/s~continuous-wordpress-cms/test-0-1.377307252371077596/wordpress/wp-content/plugins/batcache.php:42) in /base/data/home/apps/s~continuous-wordpress-cms/test-0-1.377307252371077596/wordpress/wp-admin/post.php on line 235
Warning: Cannot modify header information – headers already sent by (output started at /base/data/home/apps/s~continuous-wordpress-cms/test-0-1.377307252371077596/wordpress/wp-content/plugins/batcache.php:42) in /base/data/home/apps/s~continuous-wordpress-cms/test-0-1.377307252371077596/wordpress/wp-includes/pluggable.php on line 1121)
Failing to upload a new media file through the media manager
If you fail uploading a new file through the built-in WordPress media manager, probably you will receive an error like the one shown in the image below.
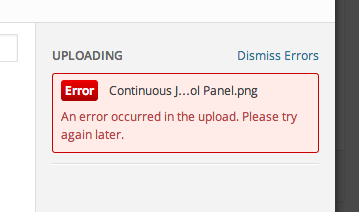
In this case, simply dismiss the Error (click on the blue link “Dismiss Errors”) and insert the image in the post as you would if nothing is happening, then save the file.
Apart from the Notice referring to Batcache (see supra, Failing to save a new post), the image should be anyway in place: try to load the post from the frontend and verify. If the image is not shown, please, leave a comment and we will try to help you as the best we can.
Notices about “Undefined property batcache::$query”
Notice: Undefined property: batcache::$query in /base/data/home/apps/s~continuous-wordpress-cms/test-permalink-1.377309360575349926/wordpress/wp-content/advanced-cache.php on line 388
Code here: https://github.com/Automattic/batcache/blob/master/advanced-cache.php#L380-L400
It seems that a simple if statement to assign the property should solve the issue:
https://github.com/Automattic/batcache/issues/35
Test before: http://test-plugin.continuous-wordpress-cms.appspot.com/
Test after: http://test-bugfix-1.continuous-wordpress-cms.appspot.com/
Bug fix pull request: https://github.com/Automattic/batcache/pull/36
If you have this warning appearing, check in wp-config.php the constant WP_DEBUG: set it to false.
Notices about “Undefined property batcache::$genlock”
Notice: Undefined property: batcache::$genlock in /base/data/home/apps/s~continuous-wordpress-cms/test-permalink-1.377309360575349926/wordpress/wp-content/advanced-cache.php on line 510
Code here: https://github.com/Automattic/batcache/blob/master/advanced-cache.php#L506-L516
Also in this case, the problem is a missing if statement (or, better, a better design of the class and of its methods and properties – does someone need a bit of refactoring?): https://github.com/Automattic/batcache/issues/34
If you have this notice appearing, check in wp-config.php the constant WP_DEBUG: set it to false.
Warnings about an invalid parameter for call_user_func_array()
Warning: call_user_func_array() expects parameter 1 to be a valid callback, first array member is not a valid class name or object in /base/data/home/apps/s~continuous-wordpress-cms/test-permalink-1.377309360575349926/wordpress/wp-includes/plugin.php on line 192
It appeared navigating http://continuous-wordpress-cms.appspot.com using a Chrome Incognito Window (https://support.google.com/chrome/answer/95464?hl=en).
Test: http://continuous-wordpress-cms.appspot.com/?p=4
I’ve never seen it before. Not investigated, yet.
But, again, if you have this warning appearing, check in wp-config.php the constant WP_DEBUG: set it to false.
Managing a WordPress site hosted on Google AppEngine
Now that our site is in the Google’s Cloud, let’s go to better understand how to manage it.
The most important things we need to learn how to do are the installation of a new plugin and the installation of a new theme, apart from the test of the permalinks.
As Google doesn’t allow us to write files directly to its Cloud Platform, we cannot use any of the automatic features that WordPress offers to install an extension (be it a plugin or a theme).
So we have anyway to pass through the local Google AppEngine Launcher and make here the manual installation, as we did for the Batcache plugin or the Google App Engine for WordPress one, then deploy our new version of our Google AppEngine app.
Test the Plugin Installation: Install a Google Analytics plugin
To repeat some of the already executed procedures, let’s try to install a new plugin into our Google-AppEngine-hosted WordPress site.
For this test, we will use the WordPress SEO plugin by Yoast (https://wordpress.org/plugins/wordpress-seo/).
Recapitulating what we’ve learnt and what we already know, we have basically two ways to install a new plugin in WordPress:
- Install it directly through the WordPress’ Administration panel;
- Manually copy the files in the wp-content/plugins folder and then activate them from the WordPress’ Administration panel.
The second option, once mastered, is the fastest and easiest way, but, as it was already shown (see supra, Understand Google AppEngine for WordPress plugin and Manually Install It), we will not use it.
Instead, we will think more about the first method, that, instead, writes the files directly on the filesystem (the download of the plugin package is a writing on the file system) and as this is not permitted by Google (see supra, Understand Batcache and Move It) seems to be, at a first look, a wrong way.
To be clear, is in any case possible to browse the available extensions from the Administration panel at the AppSpot’s URL, but is not possible to install them from directly there.
But… is it possible to use the WordPress built-in installer from a local machine, may be through the Google AppEngine Launcher?
… Mmm… Bingo! It’s possible! Let’s try it.
- From the localhost address, load the WordPress administration panel (run the project in the Google AppEngine Launcher and then click on the Browse button);
- Go to Plugins > Add new and search for the “WordPress Seo by Yoast” plugin;
- Once found, click on the Install now link, below its description. You can skip the activation step, as we are using the local database and, even if we activate it now, the activation wouldn’t be recorded too on the remote database;
- Change the version in your app.yaml file (i changed it from test-0 to test-plugin) and SAVE it;
- Deploy to the Google’s Cloud the new version of your AppEngine based app;
- In you Google Developer Console, go to COMPUTE > APP ENGINE > Versions and make the default the just deployed version by clicking on the grey/white button “Make default” on the top-left corner of the window;
- Go to your WordPress Dashboard Plugins management section, by pointing your browser to http://continuous-wordpress-cms.appspot.com/wp-admin/plugins.php;
- Here you should find the WordPress SEO by Yoast plugin: activate it;
- Configure the WordPress SEO by Yoast plugin (you may find useful to read this: https://yoast.com/articles/wordpress-seo/);
- Go to the frontend of your Google AppEngine app and ascertain that all works well.
May be you want to repeat the procedure again, this time to install Google Analytics for WordPress: https://wordpress.org/plugins/google-analytics-for-wordpress/
Test the theme installation: Install the theme IndependentPublisher.me
The installation of a theme is basically the same as the installation of a plugin:
- Download source files through localhost:8080;
- Change the version in app.yaml;
- Deploy the app to Google AppEngine;
- Configure the theme through the remote WordPress admin panel.
In practice:
- Download IndependentPublisher: http://wordpress.org/themes/independent-publisher
- Unzip it and move its folder to wordpress/wp-content/themes/;
- Open your browser and login using http://localhost:8080 as URL;
- Go to Appearance > Themes;
- Find Independent Publisher and activate it;
Does all work well? Good, let’s go to deploy through the Google AppEngine Launcher (don’t forget to change the version in app.yaml!).
When the deploying is complete, go to your Google Developer Console and make the just deployed version the default, then login into WordPress using the AppSpot’s URL.
Repeat the above steps from the 4 to the 5 (just activate the theme!) and go to the home page to see if all works well. If yes, you should see something like this:

Test the permalinks
Permalinks (http://codex.wordpress.org/Using_Permalinks) are nothing more of the permanent URl of your pages (categories, tags, posts, ecc.).
The activation of permalinks in a “normal” WordPress installation requires some changes to the .htaccess file (that is a direct writing on the filesystem and so prohibited and not permitted by Google).
Unfortunately, other than make it difficult to create an .htaccess file, Google AppEngine also doesn’t support the mod_rewrite PHP module.
So the only one solution is to write a script that “behaves like” the mod_rewrite PHP module.
Here there are some information you may find useful for the scope: https://developers.google.com/appengine/docs/php/config/mod_rewrite.
But, let’s try anyway to set them through the WordPress interface accessed from the AppSpot’s URL.
- Go to Settings > Permalinks and select the “Custom post” structure;
- Then add the following pattern:
/%category%/%postname%.html - Save the changes: WordPress tells you that “You should update your .htaccess now.”. But, let’s test the frontend of WordPress anyway…
- Go to the home page of your app on AppSpot (https://continuous-wordpress-cms.appspot.com): it should still work well;
- Click on the name of a post: WordPress doesn’t work. Actually, we need to edit the .htaccess file;
- Repeat the steps from point 1 to 3 again, but, this time, from the local WordPress Dashboard;
- Save the changes: this time WordPress tells you “Permalink structure updated.”. It seems it was able to write the file, while on AppEngine it wasn’t!
- Change the version in app.yaml (I changed it into
test-permalinks); - Deploy again your app to Google AppEngine through the Launcher and again go to your dashboard to make this new version the default one;
- Again, repeat the steps 4 and 5: WordPress should now work.
Remember to “Make. Ideas. Happen.”.
I wish you flocking users, see you soon!
L'articolo Deploying a WordPress CMS website to Google AppEngine Cloud Platform proviene da ÐΞV Experiences by Serendipity HQ.


Top comments (0)
Some comments may only be visible to logged-in visitors. Sign in to view all comments.