A Version Control System (in this article, VC) is a software that helps you control (or manage) the different versions...of something (typically source code). some of the most popular VC tools are: git, subversion and mercurial
thare are two types of VC models: centralized model and distributed model
centralized
in this model a central computer control all operations in the system. every action must go through this central model. distributed model
here there's no central repository, each computer has a complete version of the on there computer. this means they can also work offline.
why we need a VC tool
to provide us with the ability to:
the ability to label a change
the ability to give a detailed explanation of why a change was made
the ability to move between different versions of the same document
the ability to undo change A, make edit B, then get back change A without
affecting edit B
Git
Git is a distributed version control system.
git and VC terminologies
commit
You can think of it as a save point in a game - it saves your project's files and any information about them. repository
A repository is a directory which contains your project work, as well as a few files (hidden by default on Mac OS X) which are used to communicate with Git. Repositories can exist either locally on your computer or as a remote copy on another computer. A repository is made up of commits. working directory
The Working Directory is the files that you see in your computer's file system. This is in contrast to the files that have been saved (in commits!) in the repository checkout
A checkout is when content in the repository has been copied to the Working Directory. staging area/staging index/index
A file in the Git directory that stores information about what will go into your next commit. You can think of the staging area as a prep table where Git will take the next commit SHA
the id number for each commit Branch
A branch is when a new line of development is created that diverges from the main line of development
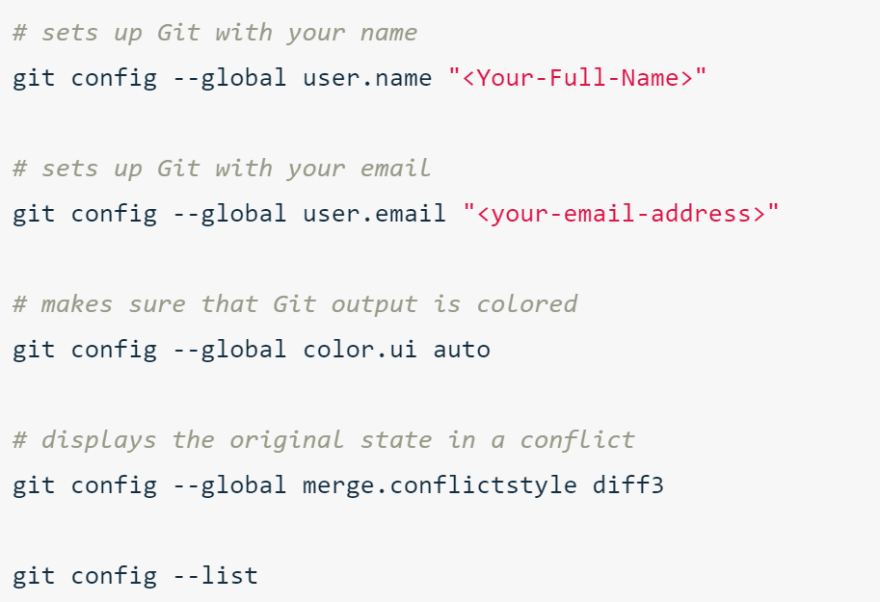
git configuration git config steps
git config --global core.editor your-editor's-config-went-here to set up your editor
git commands git init - to create a new repository git clone - to copy an existing repo git status - to determine the status of our repo git show - displays info about the given commit. requires the commit's SHA to
displays its information. git log - to review a repo's history. displays info about the existing
commits. git log can be navigated as you would less in bash
with the following: to scroll down j or arrow down to move down one line at a time d to move by half the page screen f to move by a whole page screen to scroll up k or arrow up to move up one line at a time u to move by half the page screen b to move by a whole page screen to quit out of the log, use q git log flags git log --oneline - displays all the commit history with just short SHAs and the commit message git log --stats - lists the files that were changed as well as the number of added or removed files git log -p or --patch - displays actual changes made to a file. -w flag can be added to
remove whitespaces git log -p first-seven-characters-in-SHA - does the same thing git show first-seven-characters-in-SHA does
making commits git add filename - adds file from the working directory to the staging index.
i.e stages the file. git add . adds all files in the
current directory git rm --cached * to unstage
*git commit - takes files from the staging index to the repository. git commit opens the editor you specified during configuration so you can write your commit message. this can be bypassed using the -m flag. i.e. git commit -m message
it is useful to follow your team's commit message convention. here is udacity's convention git diff - displays the difference between two versions of a file. its output
is exactly like the output of git log -p. it lets you see changes
that have been made but that haven't been committed yet git ignore - this is not a command. add file .gitignore to the same directory
the .git folder(your local repo) is located. write the names of
the files you want to ignore in this file
unrelated to topic but USEFUL: GLOBBING
for multiple files you want to gitignore, globbing comes in handy. Globbing lets you use special characters to match patterns/characters. In the .gitignore file, you can use the following:
So if all of the 50 images are JPEG images in the "samples" folder, we could add the following line to .gitignore to have Git ignore all 50 images.samples/.jpg*
git tag - adds tags to specific commits. a tag is an extra label for a commit
that can indicate useful information e.g. "this is the beta release" git tag -a v1.0 - opens up the code editor to write a message for the tag. the -a flag tells Git to create an annotated flag. If you don't
provide the flag (i.e. git tag v1.0) then it'll create what's
called a lightweight tag.
Annotated tags are recommended because they include a lot of extra information such as:
the person who made the tag
the date the tag was made
a message for the tag
the git tag command lists all the tags in a repo. git log displays where in the repo the tags are. Remember that tags are associated with a specific commit
git tag; git log
the HEAD refers to information about a branch
git tag -d v1.0 - deletes the tag named v1.0. the -d flag means delete and --delete flag can also be used
git tag -dgit tag -a v1.0 SHA - adds a tag to an existing commit. SHA refers to the 1st
seven characters of its SHA
git branch - allows multiple lines of development. git branch name-of-branch
creates a new branch of said name. HEAD points to the active
branch. git branch can also be used to list all branches in the
repo and to delete a branch. git log --oneline also displays the
names of all the branches in a repo git branch alt-sidebar-loc 42a69f - creates a branch alt-sidebar-loc and
makes HEAD point to the commit 42a69f git branch -d branchname - deletes the branch with the name specified
Deleting something can be quite nerve-wracking. Don't worry, though. Git won't let you delete a branch if it has commits on it that aren't on any other branch (meaning the commits are unique to the branch that's about to be deleted). If you created the sidebar branch, added commits to it, and then tried to delete it with the git branch -d sidebar, Git wouldn't let you delete the branch because you can't delete a branch that you're currently on. If you switched to the master branch and tried to delete the sidebar branch, Git also wouldn't let you do that because those new commits on the sidebar branch would be lost! To force deletion, you need to use a capital D flag git branch -D sidebar
git checkout - to switch between different branches and tags. git checkout
name-of-branch switches to the branch of said name to which HEAD now points git checkout -b branch-name - creates branch of said name and switches to it git checkout -b footer master - creates a new branch footer that starts from
the same spot as master git log --oneline --graph --all - --graph flag adds the bullets and lines to the leftmost part of the output. This shows the actual branching that's happening, --all flag is what displays all of the branches in the repository
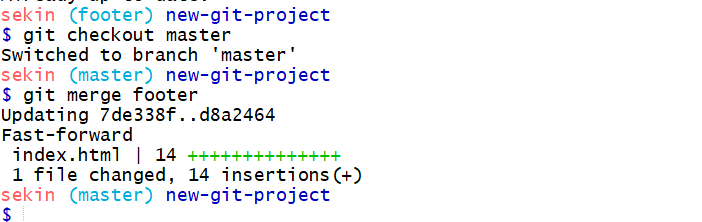
git merge - combines changes on different branches. there are two types of
merging, regular merge and fast-forward-merge footer is ahead of master fast-forward-merge occurs when for example in the image above,footer is merged into master even though footer is ahead of master.
A way to verbalize fastforward merge, I could say this is - "I want to merge in the footer branch". That "merge in" is important; when a merge is performed, the other branch's changes are brought into the branch that's currently checked out.
Let me stress that again - When we merge, we're merging some other branch into the current (checked-out) branch. We're not merging two branches into a new branch. We're not merging the current branch into the other branch. git merge "name-of-branch-to-merge-in" footer is merged into master Remember that making a merge makes a commit. normal git merge - requires a commit message because it is merging two
divergent branches
When a merge happens, Git will:
look at the branches that it's going to merge
look back along the branch's history to find a single commit that both branches
have in their commit history
combine the lines of code that were changed on the separate branches together
makes a commit to record the merge
merge conflicts - When a merge fails, it's called a merge conflict. what causes a merge conflict
Git tracks lines in files. A merge conflict will happen when the exact same line(s) are changed in separate branches.
Merge Conflict Indicators Explanation
The editor has the following merge conflict indicators:
<<<<<<< HEAD everything below this line (until the next indicator) shows you what's on the current branch
||||||| merged common ancestors everything below this line (until the next indicator) shows you what the original lines were
======= is the end of the original lines, everything that follows (until the next indicator) is what's on the branch that's being merged in >>>>>>> heading-update is the ending indicator of what's on the branch that's being merged in (in this case, the heading-update branch) resolve merge conflicts by deciding on which lines to keep and removing indicators and the commit the merge.
undoing changes git commit --amend - to alter the most recent commit. useful for if you forget
to include a file in the commit for example or had a typo
in the commit message. running git commit --amend will
let you provide a new commit message. Your code editor
will open up and display the original commit message git revert SHA - changes made in the specified commit are erased.
When you tell Git to revert a specific commit, Git takes the changes that were made in commit and does the exact opposite of them. Let's break that down a bit. If a character is added in commit A, if Git reverts commit A, then Git will make a new commit where that character is deleted. It also works the other way where if a character/line is removed, then reverting that commit will add that content back!
This command:
will undo the changes that were made by the provided commit
creates a new commit to record the change
git reset - to delete commits. commits have to be deleted in order. You've got
to be careful with Git's resetting capabilities. This is one of the
few commands that lets you erase commits from the repository. If a
commit is no longer in the repository, then its content is gone.
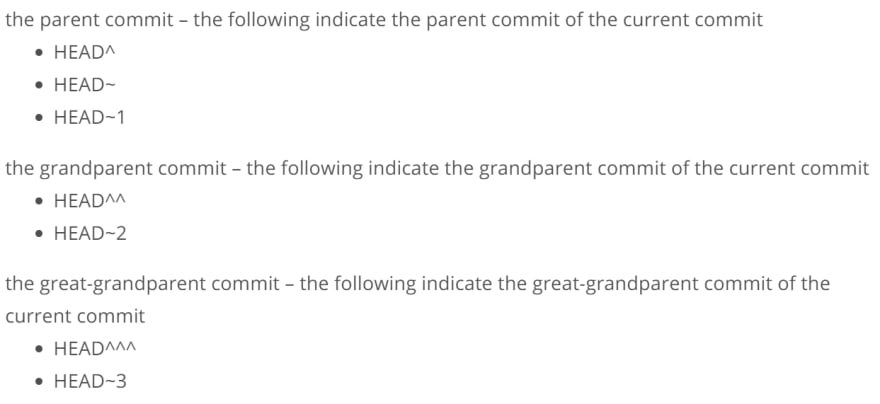
To alleviate the stress a bit, Git does keep track of everything for about 30 days before it completely erases anything. To access this content, you'll need to use the git reflog command. Check out these links for more info: git reflog reflog, your safety net git reset --hard HEAD^ - to undo changes. the ^ character is known as a
"Relative Commit Reference" and indicates "the parent
commit"
Relative Commit Reference
so we already know we can reference commits by their tags, SHA, branches and the special HEAD pointer. Sometimes that's not enough, though. There will be times when you'll want to reference a commit relative to another commit. For example, there will be times where you'll want to tell Git about the commit that's one before the current commit...or two before the current commit. There are special characters called "Ancestry References" that we can use to tell Git about these relative references. Those characters are:
^ - indicates the parent commit
~ - indicates the first parent commit
Here's how we can refer to previous commits:
The main difference between the ^ and the ~ is when a commit is created from a merge. A merge commit has two parents. With a merge commit, the ^ reference is used to indicate the first parent of the commit while 2 indicates the second parent. The first parent is the branch you were on when you ran git merge while the second parent is the branch that was merged in.
an example --graph --all
from the above diagram:
git reset flags --mixed --soft --hard
looking at
git reset --mixed HEAD^ - will take the changes made in commit 9ec05ca and move them to the working directory.
*If you created the backup branch prior to resetting anything, then you can easily get back to having the master branch point to the same commit as the backup branch. You'll just need to:
remove the uncommitted changes from the working directory
merge backup into master (which will cause a Fast-forward merge and move master up to the same point as backup)*
git reset --soft HEAD^ - will take the changes made in commit 9ec05ca and move
them directly to the Staging Index. git reset --hard HEAD^ - will take the changes made in commit 9ec05ca and
erases them
working with remotes
this part touches on using git to collaborate with a team with remote repos. there are many tools/services for hosting version control repos e.g. github, bitbucket, gitlab etc
continuing on with the git commands, this time to manage the remote repos: git remote - to manage remote repository. you can have multiple remote repos
for one local repo. The output of git remote is just the word origin.
The word "origin", here, is referred to as a "shortname". A shortname is just a short and easy way to refer to the location of the remote repository. A shortname is local to the current repository (as in, your local repository). The word "origin" is the defacto name that's used to refer to the main remote repository. It's possible to rename this to something else, but typically it's left as "origin". git remote -v - shows the full path of a remote repository git remote -v git remote add origin URL - to create a connection between a local repo and a
remote github repo
git push - to send changes up to the remote git push *remote-shortnamebranch * - To send local commits to a remote
repository you need to use the git push
command. You provide the remote short
name and then you supply the name of the
branch that contains the commits you
want to push. as in git push origin
master git push -u origin master - -u flag stands upstream. --set-upstream can
also be used notice the origin/master
the branch that appears in the local repository is actually tracking a branch in the remote repository e.g. origin/master in the local repository is called a tracking branch because it's tracking the progress of the master branch on the remote repository that has the shortname "origin"
git pull - to retrieve updates from the remote repository. git push will sync
the remote repository with the local repository. To do the opposite to sync the local with the remote, we need to use git pull
The format for git pull is very similar to git push - you provided the shortname for the remote repository and then the name of the branch you want to pull in the commits git pull origin master
If you don't want to automatically merge the local branch with the tracking branch then you wouldn't use git pull you would use a different command called git fetch. You might want to do this if there are commits on the repository that you don't have but there are also commits on the local repository that the remote one doesn't have either
git fetch - Git fetch is used to retrieve commits from a remote repository's
branch but it does not automatically merge the local branch with
the remote tracking branch after those commits have been received git fetch origin master
When git fetch is run, the following things happen:
the commit(s) on the remote branch are copied to the local repository
the local tracking branch (e.g. origin/master) is moved to point to the most
recent commit
The important thing to note is that the local branch does not change at all.
You can think of git fetch as half of a git pull. The other half of git pull is the merging aspect
other git log commands git shortlog - to group commits by author git log --author="author name" - filters commits by author name with the --
author flag git log --grep="commit message" - --grep flag is used to filter commits by
commit message. e.g git log --grep="border
radius issue in Safari"
contributing to another person's project is done by forking and creating pull requests. A pull request is a request to the original or source repository's maintainer to include changes in their project that you made in your fork of their project. You are requesting that they pull in changes you've made
CONTRIBUTING.md
The name of the `CONTRIBUTING.md file is typically written in all caps so that it's easily seen. As you could probably tell by its name, this file lists out the information you should follow to contribute to the project.
The best way to organize the set of commits/changes you want to contribute back to the project is to put them all on a topic branch. Now what do I mean by a topic branch? Unlike the master branch which is the default branch that holds all of the commits for your entire project, a topic branch host commits for just a single concept or single area of change.
best practices for contributing to another person's project
Write Descriptive Commit Messages
Create Small, Focused Commits
Update The README
staying in sync with source project
using stars and watching features available on the repo page. stars feature in github
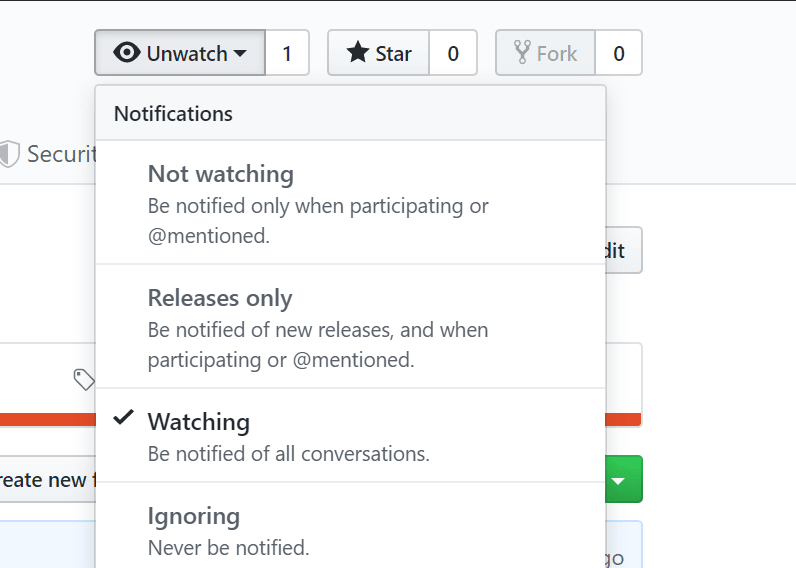
If you need to keep up with a project's changes and want to be notified of when things change, GitHub offers a Watch feature: watch feature
If you're working on a repository quite often, then I'd suggest setting the watch setting to "Watching". This way GitHub will notify you whenever anything happens with the repository like people pushing changes to the repository, new issues being created, or comments being added to existing issues.
Now lets say that you're watching it and you get notified that some commits have been pushed to the original, source repository. How do you go about getting those changes into your fork of the repository?
well, we can create a connection between our local repo and the original repo by creating a shortname typically upstream to represent the original remote repo.
git remote add upstream url-of-original-repo*
origin really means your own repo while upstream really means source-repo. their names can be changed as seen heregit remote rename current-remote-name new-remote-name
to get upstream changes
run a git fetch. git fetch upstream master
Recap of getting upstream changes
When working with a project that you've forked. The original project's maintainer will continue adding changes to their project. You'll want to keep your fork of their project in sync with theirs so that you can include any changes they make.
To get commits from a source repository into your forked repository on GitHub you need to:
get the cloneable URL of the source repository
create a new remote with the git remote add command
use the shortname upstream to point to the source repository
provide the URL of the source repository
fetch the new upstream remote
merge the upstream's branch into a local branch
push the newly updated local branch to your origin rep
git rebase - squashing commits into one commit. The git rebase command will
move commits to have a new base. git rebase -i HEAD~3 - we're telling Git to use HEAD~3 as the base where all of
the other commits HEAD~2, HEAD~1, and HEAD will
connect to. The -i flag in the command stands for
"interactive". You can perform a rebase in a non-
interactive mode
Using git rebase creates a new commit with a new SHA. When I tried using git push to send this commit up to GitHub, GitHub knew that accepting the push would erase the three separate commits, so it rejected it. git push -f is used to force push
Rebase Commands
Let's take another look at the different commands that you can do with git rebase:
use p or pick – to keep the commit as is
use r or reword – to keep the commit's content but alter the commit message
use e or edit – to keep the commit's content but stop before committing so that you can:
add new content or files
remove content or files
alter the content that was going to be committed
use s or squash – to combine this commit's changes into the previous commit
the i.e. commit above it in the list
use f or fixup – to combine this commit's change into the previous one but
drop the commit message
Functioning as Administrative help chief at Monk House Sales very nearly 10 years prior I joined here. It's an extraordinary open door . With this I am likewise investigating a few sorcery stunts .


Top comments (1)
that is amazing to see such informative and valuable information you have shared with . कागज पर नाम लिखकर जला दे