Three great .NET Core features
.NET has come a long way in the past several years.
Starting with the development of ASP.NET 5, which eventually became .NET Core / ASP.NET Core and later the development of the .NET Standard, we have seen innovation, growth, and standardization in the .NET world.
Currently (as of April 2019), .NET Core’s latest official runtime version is 2.2 and the ecosystem of tools and developer ergonomics it brings to the table is a breath of fresh air to any .NET developers that have been working with the .NET Full Framework.
Since .NET Core was somewhat of a blank-slate development effort, the engineers at Microsoft were able to take into consideration the complaints and problems with the existing (and aging) .NET Framework, and the tooling around it, when building out this new ecosystem.
Three of my favorite features of .NET Core are the dotnet Command Line Interface (CLI), the NuGet <PackageReference> element in project files, and the new simplified Common Project System (CPS).
How does modern .NET work with Kentico?
You might be asking yourself why I’m talking about this .NET Core goodness when we Kentico developers are still using .NET Full Framework in our CMS and MVC projects. 🤔
The simple answer is that we can have our cake (cool .NET Core features) and eat it too (integrate it into our Kentico projects).
Below I’m going to detail exactly how to take advantage of these features. This will help us both improve our development process and future-proof our code bases.
But first, an introduction giving some context into the three features we will take advantage of to make our projects better.
TLDR? Skip to "Let’s Build Something!" below 👇 or go directly to the source code.
Old School vs New School: Or — Why is this Worth the Effort? 🚵♀️
.NET Core CLI
The .NET Core CLI is often just a wrapper around the classic MSBuild commands that Visual Studio hides from us with its multitude of menus, options, and buttons. This, however, doesn’t lessen the improvements it brings to developers wishing for a simpler toolchain for their .NET solutions and projects.
Do you know the MSBuild command to compile your solution at the command line? Is MSBuild even in your shell’s PATH? I’m already getting a headache! 😖
When you install the .NET Core SDK, you get the CLI automatically and added to your PATH. If you then want to compile a solution, simple open a command prompt to the directory your solution is in and type dotnet build. Yes, it’s that simple. 🎉
Want to run all the unit tests in all the unit test projects in your solution? Type dotnet test and clock out early! Or run dotnet pack to create a NuGet package (without first having to create a .nupkg) for every project in your solution.
Having these well-documented and simple commands powered by the CLI means that anywhere the .NET Core SDK is installed, you can perform these same commands in your CI/CD environment with the same results as your local environment.
<PackageReference>
For a long time, .NET developers downloaded and then committed third-party library binaries to source control because there wasn’t a package artifact solution. Then came NuGet and everyone rejoiced — we had reproducible dependency management — except when it didn’t work. Then there was gnashing of teeth and keyboards. 👹
Of NuGet’s many sharp edges that developers have cut themselves on over the years, the ones I’ve found most painful have been the following:
- The inability to handle transitive package dependencies correctly.
A -> B -> Cresults in C not showing up in the/binafter a build because it wasn’t referenced by the original project. 👎 -
packages.configbecoming a maintenance nightmare over time because each installed package’s transitive dependencies were added to the manifest. I install package A and then B, C, D, E are all added to mypackages.config. This makes it very difficult to keep track of what your code depends on and what came along for the ride. Knowing what you can uninstall becomes a tedious task of trial and error. 👎 - All the noise added to your
.csprojeach time a package is installed. Not only does thepackages.configget filled up with entries, but file system relative references to those packages are added to your.csprojfile. If you change your project target framework, those paths don’t change with it — good luck sorting through that mess. Your best bet might be to remove all packages and re-install one by one. 👎
<PackageReference> solves all of these problems.
First, it stores all packages for all projects in a folder under your user account path as a cache, which is great for common package re-use between projects in different solutions/repositories. 👍
Second, packages.config is gone. 🙏
Third, the relative path references to packages in your .csproj turn into declarative entries of the package name and version, which is much easier to maintain and it’s even possible to hand edit.
The package declarations can even be hand edited live — Visual Studio will auto update the packages for you! 😄✨
All transitive package issues are gone — the packages you install are the only ones listed and all their dependencies correctly end up in your /bin after a build.
Packages don’t list the target framework (it’s assumed to match your project’s target framework) and even allow for ranges of versions if you want to ensure the latest hotfixes of a package are always used.
It should be noted that
<PackageReference>can be used in the classic Common Project System (ex. a typical ASP.NET Full Framework application.csproj) and we at WiredViews use it in all of our projects. But it’s best when combined with the new Common Project System.There is a Visual Studio extension to help convert packages.config based class library projects to
<PackageReference>.
The new Common Project System (CPS)
While the <PackageReference> syntax for NuGet packages can be used in traditional .NET Full Framework class libraries and applications, it was really meant to be used in the new CPS designed for .NET Core.
The original project system was designed to keep track of your project’s files and assets and provide instructions to Visual Studio for processes like Build, Clean, and Run. It was not designed to be edited by hand or even looked at. Every file in your project was explicitly listed and lots of MSBuild metadata, targets, props and miscellaneous settings were included in what felt like an arbitrary order. 😟
The explicit file enumeration is a common thorn for developers when it comes to source control, since the enumeration is unordered and any developer adding, renaming, or removing a file would cause a change to it. Merge conflicts are inevitable and consistent. 😵
With the new CPS your .csproj files now:
- Rarely grow to a hundred lines (even for large projects). 😃
- By default assume all files in your project are included. 😄
- Use readable, documented, and easily customizable XML elements and attributes. 😀
- In general try to stay simple and out of your way. 😁
There is a command line tool to help you convert existing libraries to the new CPS. I used it with great results when converting our internal libraries initially. You can also create new projects in the same method as we do in the example below and copy your existing code files over.
One additional fun feature of the CPS is the ability to view the entire transitive dependency graph (with exact versions) of any referenced Project, NuGet package, or Assembly within the Visual Studio Solution Explorer UI.
Here is an example:
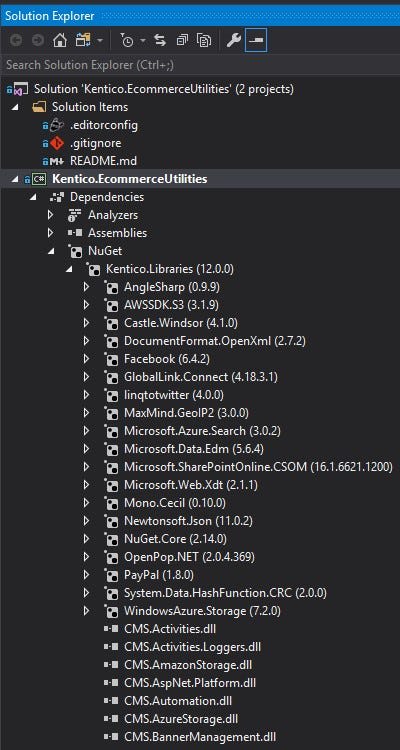
Mono.Cecil or AngleSharp is in your Kentico project’s /bin? Now you can dig through the entire dependency tree with the new CPS.
Let’s Build Something: The Kentico Library! 👊
With that background in mind… 👩🏽🏫
We are going to build an extremely simple e-commerce utility library for Kentico and an NUnit unit test project to test that library.
A quick caveat:
None of this is documented (or supported) by Kentico. I’ve run through the trial-and-error process of figuring out what works and what doesn’t.My company, WiredViews, has been using most of these features with our internal libraries successfully for about 17 months (since Kentico 10).
Your mileage may vary, but standard use-cases should work just fine!
First install the .NET Core SDK (v2.2.106 for VS 2017 and v2.2.203 for VS 2019) and .NET Framework 4.7.2 Developer Pack if you haven’t already.
Now create a new directory using your command line of choice (I prefer GitBash) and type the following command to create a new solution file:
dotnet new sln --name Kentico.EcommerceUtilities
Open that solution file in Visual Studio, right-click on the solution and select Add -> New Project and select a .NET Standard Class Library project template.
Quick Tip:
You can open.slnfiles in Visual Studio at the command line by typingstart NameOfYour.sln. If you’re already working at the command line this can save you some time when switching to VS.
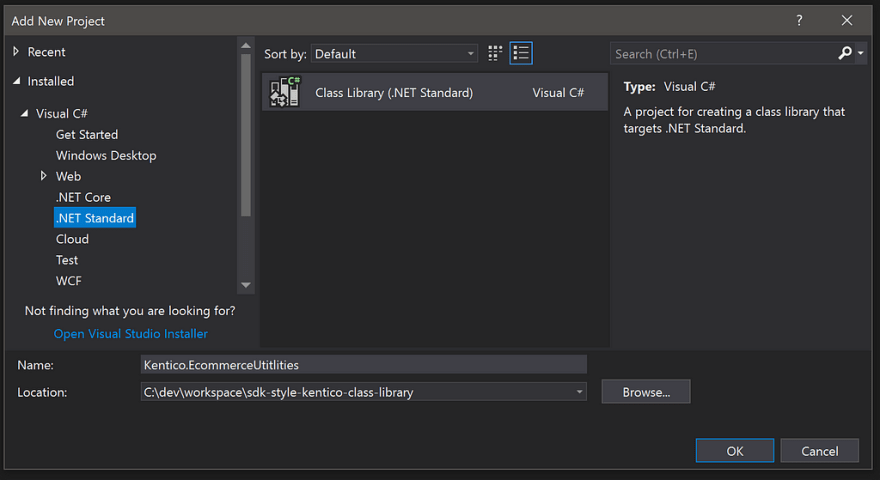
.csproj. The .NET Standard template is extremely simple so it’s a good starting point.
If you aren’t used to working with the new .NET Project System, one nice surprise you might notice is that you don’t need to ‘unload’ a project before editing its .csproj in Visual Studio. 💖
Go ahead and right click the new Kentico.EcommerceUtilities project we created and select Edit Kentico.EcommerceUtilities.csproj.
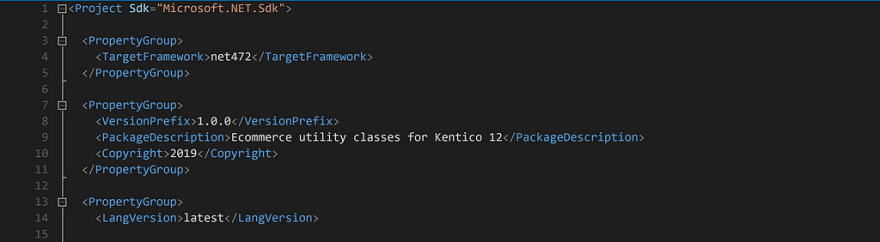
Copy and paste the following code into your .csproj and we’ll go through each piece:
The first line tells us the most important part!
<Project Sdk="Microsoft.NET.Sdk"> declares that we are using the new CPS / SDK style project format and everything below will follow those conventions.
Target Framework
We set the <TargetFramework> to net472. Kentico 12 supports .NET 4.6.1 or newer, so we use nearly the latest version (.NET 4.8 was just released!) due to better compatibility with .NET Standard 2.0. 👌🏻
.NET 4.6.1 is technically .NET Standard 2.0 compatible, but there are sharp edges to be aware of and the developer ergonomics were not great last time I checked. .NET 4.7.2 is a fully-no-questions-asked .NET Standard 2.0 compatible version of .NET Framework.
Versioning
Notice the use of <VersionPrefix>. The traditional version values that would be specified in an AssemblyInfo.cs are still available if you want to set them (more details can be found in Andrew Lock’s great overview), but <VersionPrefix> is a good option to set if you want to create CI/CD versions of NuGet packages without rebuilding the project each time you create a new "pre-release" package. 💯
The dotnet pack command accepts a --version-suffix option with a value. That suffix value will be appended to the <VersionPrefix> value in the .csproj to set the NuGet package version (but not the binary version).
Changing the package version by re-packaging the same build output allows you reflect changes in package quality (ex.
pre-release => beta => release) without having to re-build the library, which could introduce issues and wouldn’t be a true representation of the packaged code that was originally built/run/verified.
SourceLink
The <PublishRepositoryUrl>, <EmbedUntrackedSources>, and <AllowedOutputExtensionsInPackageBuildOutputFolder> elements are used in conjunction with the NuGet package Microsoft.SourceLink.GitHub.
SourceLink is a cool technology that allows you to embed repository information into your NuGet packages. This repository information is then used by a consumer of the package to step into your original source code while debugging an application that uses your package. This is even possible when your package binaries have been compiled in Release mode. 😍😎
Public packages on nuget.org have a slightly different package configuration for SourceLink than packages hosted in Azure DevOps / Github / BitBucket / Gitlab, so check out the docs if you want to use it in that scenario. Here I’m assuming you will be creating a Kentico library that is used internally at your company and generated from your private source controlled code.
My company uses Azure DevOps, so we use the
Microsoft.SourceLink.Vsts.GitNuGet package. If you are hosting your repository in GitLab, for example, replace theMicrosoft.SourceLink.GitHubpackage withMicrosoft.SourceLink.GitLab.
NuGet Packages
Finally, you can see we have our NuGet <PackageReference> elements that very clearly state the package name and version — the target framework is assumed to be your project’s target framework.
We include Kentico.Libraries which provides us with all the CMS.* and related dependencies we need to build our custom Kentico dependent code in our library.
We have version range [12.0.0, 12.1.0) specified here, and while you could change this to either float (12.0.* to grab the latest hotfix) or set an explicit version (ex. 12.0.15), unless you have some specific version requirements, I would leave it as the version range. 👨🏽🏫
But don’t we want to stay up to date with our dependencies? 🙋🏿♂️
<PackageReference>, in addition to supporting exact versions, supports both version ranges and floating versions. The floating version 12.0.* tells NuGet that it can install any version ≥ 12.0.0 and ≤ 12.1.0 into our project but the resulting package created from this project will include a dependency on the exact version that was resolved at restore time (ex. 12.0.15).
Unfortunately, this means downstream consumers of our library would be forced to install whatever version of Kentico.Libraries happened to be the latest at the time that a dotnet restore / dotnet pack is performed on our project. 😨
This is why we use a version range. It tells the consumer of our library NuGet package that it can install any Kentico.Libraries version within the range we specified for our project.
In the end, this means our package can be used in any Kentico 12.0 site, no matter what hotfix version that site is using (this also applies to other class libraries that might take a dependency on our library). 💪
If we install our library package into a Kentico 12.0 site, those CMS.* binaries our project gets from Kentico.Libraries will be there either because the CMS project has a reference to them from the \Lib folder, or because the MVC app has the correct hotfix version of Kentico.Libraries already installed.
This is great because our Kentico library won’t ever need to have its Kentico NuGet package dependency updated — it’s only the final runtime target that needs to ensure to correct hotfix is installed. Our library package will work anywhere without changes because Kentico doesn’t make breaking changes to APIs between hotfixes.
Finally, we have some references to GAC libraries that are not included by the project system by default.
You might notice that GAC libraries you would expect to be available under the old .NET Full Framework project templates are not available by default with this approach. Fortunately you can use the normal
Add Reference => AssembliesUI to fix this.
Somewhere in your project you will need to add the [assembly: AssemblyDiscoverable] attribute, which Kentico uses at runtime via reflection to find the custom libraries that should be scanned for modules to execute.
The .NET Core project template doesn’t include an AssemblyInfo.cs file, which is the traditional location for this metadata, so we can add one manually (put it in a Properties folder in the project to keep with conventions) and place this attribute there.
Let’s Build Something: The Kentico Unit Test Project!
Hey there! 👋
Are you tired of learning about .NET internals?!🤦🏼♂️
That’s ok, because now we are going to add a unit tests project for our Kentico library to the solution. 👏🏻
Kentico only offers NUnit as a supported/compatible unit test framework, so we are going to use the NUnit .NET Core unit test project template in Visual Studio as our starting point.
Apparently you can use Xunit. It does work but I haven’t really dug into that customization yet. It’s something you could explore if you prefer Xunit over NUnit. I definitely do!

Your unit test project name must end in Tests, otherwise it can’t be found by Kentico’s tooling. I prefer to use the same name as the project the tests are for with the .Tests suffix.
Once your test project is created, open the .csproj and paste the following over what was generated for you:
Here we can see a very similar setup to our Kentico library .csproj. We have a <TargetFramework> of net472, a project reference to our Kentico library project, some GAC library references, and NuGet package references.
The NuGet packages include one of my favorite unit testing libraries, FluentAssertions, and the Microsoft.NET.Test.Sdk package which is used to ensure your tests are prepped correctly so the dotnet CLI can run them.
We also include Kentico.Libraries.Tests, which is the test helper library required to write tests against Kentico’s data layer (*Info and *InfoProvider types). This package will bring NUnit 3.8.1 along as a dependency.
This specific version number for NUnit is important as it’s the only valid version that is supported by Kentico 12.0 — more on this shortly.
We finally include the NUnit3TestAdapter package. The Kentico documentation states that you have to install the Visual Studio extension NUnit 3 Test Adapter, but this is not the case and I consider it to be a bad practice anyway. 👮🏻♀️
It’s best if you keep all the dependencies required to build a project and run its unit tests under source control with the project. Using the NUnit Visual Studio extension means there is an addition bit of configuration per developer machine that needs to be performed to get them working on the project. No thanks!
You’ll notice the reference to an app.config file in the test project. Here is that file:
The key piece is the binding redirect of nunit.framework from any of the currently available versions to 3.8.1.
Since this is the only version supported by Kentico 12.0, we have to ensure that our other dependencies don’t install or require different versions of the test framework. If we let our unit test project use a version other than 3.8.1 of nunit.framework our tests would not be found or run. 🤷🏼♂️
I’ve found with Kentico unit tests, it’s not obvious what causes the tests to not work, so if you do notice an issue with tests not running, check your package versions!
Let’s Build Something: The Kentico Library Code and Tests!
Now that we have our modern .NET projects set up we can create the first reusable library code in our Kentico library project.
Below is an AddressValidator class that determines if a provided AddressInfo is valid or not according to some business requirements.
This is a non-static class that has one method. It returns true if the provided address is valid and false if it is not valid.
The class has a constructor dependency of a collection of forbidden postal codes which are used to determine the validity of an address.
Now we write the unit tests for this class in our Tests project:
I like to match the folder structure of my library / application project in my unit tests project to make the tests easy to find. I also make a
*Tests.csfile per type that I am testing.
I name it the same as the type I’m testing with theTestssuffix. Of course, there are many test conventions and patterns, so pick the one that works for you!
Here are the AddressValidatorTests.cs tests:
I prefer not to use the
[SetUp]and[TearDown]attributes in NUnit if I can avoid them.I worry less about keeping my tests DRY and more about their readability.
I stick to the Arrange, Act, Assert pattern to keep each isolated from others and easy to understand without having to scroll up and down the file.
You can now run your unit tests via the Visual Studio Test Explorer or via the dotnet test command with the CLI.
You are probably familiar with the Test Explorer UI in Visual Studio, so I’ll leave that path up to you.
Using the CLI is just as easy (maybe easier?)! 😏
Open the folder that contains your .sln file in your command prompt and type dotnet test. This will scan all the projects in your solution to find which ones are unit test projects and it will then execute all the tests in each project. The results will be reported to you at the command line in an easy to read format.
If your projects have not been built or their NuGet package dependencies have not been restored, then these operations will be taken care of for you. 👍
If you would like to create a NuGet package containing your Kentico library, first make sure it’s committed to source control with an upstream (DevOps, Github, etc…), as the SourceLink integration depends on this.
Now run the following command:
dotnet pack .\Kentico.EcommerceUtilities\Kentico.EcommerceUtilities.csproj -c Release --version-suffix alpha.1
This will create a .nuspec file based off your .csproj and then a .nupkg based off that .nuspec. It will set the version of the NuGet package to 1.0.0-alpha.1.
The binaries will be a Release build, and if you put this package into a NuGet feed, it will be treated as a prelease package (you would have to check the Include prelease checkbox in the Visual Studio NuGet UI to see it).
Also, thanks to SourceLink, the original source of the package will be debuggable when installed into another library or application you are developing. 🌈
Wow! The Future is Here!🎉
We took advantage of the dotnet CLI, better NuGet package resolution, and the cleaner and simpler Common Project System.
All of these things you get out-of-the-box when doing .NET Core development, but we brought them into our .NET Full Framework Kentico class library and unit test project so we can reap their benefits today.
Hurray! Now you know all the steps and tricks to building a Kentico 12 class library using modern .NET Core features— and knowing is half the battle. 🌠
I’ve linked below to a GitHub repository where you can see this project setup fully configured and use it as a starting point for your new work.
https://github.com/seangwright/sdk-style-kentico-class-library
I hope you find these techniques helpful — feel free to leave questions in the comments below or as an issue on the GitHub repository. I’d love to know what you think!
Cheers!

Top comments (0)