
Outline
- Introduction
- Understanding the Chrome Alarm API
- What is the Chrome API?
- Key Features and Benefits
- Use Cases
- Getting Started with the Chrome Alarm API
- Installation and Setup
- Chrome Alarm API Basics
- Advanced Usage and Techniques
- Repeating Alarms
- Updating and Clearing Alarms
- Best Practices and Considerations
- User Experience Considerations
- Security and Permissions
- Example: Creating a Reminder Chrome Extension
- Conclusion
Introduction
The Chrome Alarm API is a powerful tool that allows developers to schedule and manage timed events within their Chrome extensions. Whether you want to create reminders, automate tasks, or perform actions at specific intervals, the Chrome Alarm API provides the necessary functionality to enhance the capabilities of your extension. In this article, we will dive into the details of the Chrome Alarm API, its features, usage, and best practices.
Understanding the Chrome Alarm API
What is the Chrome Alarm API?
The Chrome Alarm API is a feature in the Chrome browser that lets developers schedule and control timed events in their Chrome extensions. It’s like having an alarm clock inside your extension.
The Chrome Alarm API is important because, it allows developers to make their extensions do things at specific times or after a certain amount of time. For example, they can set reminders, update information in the background, or show notifications to users at the right moment.
Imagine you have a weather extension. With the Chrome Alarm API, you can make it automatically refresh the weather data every hour. Or, if you have a to-do list extension, you can set it to remind you of important tasks at specific times throughout the day.
To draw a relatable analogy, think of the Chrome Alarm API as the traditional alarm clocks. Just like how you can set an alarm on a clock to wake you up or remind you of something at a particular time, the Chrome Alarm API functions similarly. Instead of waking you up, it helps the extension perform tasks, show notifications, or update information at specific times.
Key Features and Benefits
The Chrome Alarm API offers several key features and benefits for developers:
- Scheduling: Set alarms to execute code or trigger actions at specific times or intervals.
- Automation: Automate processes within your extension by utilising timed events.
- Reminders: Create reminder functionality to notify users about important events or tasks.
- Background Tasks: Perform background tasks periodically based on alarms.
Use Cases
The Chrome Alarm API can be applied in various scenarios:
- Reminder Extensions: Develop extensions that remind users of important tasks, appointments, or breaks at predefined intervals.
- Automation Extensions: Build extensions that perform automated tasks at specific times, such as data updates or synchronisation.
- Background Processes: Utilises alarms to trigger background processes, like checking for updates or performing periodic maintenance.
Getting Started with the Chrome Alarm API
Installation and Setup
Before diving into Chrome Alarm API, ensure you have a development environment set up for Chrome extension development. This typically involves installing the Chrome browser and a code editor of your choice.
Recommendation: Visual Studio Code

Chrome Alarm API Basics
The Chrome Alarm API provides a way for developers to schedule timed events within their Chrome extensions. Here’s how it works
-
Creating an Alarm: Developers can use the
chrome.alarms.createmethod to set alarms. This method allows them to specify the time or delay for the alarm to trigger. For example, they can set an alarm to go off in 30 minutes or at a specific time tomorrow. Each alarm is given a unique name for identification.
chrome.alarms.create("myAlarm", { delayInMinutes: 10 });
-
Handling Alarms: To handle alarm triggers, you can use the
chrome.alarms.onAlarmevent listener. This allows you to execute specific code or actions when the alarm event occurs. When the scheduled time or delay is reached, the Chrome browser triggers the alarm. Developers can define what actions should be taken when an alarm is triggered. This could include executing specific code or performing certain tasks within the extension.
chrome.alarms.onAlarm.addListener((alarm) => {
    if (alarm.name === "myAlarm") {
        // Perform desired actions here
    }
});
Advanced Usage and Techniques
Repeating Alarms
If you want to create recurring alarms, you can specify the periodInMinutes property when setting the alarm. This will cause alarm to repeat at the specified interval.
Example:
chrome.alarms.create("recurringAlarm", { periodInMinutes: 60 });}
Updating and Clearing Alarms
You can modify or cancel existing alarms using the chrome.alarms.clear and chrome.alarms.clearAll methods. This allows you to update you alarm settings o remove alarms as needed.
Persistent Alarms
By default, alarms are cleared when the user restarts their computer or browser. However, you can create persistent alarms using the chrome.alarms.create method with the persistent property set to true. These alarms survive browser or system restarts.
Best Practices and Considerations
User Experience Considerations
- Be mindful of alarm frequency to avoid excessive notifications or disruptions to the user.
- Provide options for users to customise alarm settings, such as the ability to enable/disable alarms or adjust intervals.
Security and Permissions
- Request only the necessary permissions for alarm functionality to maintain user trust.
- Handle alarm-related security considerations.
Example: Creating a Reminder Chrome Extension
In order to practise the usage of the Chrome Alarm API, we will work through the process of creating a simple Reminder Chrome Extension. This extension will allow users to set reminders for important tasks or events, and it will display notifications when the reminders are triggered.
-
Setup:
- Set up a new directory for your Chrome extension project.
- Create the necessary files.
manifest.json,popup.html,popup.js,popup.css, andbackground.js.
-
Manifest File:
- Fill in the basic details of your extension, such as name, version, and permissions, in the
manifest.jsonfile. - Specify the necessary permissions, such as
alarms,notifications, andactiveTab. Example:Manifest.json```
- Fill in the basic details of your extension, such as name, version, and permissions, in the
{
"manifest_version": 2,
"name": "Reminder Extension",
"version": "1.0",
"description": "A simple reminder extension",
"permissions": ["alarms", "notifications", "activeTab"],
"background": {
"scripts": ["background.js"],
"persistent": false
},
"action": {
"default_popup": "popup.html",
"default_icon": {
"16": "icons/icon16.png",
"48": "icons/icon48.png",
"128": "icons/icon128.png"
}
}
}
- **Popup HTML:**
    - `Create the popup`.html file, which will serve as the interface for users to set reminders.
    - Design a simple form with an input field for the reminder message and a button to set the reminder.
Example `popup.html`
<!DOCTYPE html>
Set Reminder
Set Reminder
- **Popup JavaScript:**
    - Add the necessary JavaScript code in `popup.js` to handle the form submission and set the reminder using the Chrome Alarm API.
Example `popus.js`
document.getElementById("reminderForm").addEventListener("submit", function(event) {
event.preventDefault();
const reminderMessage = document.getElementById("reminderInput").value;
chrome.alarms.create("reminder", { delayInMinutes: 1 });
chrome.storage.local.set({ reminderMessage });
window.close();
});
- **Background JavaScript**
    - Create the `background.js` file to handle the alarm triggers and display notifications.
Example: `background.js`
chrome.alarms.onAlarm.addListener(function(alarm) {
if (alarm.name === "reminder") {
chrome.storage.local.get("reminderMessage", function(data) {
const notificationOptions = {
type: "basic",
iconUrl: "icons/icon48.png",
title: "Reminder",
message: data.reminderMessage
};
chrome.notifications.create(notificationOptions);
});
}
});
- **CSS Styling**:
- Style the `popup.html` file by creating a `pop.css` file.
- **Testing:**
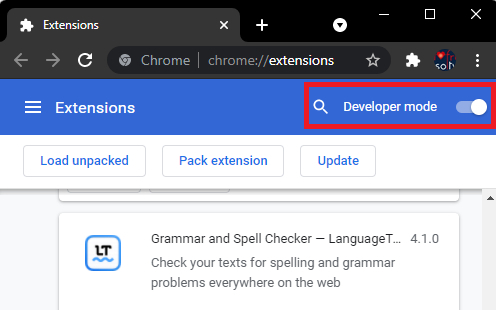
- Load the extension in the Chrome by navigating to chrome://extensions and enabling the developer mode.
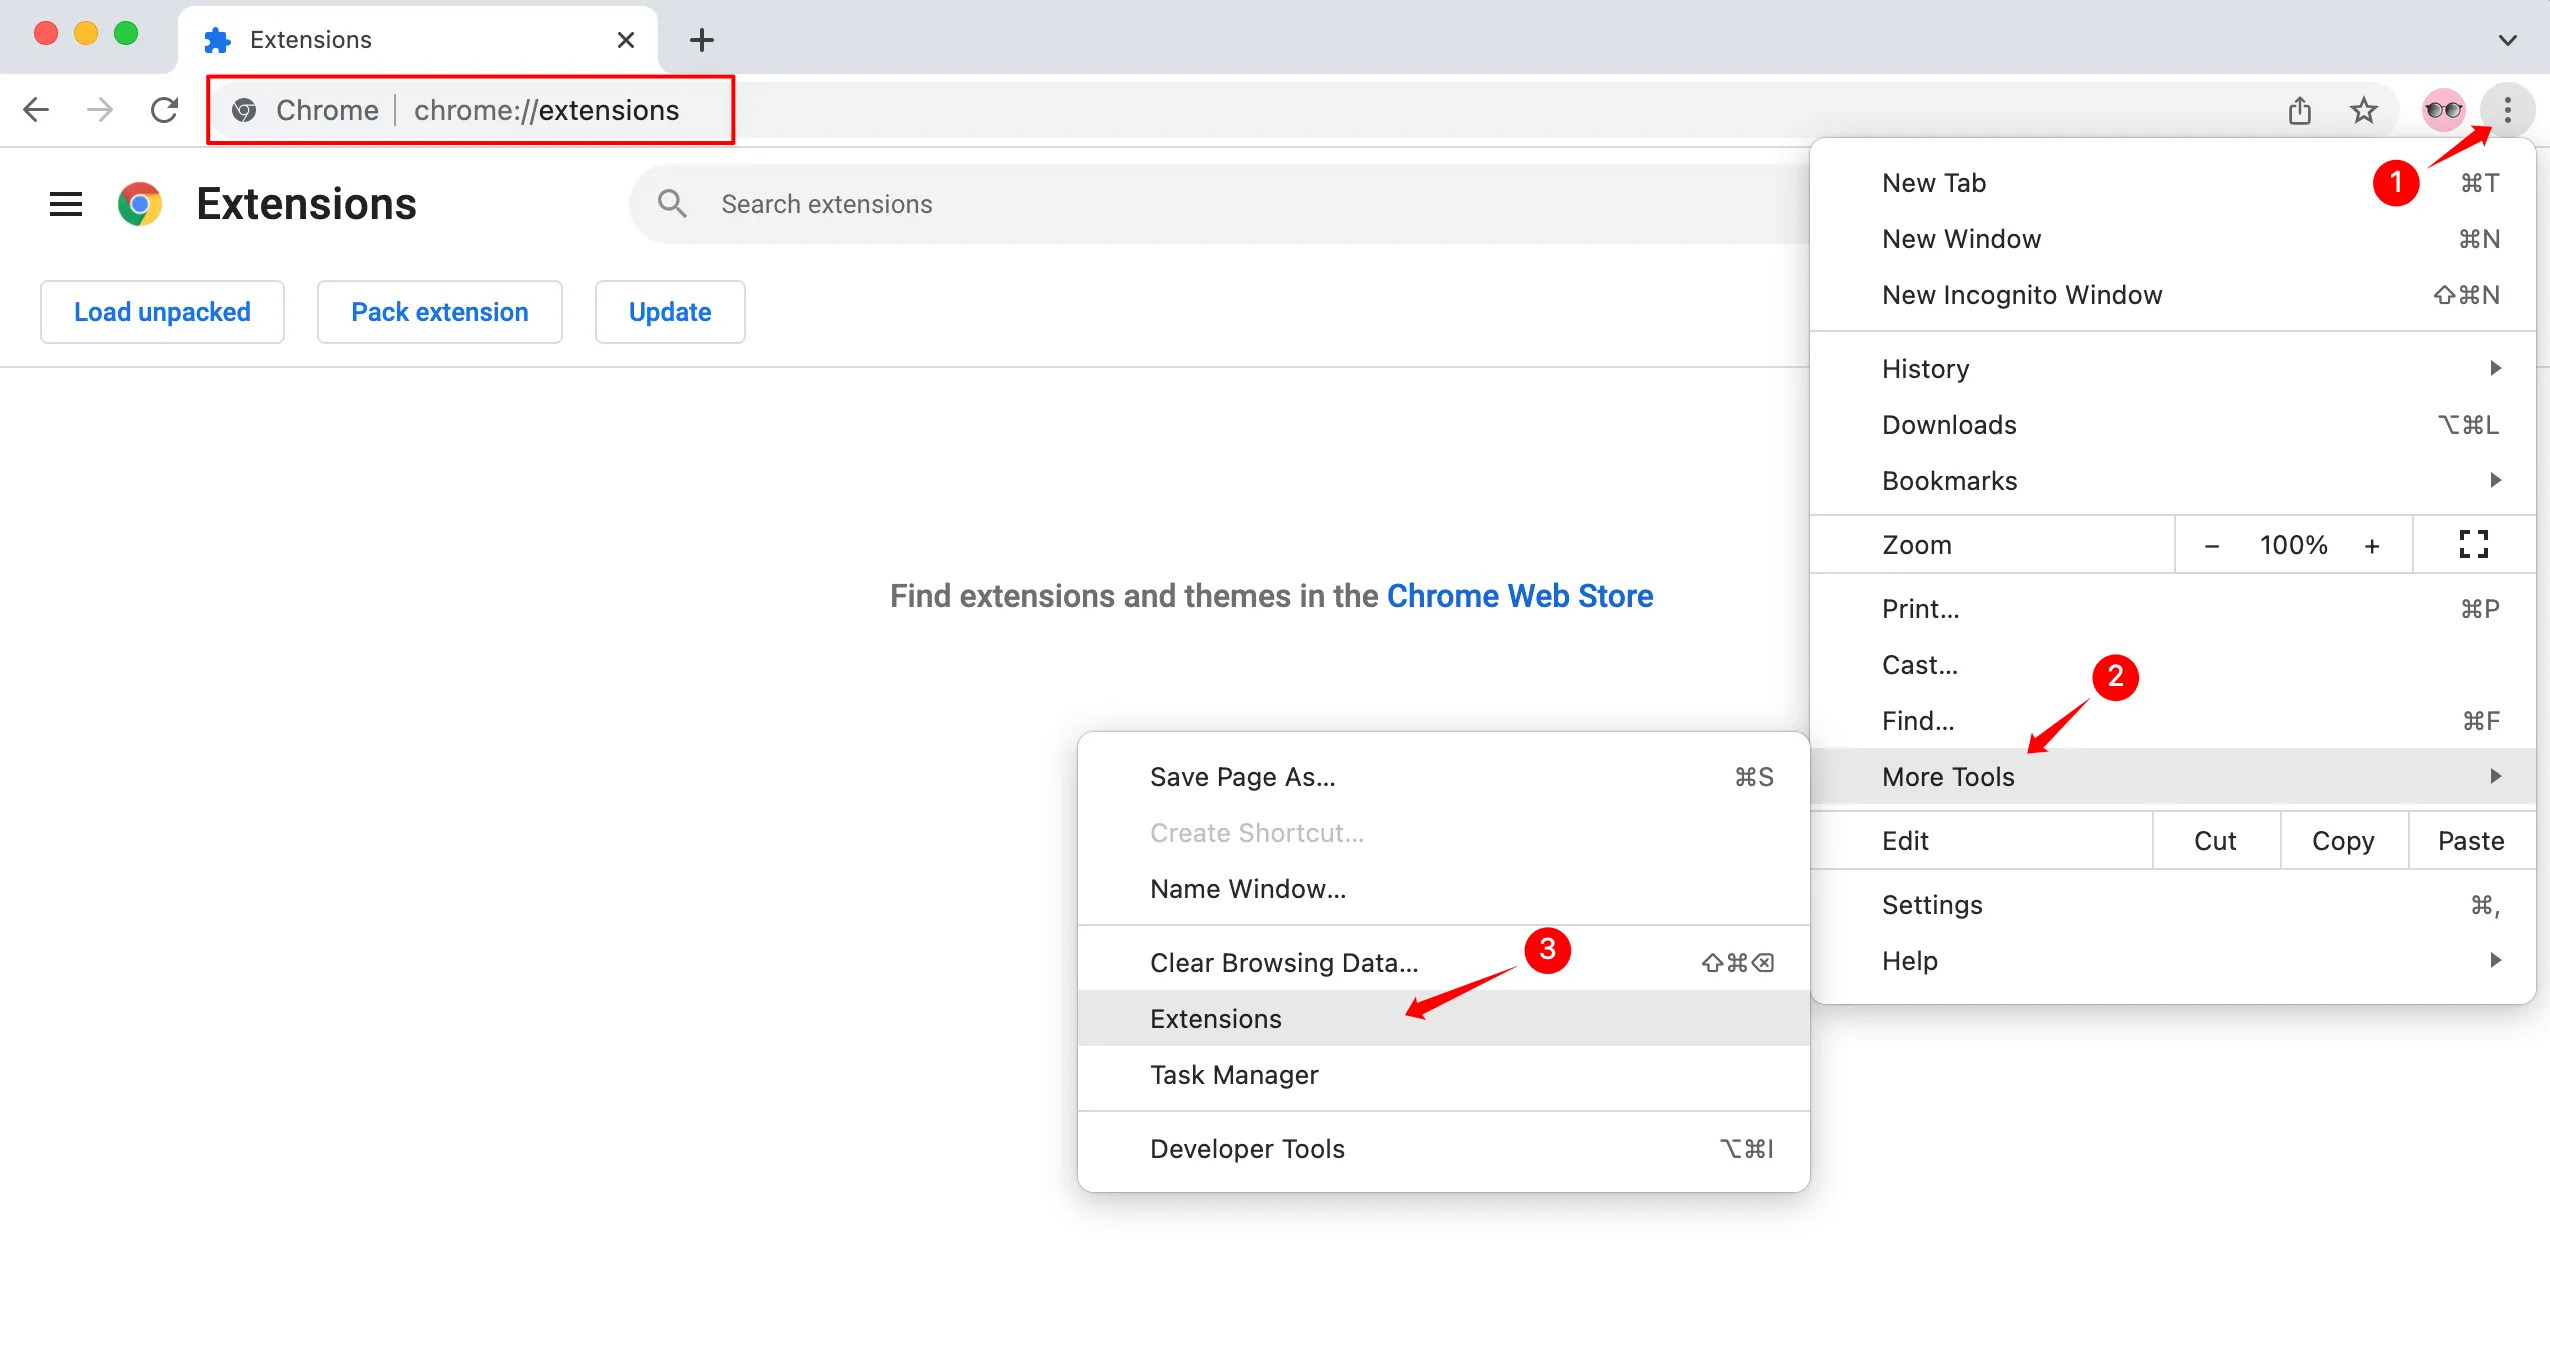
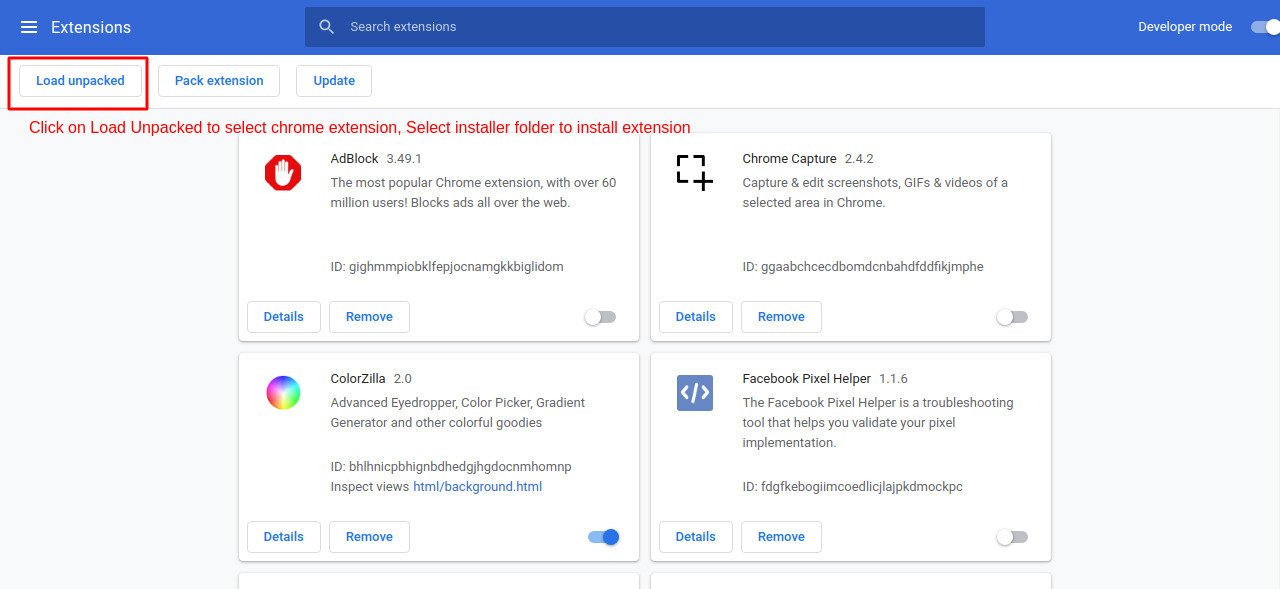
- Click the Load Unpacked and select the directory containing your extension files.
- Test the extension by setting a reminder and verifying that the notification works.
## Conclusion
In this article, we explored the key aspects of the **Chrome Alarm API**. We discussed its purpose and benefits, highlighting its ability to schedule tasks, automate processes, and enhance the user experience. We also examined the core components of the API, such as setting alarms using `chrome.alarms.create` and handling triggers with the `chrome.alarms.onAlarm` event listener.
Furthermore, we delved into advanced techniques, including repeating alarms, updating and clearing alarms, and working with persistent alarms.
Lastly, if you enjoyed this article, please like, comment, and share with your friends on socials.
_**PS:** This article is inspired by Aderemi Okeowo. The best mentor I know. Thank you so much sir for all you do._
_You can check him out on Twitter: @qtguru and LinkedIn: Okeowo Aderemi_

Top comments (1)
Nice article, one hardly can find too many researches on that here at dev 👍
Btw, you can add syntax highlighting to your code snippets by adding language to the first line after apostrophes, like
tsorhtml, see here for instance:Formatting Code for DEV Comments and Posts
Chris Achard ・ Aug 28 '19 ・ 3 min read