
MySQL is the number one open source relational database management system in the world, and is used by millions of developers across all application types. DigitalOcean, a fast-growing cloud provider that’s increasing in popularity amongst the developer community, is a great host to consider for your MySQL deployments. In this article, we’re going to show you how to set up MySQL on DigitalOcean at ScaleGrid for the best possible performance in the cloud.
Building Your DigitalOcean MySQL Deployment
For this tutorial, we are using our fully managed MySQL hosting solution, as it offers the highest throughput and lowest latency on DigitalOcean. Learn more in the Best MySQL DigitalOcean Performance article to compare ScaleGrid vs. DigitalOcean Managed Databases pricing, latency and throughput performance.
The entire process should take less than 20 minutes, with just a couple minutes at the beginning to customize your MySQL deployment configuration, and a couple minutes at the end to connect to your application.
Video Tutorial: https://www.youtube.com/watch?v=ywBy-w0KiN0
After signing up for a free trial account, the first thing you’ll do is select MySQL as your database, DigitalOcean as your cloud, and Dedicated Hosting as your plan to initiate the cluster creation process:
Step 1. Enter MySQL Deployment Details
The cluster creation wizard will open to the first step where you can customize the basic details of your deployment. Enter a name for your cluster using alphanumerics, and use a unique, descriptive name so you can easily recognize your cluster later on.
Next, select the DigitalOcean data center you’d like to use for your master server from the cloud region dropdown - we recommend using the same region as your applications DigitalOcean Droplets for the best performance. Then you can select your VM size of DigitalOcean Droplet instances, and the version of MySQL you wish to use (all major versions supported). InnoDB Storage Engine is the default for all MySQL deployments. Click next.

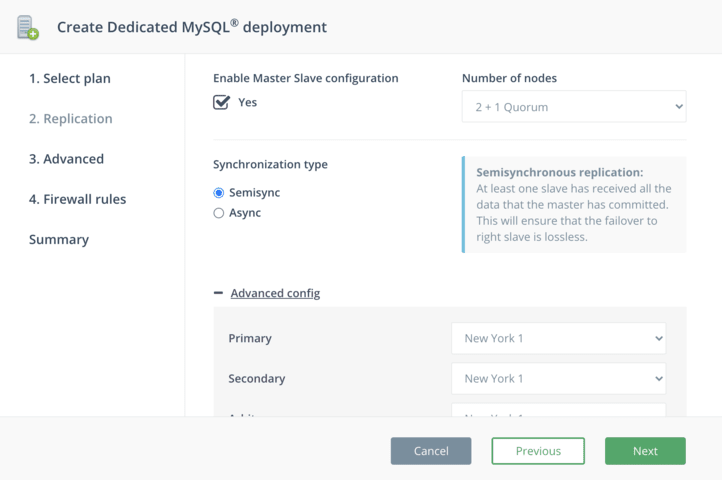
Step 2. Enable Master-Slave Replication
In step 2, you can enable DigitalOcean MySQL master-slave replication to add high availability to your deployment. Replication is important for keeping your application available and online for your users in the event your DigitalOcean data center region goes down. While DigitalOcean is a highly reliable cloud provider with 99.99% uptime, data centers inevitably go down, so replicating your data to additional data center locations allows you to minimize the risk of data loss and downtime for your users.
If you want to continue with a standalone deployment, click next to move onto step 3 without enabling master-slave configuration.
Note - master-slave configuration is only available for paid accounts, you cannot set up a replica set deployment while you are in trial mode.
There are a couple options here to customize your MySQL master-slave setup. First, you can choose between 2 + 1 Quorum or 3 nodes for your deployment. Both offer high availability, but in the 2 + 1 Quorum setup, you have only 2 data-bearing nodes as the Quorum node serves as a decision-maker in a failover event. You can also contact support to customize your master-slave configuration to add more nodes to your deployment.
Next, you can choose between semisynchronous and asynchronous replication. Semisynchronous replication guarantees at least one slave has received all the data that the master has committed, ensuring that the failover to the right slave is lossless. In asynchronous replication, each slave syncs asynchronously to the master so failover from master to slave may result in failover to a server that is not fully synced up to the current master.
Lastly, customize the DigitalOcean data center locations you wish to use for your slave nodes. Once you’re done, click next.
Step 3. Enable SSL
In step 3, you can enable SSL for your deployment. By default, MySQL server always installs and enables SSL configuration, but it’s not enforced that clients connect using SSL. Clients can choose to connect with or without SSL as the server allows both types of connections. Learn more about configuring and managing SSL in this MySQL tutorial.

Step 4. Configure Firewalls
In the last step of the cluster creation process, enter at least one IP CIDR that will be allowed access to your MySQL deployment to set up your firewall rule. You can find your current IP CIDR at the top of the page. These can be customized later at both the cluster-level and account-level. Once you’ve entered it, click Add. Enter all the IP CIDRs you’d like, and then click next.

Step 5. Review & Create
The last page provides a short summary of your new MySQL DigitalOcean cluster. Review all of the details and click the Previous button to go back to an earlier step and modify your configurations. Once you’re ready, click Create to spin up your cluster.

And that’s it! Your deployment is now being provisioned! This takes about 15 minutes, so while you wait, you can familiarize yourself with the management tools for MySQL in the console - backups, restores, scaling, alerts, query analysis, etc.
Connect & Migrate
Once the cluster status changes from “Creating” to “Running”, you can connect your deployment. There are a couple different ways to do this - through your connection string to your app, through the command line, through WordPress, through MySQL Workbench or other popular GUI tools. All of your connection details are available in the lower half of the Overview tab of your cluster details page.
Visit the top tabs to create a MySQL database and create a MySQL database user. These can be accessed and managed anytime from the ScaleGrid console.

Migrating is also an automated process that requires just a few details from your existing deployment. Click the Import Data button on your Overview tab, and enter your Server Name, Port, Database Name(s), Username and Password. Check out our MySQL Migrations doc for more detail, and additional migration options.
Running on DigitalOcean
Once you’re up and running, your deployment can virtually operate on auto-pilot. Since ScaleGrid is a fully managed service, we handle all of your day-to-day MySQL administration and maintenance so you can focus on building your app. If anything should arise that requires your attention, such as running low on disk space, we’ll send you a notification so you can login and see if you’re ready to scale up your cluster.
You can also connect with our MySQL experts anytime through our 24/7 support to help you set up and troubleshoot your deployment.

Top comments (2)
Some comments may only be visible to logged-in visitors. Sign in to view all comments.