
Introduction
In modern cloud applications, securely managing sensitive data like API keys, database connection strings, and certificates is crucial. Hardcoding secrets in configuration files pose security risks, making applications vulnerable to breaches. Azure Key Vault offers a secure and centralized solution to store and manage secrets, ensuring they are protected and accessible only to authorized services.
This article provides a step-by-step guide to implementing Azure Key Vault in an ASP.NET Core application. You’ll learn how to store secrets in Key Vault, retrieve them dynamically in .NET applications, and configure secure access using Managed Identity. By following this approach, you can enhance security, simplify secret management, and ensure compliance with best practices in cloud security.
What is Azure Key Vault?
Azure Key Vault is a cloud-based service that securely stores and manages secrets, such as API keys, passwords, certificates, and cryptographic keys. It enhances security by controlling access to sensitive data and allows applications to retrieve secrets securely.
Why Use Azure Key Vault?
- Centralized Security Management: Store secrets in one place instead of in appsettings.json or environment variables.
- Access Control with RBAC: Uses Azure Active Directory (AAD) authentication for access.
- Automatic Secret Rotation: Easily update and manage secrets without modifying the application code.
- Compliance & Auditing: Meets security standards like ISO 27001, FedRAMP, and GDPR.
Implementing in ASP.NET Core project
Step 1. Create an Azure Key Vault
Step 1. Go to Azure Portal → Create a resource → Search for “Key Vault”.
Step 2. Click Create, and enter the following:
- Resource Group: Select an existing one or create a new one.
- Key Vault Name: Example: MyAppKeyVault
- Region: Choose your Azure region.
- Pricing Tier: Standard is fine for most cases.
Step 3. Click Review + Create → Create.
Step 2. Add Secrets to Azure Key Vault
- Open Key Vault → Secrets → Click Generate/Import.
- Enter Name (e.g., DatabaseConnection) and Value (e.g., Server=myserver;Database=mydb;User Id=myuser;Password=mypassword;).
- Click Create.
Step 3. Assign Permissions (Managed Identity)
Step 1. Enable Managed Identity for Your App:
- Go to Azure App Service → Identity → Enable System-Assigned Identity → Save.
Step 2. Grant Access in Key Vault:
- Go to Key Vault → Access Control (IAM) → Add Role Assignment.
- Select Key Vault Secrets User.
- Assign to Your App Service.
Step 4. Create a new ASP.NET Core Web API project and Install the below NuGet Packages
Note: If you need to implement this in your existing project you don’t need to create a new project.
Run these commands to install the required dependencies:
dotnet add package Azure.Security.KeyVault.Secrets

dotnet add package Azure.Identity
Step 5. Add the below code to Configure in appsettings.json
Add your Key Vault URL:
{
  "AzureKeyVault": {
    "VaultUri": "https://myappkeyvault.vault.azure.net/"
  }
}
Step 6. Load Azure Key Vault Secrets in the Program.cs
Modify Program.cs to fetch secrets securely:
// Get Key Vault URL from configuration
var keyVaultUrl = builder.Configuration["AzureKeyVault:VaultUri"];

if (!string.IsNullOrEmpty(keyVaultUrl))
{
    var client = new SecretClient(new Uri(keyVaultUrl), new DefaultAzureCredential());

    // Retrieve and load secrets into IConfiguration
    var secrets = client.GetPropertiesOfSecrets();
    foreach (var secret in secrets)
    {
        var secretValue = client.GetSecret(secret.Name);
        builder.Configuration[secret.Name] = secretValue.Value.Value;
    }
}
Step 7. Retrieve Secrets in a Controller
Create SecretsController.cs to test Key Vault secret retrieval:
using Microsoft.AspNetCore.Mvc;
using Microsoft.Extensions.Configuration;

namespace KeyVaultDemo.Controllers
{
    [ApiController]
    [Route("api/secrets")]
    public class SecretsController : ControllerBase
    {
        private readonly IConfiguration _configuration;

        public SecretsController(IConfiguration configuration)
        {
            _configuration = configuration;
        }

        [HttpGet("{secretName}")]
        public IActionResult GetSecret(string secretName)
        {
            var secretValue = _configuration[secretName];
            if (string.IsNullOrEmpty(secretValue))
            {
                return NotFound($"Secret '{secretName}' not found.");
            }

            return Ok(new { secretName, secretValue });
        }
    }
}
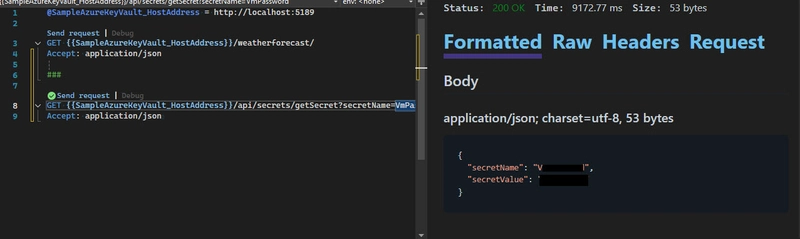
Step 8. Run & Test the API
Now we can run and check the secrets value.
If you are using Visual Studio you can simply run the project or can use command.
dotnet run
Then we can use the http file or Postman to call the API. Below is the output of calling GetSecret API from the http file.
The sample code for this can be found here.
Conclusion
Azure Key Vault is an essential tool for securing sensitive information such as API keys, database credentials, and certificates in cloud applications. By integrating it into an ASP.NET Core application, we eliminate the risks of storing secrets in configuration files or hardcoding them in source code. In this guide, we covered the step-by-step implementation of Azure Key Vault in .NET 9, from creating a Key Vault to retrieving secrets dynamically using Azure.Identity and Azure.Security.KeyVault.Secrets.
We also demonstrated how to secure access using Managed Identity. By leveraging Azure Key Vault, your application benefits from enhanced security, centralized secret management, automatic secret rotation, and compliance with industry standards. Implementing this best practice ensures your applications remain secure, scalable, and manageable in a cloud environment.


Top comments (0)