In this tutorial we will build a full stack application that shows user generated locations on an interactive map! Let’s get started.
Live demo: https://visited-places-api.herokuapp.com/
Github repo: https://github.com/sanderdebr/visited-places-api
Structure
For the back-end we will build an API with express in Node and store the location in a MongoDB database stored on Heroku. We will test the API using Postman.
We will the MapQuest API to convert any user entered address into GeoJSON that MapBox can understand and plot on a map.
On the front-end we will show a map with all locations and update it directly when a user adds his location. For styling we will use a simple CSS framework called Bulma CSS.
Finally we will deploy the app using Heroku.
This tutorial is divided up into the following sections:
Creating the API
Setting up MongoDB
Adding GeoJSON and MapBox
Front-end rendering the map
Deploying on Heroku
Creating the API

Let’s create a new github repo called “visited-places-api” and add it locally by running the following commands:
mkdir visited-places-api

cd visited-places-api

git init

npm init
Leave all the fields as is but set the main file as “server.js”.
When package.json is created, add a script so that Heroku will node how to run the app:
...

"start": "node server.js",

...
Next up we will install all the packages that we will need:
npm install express dotenv cors mongoose node-geocoder
And we will add nodemon so we do not have to refresh every time:
npm install nodemon -dev
Then we’ll create a file called server.js and include our packages and define app with express:
`const path = require('path');
const express = require('express');
const detenv = require('dotenv');
const cors = require('cors'):
const app = express();`
We will use express.json() to recognize incoming requests as JSON:
app.use(express.json());
And enable CORS:
app.use(cors());
Next up create a new folder called “config” with a file called “config.env”.
Here we will specify environment variables, which are not publicly accessible by the user. Only on our local environment and later on Heroku. In this file add:
NODE_ENV=development
Then include them inside server.js:
dotenv.config({ path: ./config.config.env });
Then in the main folder create a file called “.gitignore” and add:
node_modules

config.env
So that these files are not uploaded to GitHub.
Then in our server.js we will define the PORT variable to the PORT set by the environment (later automatically by Heroku) or otherwise default 5000:
const PORT = process.env.PORT || 5000;
Let’s listen to this port and try out our app. Server.js now looks like:
Run npm start and check if out server is logging out: “Server running in development mode on port 5000”.
Great, we have our server running!
Setting up MongoDB

To connect our server to the MongoDB database from Heroku we will first connect to Heroku:
If you do not have Heroku yet:
Create a free account on heroku.com
Install the Heroku command line interface: npm install -g heroku
Login using the CLI: heroku login
Then run heroku create
This will create a Heroku app for you and will show up on your Heroku personal apps page.
Browse to add-ons and add the mLab MongoDB sandbox version to your app.
If you go back to the overview page of the app in Heroku, and click on the external link icon add the MongoDB add-on, you should go to the database overview page. On this page you can see the data that has been entered inside the database.
First add a new user called admin in the database. Then copy the Mongo URI listed in the header on this page and add in your newly created user and password. Then paste this into our config.env file behind “MONGO_URI=”.
Next up we will connect our server to this database. Create a new file inside our config folder called “db.js”.
In here we will connect to our database using mongoose with an async await function. We will also export out our function and import it into server.js:
const connectDB = require{'./config/db');

// Connect to database

connectDB();
Run npm start again to check if your database connection is succesfull.
Now let’s set up our routes. Inside server.js add:
//Routes

app.use('/api', require('./routes/places'));
Then add a new folder called “routes” with a file called “places.js” where we will define our routes.
Inside this file we are already on the “/api” path so we can define the route as “/”. Then for the get request we will retrieve the places with a function getPlaces(), and for the post request we will add a place with the addPlace() function which will write after this.
For the actual request, create a folder called “controllers” with a file called “places.js”.
Before we define our controllers, we will first create a model of a place. Models are responsible for creating and reading documents from the underlying MongoDB database. Create another folder called “models” with a file called “Place.js”. Convention is to use a capital for models.
We will keep our model very simple for now:
Now let’s go back to our controllers inside “places.js” and add the addPlace() controller:
Again we are using an async function here. As parameters, express always asks for a request and a response and we need to add next because this is a middleware function. We wait for the Place model schema to create and send a succes status when finished, otherwise we will log out the error.
We will use Postman to check if our API is working correctly by sending test requests. If you do not have it you can get it for free at https://www.getpostman.com/
Open up Postman and make a POST request to http://localhost:5000/api/ using the header Content-Type: application/json and as body a JSON object containing any address you like:
{ "address": "amsterdam" }
Send the request and you should receive a 200 status. Now check inside MongoDB if your collection has been updated.
We have build an API which updates an remote database, yay!
To retrieve the list of places we will use a similar controller:
Also try to test the getPlaces request by using Postman GET http://localhost:5000/api/ — it should give you a 200 success status with the count and data.
Adding GeoJSON and MapBox

Next up we will automatically convert the user entered address to JSON that MapBox can read to plot out all locations on a map.
We already have the node-geocoder package installed, so let’s get an API key from MapQuest to convert our address to geo code. You can get one for free from https://developer.mapquest.com/
Then inside our config.env file add two new configs:
GEOCODER_PROVIDER=mapquest

GEOCODER_API_KEY=<your api key>
Create a new folder called “utils” with a file “geocoder.js”. Inside here we will use our mapquest key inside the options NodeGeocoder expects:
We will use the geoCoder inside our Place model. Our location will have three properties: type, coordinates and a formattedAddress.
Now before our Place model gets saved we have to convert the user address to geo code. We do this by adding an async function before saving the model. Then we do not save the user entered address anymore and move on with our function:
Start you server again npm run start and open up Postman to send a new POST request with an application/json Content-Type and JSON body with an address.
If you’ll receive an 200 status code and see the location with coordinates, also make sure the item is inserted correctly inside MongoDB.
Let’s start working on our front-end!
Front-end rendering the map

First, let’s define a public folder inside our API. Create a new folder called “public” and add an “index.html” file inside.
Now inside “server.js” add the following line so express recognizes the static folder to publish on the front-end.
// Set static folder

app.use(express.static(path.join(__dirname, 'public')));
Inside the index.html file of our public folder if you are using Visual Studio Code just type in doc en press enter to render a basic HTML template.
If you now run the app again with npm run start you’ll should see an empty HTML page on http://localhost:5000/
I have made a starter template for you here that uses the CSS framework Bulma so that we do not have to style everything ourselves. As well as an “app.js” file that we have to create inside a “/js” folder.
I’ve addes some quick inline styles to make it look better, the purpose of this tutorial is not to learn CSS so it is fine for now.
Create an account at https://account.mapbox.com/ and then click on “Install the Maps SDK” for web inside your account page. Choose CDN and paste to files in the head of your index.html
Then create a new folder inside our public folder called “js” with a file called “app.js”. Inside here we will call the MapBox map and also plot our points retrieved via our API.
In the documentation examples you’ll find many snippets on parameters you can set for the map. We will set the style to street and zoom to 1. You can also define a start location by “center”. We’ll also indicate our container with id “map”.
mapboxgl.accessToken = '<your token>';

const map = new mapboxgl.Map({

 container: 'map',

 style: 'mapbox://styles/mapbox/streets-v11',

 zoom: 1,

});
Then you should see something like this:

Let’s create an async function getPlaces() that retrieves the places from our API and store them in a variable called “places”.
Then we’ll create a function showMap(places) that shows the places on the map with the places variable we just created as an input. We have to call this function at the end of our async function so the places variable is filled.
If you add a place now through Postman with our API it should show up on the map. Great!
Now let’s create the add place functionality. First we will set up some event listeners on our form, input and submit so we can show the user an error message when no address has been filled.
We will make the addPlace(e) an async function because we have to await the api fetch. When the user gets a 200 status message, we will retrieve the API data gain to update their map.
So the user sees his added adres directly appear on screen.
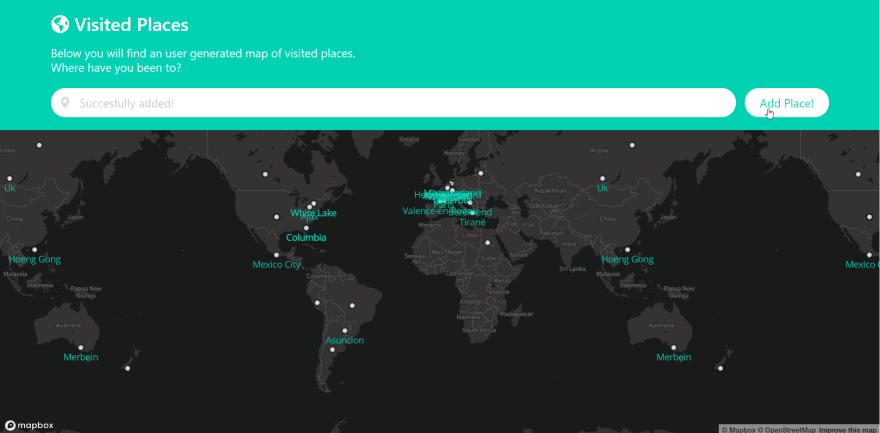
We have come a long way! I’ve made my map dark, which you can set in settings by changing the style to “dark-v10”. Let’s publish our app in the next section.
Deploying on Heroku
We already created our app in Heroku and attached their MongoDB add-on. First we will add our environment variables inside Heroku. Go to the app’s settings and click on “reveal config vars” and add the following:
NODE_ENV=production

MONGO_URI=< your uri from your config.env file >

GEOCODER_PROVIDER=mapquest

GEOCOVER_API_KEY=< your api key >
Run heroku local web to check if your app is working correctly on http://localhost:5000/
Now we need to deploy our app. We can do this by the following commands:
git add .

git commit -m '...'

git push heroku master
If there were no issues, your app should be live!
Visited Places
*Below you will find an user generated map of visited places. Where have you been to?*visited-places-api.herokuapp.com


Top comments (3)
Great Article 👍,
It gives complete start on, How to use GeoJSON format Map data with NodeJs/ExpressJs Rest-APIs and MongoDB.
Keep it up ✍️
Thanks a lot!
Hi!
Thanks for this article :)
The mLab team has discontinued their MongoDB add-on.
What do you recomend to use instead?
Another add-ins are here: elements.heroku.com/search/addons?...