
Did you ever encountered a bit of a mess when looking at JavaScript code? Especially when there is a lot of code involved, JavaScript's flexible nature can easily create a bunch of tangled spaghetti code.
This is where code patterns and structures come into place. One of the most popular, widely used pattern is called the MVC pattern: model, view and controller.
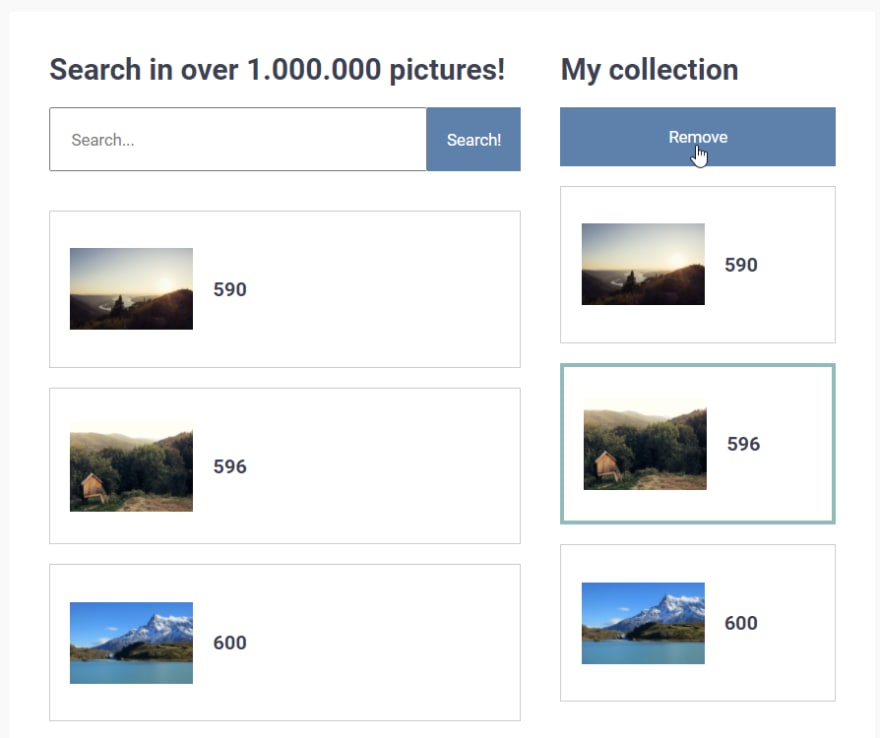
In this article we would build a simple JavaScript application that:
- Fetches pictures from the SplashBase API
- Enables the user make a selection of those pictures
- Enables the user to remove and change their selection
- Using the MVC pattern with OOP and FP techniques for structuring our code
Fetching from this API only works on your local machine, as the API does not support HTTPS. However, this one is simple, free and does not require an API key.
Prerequisites
- Basic JS and HTML
- Basic Webpack
Let's get started! 😄
What is MVC?
A design pattern that separates an application into three parts:
- Model: manages the data of the application (data layer)
- View: visual representation of the model (presentation layer)
- Controller: glues model and view together (application layer)
General rules
- Model never touches the view. View never touches the model. Controller connects both.
- Views do not run their own methods (e.g. a dialog should not open itself).
- The larger the application, the more it will benefit from MVC.
1. Project setup
Let's start with setting up our package.json and installing the required dependencies.
npm init -y
Then replace the scripts and dependencies with the following:
"scripts": {
    "dev": "webpack --mode development",
    "build": "webpack --mode production",
    "start": "webpack-dev-server --mode development --open"
  },
  "devDependencies": {
    "@babel/core": "^7.7.4",
    "@babel/preset-env": "^7.7.4",
    "babel-loader": "^8.0.6",
    "html-webpack-plugin": "^3.2.0",
    "webpack": "^4.41.2",
    "webpack-cli": "^3.3.10",
    "webpack-dev-server": "^3.9.0"
  },
  "dependencies": {
    "@babel/polyfill": "^7.7.0",
    "axios": "^0.19.2"
  }
And then run npm install to install the packages.
Next up, create the following folders and files:
/dist
--style.css
/src
--/js/index.js
--index.html
Because our focus is on learning MVC in JavaScript, you may just copy the following code for index.html and style.css below:
Click here for the HTML code
Click here for the CSS code
Subsequently we'll add a webpack.config.js file in our root folder to set up Webpack. Pour the following code in there:
.webpack.config.js
const path = require("path");
const HtmlWebpackPlugin = require("html-webpack-plugin");

module.exports = {
  entry: ["@babel/polyfill", "./src/js/index.js"],
  output: {
    path: path.resolve(__dirname, "dist"),
    filename: "js/bundle.js",
  },
  devServer: {
    contentBase: "./dist",
  },
  plugins: [
    new HtmlWebpackPlugin({
      filename: "index.html",
      template: "./src/index.html",
    }),
  ],
  module: {
    rules: [
      {
        test: /\.js$/,
        exclude: /node_modules/,
        use: {
          loader: "babel-loader",
        },
      },
    ],
  },
};
This will use our /src/js/index.js as input file and convert it bundle it into our /dist/ folder nicely. Also it will use our /src/index.html file as template and generate that file too in our output /dist/ folder.
Then create a file called .babelrc in the root and add the following code:
.babelrc
{
  "presets": [
    [
      "@babel/env",
      {
        "targets": {
          "browsers": ["last 5 versions", "ie >= 8"]
        }
      }
    ]
  ]
}
Great! We are now ready to start coding some JavaScript.
2. Setting up controllers
If you run npm start Webpack will spin up a dev server for us where we can see our changes directly without reloading.
Our index.js file will serve as the controller of our application. We will create an object called state to keep track of the current state of the application. We then need two controllers: one for the search part and one for the collection part:
index.js
/*
** Global state of the app
*/

const state = {};

/*
** Search controller
*/

const searchController = () => {
    //
}

/*
** Collection controller
*/

const collectionController = () => {
    //
}
Let's work on the search controller first. This is how it will work:
- User types into the input field and presses the search button.
- This will fire our controller that reads the input.
- The controller will ask our Search Model to fetch pictures with the given input.
- The controller will then ask the View to update the screen for the user with the fetched pictures, if any.
Inside /src/js/ create the folders models and views. Inside views create a file called base.js.
Inside base.js we will setup an object that holds all our HTML elements:
/views/base.js
export const elements = {
  searchInput: document.querySelector(".search__input"),
  searchButton: document.querySelector(".search__button"),
  searchResults: document.querySelector(".search__result"),
  error: document.querySelector(".search__error"),
  myPictures: document.querySelector(".my-pictures__collection"),
  removeButton: document.querySelector(".my-pictures__button"),
};
It is always good practice to structure data inside objects. Because these are the UI elements, we've placed this inside our views folder.
3. Creating the Search view
Next up we'll create our first view file inside /views/ called searchView.js. Let's set up the function to get the users input:
/views/searchView.js
import { elements } from "./base";

export const getInput = () => elements.searchInput.value;
Go back to the main index.js file, import this file and use it as follows to get the users input:
index.js
const searchController = () => {
  const query = searchView.getInput();
};
This is nice and all, but when does this function get fired? Well, when the users presses the search button! Let's create an event listener for this action inside our controller:
index.js
elements.searchButton.addEventListener("click", (event) => {
  event.preventDefault();
  searchController();
});
Make sure to import elements inside the controller file.
Everytime the user presses the search button, our seachController function will fire off and retrieve the users input from the searchView.getInput() function.
4. Creating the Search model
Next up we want to actually fetch some images based on the users input. For this we will use the free API from splashbase.
Fetching data and storing it into their own state is something a model will do. Create a new file inside /models/ called Search.js.
For our search model we will create a class Search that takes a query as constructor and also keeps track of an array of pictures inside the constructor.
/models/Search.js
export default class Search {
  constructor(query) {
    this.query = query;
    this.pictures = [];
  }
}
Back to our searchController function. First, we'll convert the function to an async function because we will have to wait for the API's result to come back. Then we'll check if the user actually typed something. If so, we'll create a new instance of Search, using the users input as query.
Next we'll try to fetch the pictures from the API, which are then stored inside our state.search object (instance of Search).
index.js
const searchController = async () => {
  const query = searchView.getInput();

  if (query) {
    state.search = new Search(query);
    try {
      await state.search.getPictures();
    } catch (err) {
      alert(`Something went wrong: ${err}`);
    }
  }
};
Let's create the method getPictures() inside our Search model. We'll be using axios to easily fetch data from the API. If successful, we'll store the result in Searchs own state called this.pictures.
/models/Search.js
import axios from "axios";

export default class Search {
  constructor(query) {
    this.query = query;
    this.pictures = [];
  }

  async getPictures() {
    try {
      const result = await axios(
        `http://www.splashbase.co/api/v1/images/search?query=${this.query}`
      );
      this.pictures = result.data.images;
    } catch (error) {
      alert(error);
    }
  }
}
Now the our controller should receive the requested pictures based on the users input when he clicks on search, great! Let's show the result on the UI next.
5. Displaying the result
If our Search model has successfully received some image data, we want to display it onto the screen.
First, let's create two methods to clear the input and the screen:
searchView.js
export const clearInput = () => (elements.searchInput.value = "");

export const clearResults = () => (elements.searchResults.innerHTML = "");
Back in index.js we'll call these methods right after our query starts:
index.js
state.search = new Search(query);
searchView.clearInput();
searchView.clearResults();
It would be nice to see a loading spinner while the pictures are being fetched. Let's create that next.
We'll need a renderSpinner() and a clearSpinner()function for this which we'll add in our base.js file:
base.js
export const renderSpinner = (element) => {
  const spinner = `<div class="spinner"></div>`;
  element.insertAdjacentHTML("afterbegin", spinner);
};

export const clearSpinner = () => {
  const spinner = document.querySelector(".spinner");
  if (spinner) spinner.parentElement.removeChild(spinner);
};
Our renderSpinner() function is able to add the loading spinner inside any element we provide it with. The clearSpinner() function finds the element and removes it.
Back into index.js we'll render our spinner right after clearing the screen, and remove it when the waiting for the API has finished:
index.js
const searchController = async () => {
  const query = searchView.getInput();

  if (query) {
    state.search = new Search(query);
    searchView.clearInput();
    searchView.clearResults();
    renderSpinner(elements.searchResults);

    try {
      await state.search.getPictures();
      clearSpinner();
    } catch (err) {
      alert(`Something went wrong: ${err}`);
    }
  }
};
For displaying the pictures, we need to check if the Search model was able to add pictures to it's local state. If so, we'll ask the searchView to render them to the screen:
index.js
if (state.search.pictures.length) {
    searchView.renderPictures(state.search.pictures);
} else {
    searchView.renderNoResults("No pictures found.");
}
searchView.js
const renderPicture = (picture) => {
  const markup = `
      <div class="search__item" data-id=${picture.id}>
        <img
          src=${picture.url}
          alt=""
          class="search__img"
        />
        <h4 class="search__text">${picture.id}</h4>
      </div>
      `;
  elements.searchResults.insertAdjacentHTML("beforeend", markup);
};

export const renderPictures = (pictures) => {
  pictures.forEach((picture) => renderPicture(picture));
};

export const renderNoResults = (msg) => {
  elements.searchResults.innerHTML = msg;
};
Awesome, our spinner and pictures should now display on screen! 😃
6. Adding and handling collection
Now that are search functionality is working, let's create the capability that the user is can select and remove pictures to and from their collection.
First, let's create the model called Collection:
/models/Collection.js
export default class Collection {
  constructor() {
    this.pictures = [];
  }

  get getSelectedPictures() {
    return this.pictures.filter((x) => x.selected === true);
  }

  get _getUnselectedPictures() {
    return this.pictures.filter((x) => x.selected === false);
  }

  addPicture(picture) {
    this.pictures.push(picture);
  }

  removePictures() {
    this.pictures = this._getUnselectedPictures;
  }

  toggleSelected(id) {
    const target = this.pictures.find((x) => x.id === id);
    target.selected = !target.selected;
  }
}
This model has its own state that stores an array of pictures. It has two getter methods, one of them is private (notice the underscore to indicate it is private method) because it is only used by an internal method.
The toggleSelected(id) method toggles the selected property of a given id to true or false.
Next up, the collection view.
/views/collectionView.js
import { elements } from "./base";

export const clearCollection = () => (elements.myPictures.innerHTML = "");

export const toggleSelected = (picture) => picture.classList.toggle("selected");

export const enableButton = () =>
  (elements.removeButton.classList = "my-pictures__button");

export const disableButton = () => {
  elements.removeButton.classList = "my-pictures__button disabled";
};

const renderPicture = (picture) => {
  const markup = `
      <div class="search__item ${picture.selected ? "selected" : ""}" data-id=${
    picture.id
  }>
        <img
          src=${picture.url}
          alt=""
          class="search__img"
        />
        <h4 class="search__text">${picture.id}</h4>
      </div>
      `;
  elements.myPictures.insertAdjacentHTML("beforeend", markup);
};

export const renderPictures = (pictures) => {
  pictures.forEach((picture) => renderPicture(picture));
};
It is similar to our searchView, except for toggling the remove button and toggling a selected picture.
Back to index.js let's start with the event listener for adding a picture to the collection.
index.js
// Add picture to collection
elements.searchResults.addEventListener("click", (event) => {
  let target;
  if (!event.target.classList.contains("search__item")) {
    target = event.target.parentElement;
  } else {
    target = event.target;
  }

  const id = parseInt(target.dataset.id);
  const alreadySelected = state.collection.pictures.find((x) => x.id === id);

  if (!alreadySelected && id) {
    const { url } = state.search.pictures.find((x) => x.id === id);
    state.collection.addPicture(new Picture(id, url));

    collectionController();
  }
});
We need to grab the dataset-id from the element that the user clicks on, so when a user clicks on an element inside the div we are looking for, we'll grab the parent element.
Then we'll check if this picture is already in our collection by using the find() method.
If not, we'll let our collection model add the picture to its state by creating a new model Picture which is very simple:
/models/Picture
export default class Picture {
  constructor(id, url) {
    this.id = id;
    this.url = url;
    this.selected = false;
  }
}
Finally, we'll call collectionController() to render our updated collection:
index.js
const collectionController = () => {
  collectionView.clearCollection();
  collectionView.renderPictures(state.collection.pictures);

  if (state.collection.getSelectedPictures.length) {
    collectionView.enableButton();
  } else {
    collectionView.disableButton();
  }
};
Next up we'll add the event listener inside our collection so users are able to mark pictures that they want to have removed, which is very similar as our event listener for adding pictures to the collection:
index.js
// Select picture for removal
elements.myPictures.addEventListener("click", (event) => {
  let target;
  if (!event.target.classList.contains("search__item")) {
    target = event.target.parentElement;
  } else {
    target = event.target;
  }

  const id = parseInt(target.dataset.id);

  if (id) {
    const picture = state.collection.pictures.find((x) => x.id === id);
    state.collection.toggleSelected(picture.id);

    collectionController();
  }
});
Then we also need to add the functionality to actually remove the selected pictures from our collection:
index.js
// Remove selected pictures
elements.removeButton.addEventListener("click", () => {
  if (state.collection.pictures.length) {
    state.collection.removePictures();
    collectionController();
  }
});
At last, we need to create a new instance of our Collection class on page load, so our application has a place where to store the images:
index.js
/*
 ** Startup on page load
 */

window.addEventListener("load", () => {
  state.collection = new Collection();
  state.collection.pictures.forEach((picture) =>
    collectionView.renderPicture(picture)
  );

  collectionController();
});
Make sure to import all the necessary files, the application should work now! 😀
Thanks so much for following this tutorial. If you have any questions or feedback please let me know.
Make sure to follow me for more tips and tricks! 👋


Top comments (0)