
For a specific scenario, we wanted to expose a queuing endpoint towards a customer, in a secure way, but at the same time abstracting our internal usage of Azure Service Bus.
As we already had Azure API Management in place to expose our API, we decided to leverage this and see if we could avoid the typical scenario where we'd have to develop a strong typed custom API that then just takes the incoming request and maps it to a Service Bus message that should be be processed to the right endpoint.
And this post describes exactly how you can achieve this.
Azure API Management policy
The following abstract is the full policy that we configured. So, you could see this as the "tldr;" of this blog post. In the rest of the article, we'll dive deeper in the details and discuss what's behind everything.
<policies>
    <inbound>
        <base />
        <validate-content unspecified-content-type-action="detect" max-size="262144" size-exceeded-action="detect" errors-variable-name="schema-validation-error">
            <content type="application/json" validate-as="json" action="prevent" schema-id="OrderRequest" allow-additional-properties="false" />
        </validate-content>
        <trace source="Order create">Request validated</trace>
        <authentication-managed-identity resource="https://servicebus.azure.net" output-token-variable-name="sbBearerToken" ignore-error="false" />
        <set-header name="Authorization" exists-action="override">
            <value>@{return $"Bearer {(String)context.Variables["sbBearerToken"]}";}</value>
        </set-header>
        <set-backend-service base-url="https://{{serviceBusNamespaceFQDN}}" />
        <rewrite-uri template="/orders/messages?api-version=2015-01" />
        <set-header name="MessageType" exists-action="override">
            <value>Order</value>
        </set-header>
    </inbound>
    <backend>
        <retry condition="@(new List<int>() { 408, 429, 500, 502, 503, 504 }.Contains(context.Response.StatusCode))" count="2" interval="1" max-interval="10" delta="1">
            <forward-request buffer-request-body="true" />
        </retry>
    </backend>
    <outbound>
        <base />
    </outbound>
    <on-error>
        <base />
    </on-error>
</policies>
Set up the API operation contract
As we want to have a strong typed operation, enforcing the contract, we have to define both the actual operation (http resource) as well as the incoming payload schema first.
In the following screenshot, you can see we define the resource (POST /order). We also indicate that the operation expects an instance of the definition CreateOrderRequest in the request.
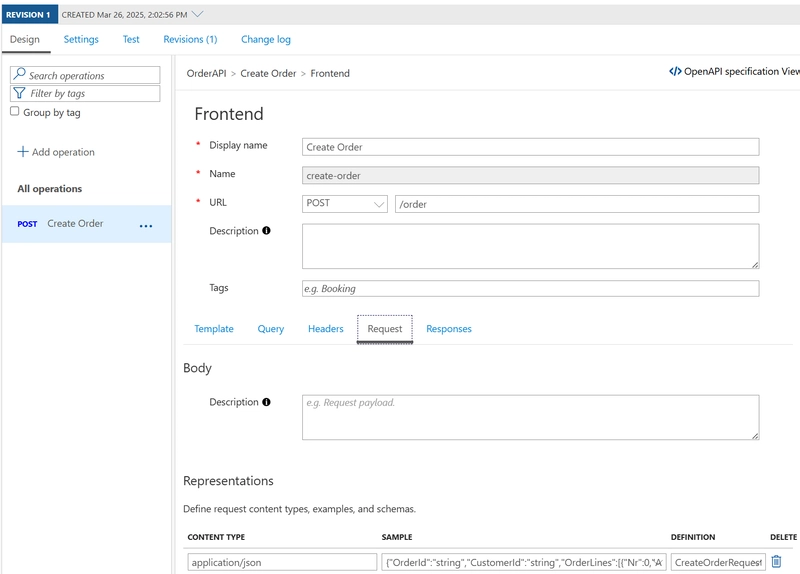
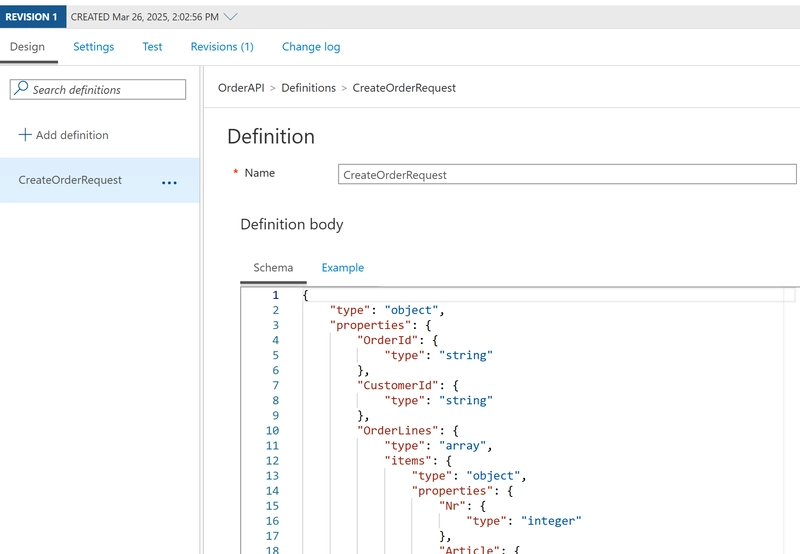
The schema itself is defined in the Definitions tab (at the bottom), where you can define the schema itself, or have the schema generated from a sample instance.
Enable security and access rights on Service Bus
In order to allow the API Management service to send messages to the Azure Service Bus endpoint, it is important to assign the correct permissions. We will do this by providing the Azure Service Bus Data Sender role to the System Identity of Azure API Management.
- Please verify the System Assigned Identity is enabled on API Management, by navigating to the 'Managed Identities' tab.
- Take note of the Object (principal) ID.
- Navigate to your Service Bus namespace in the Azure portal
- Assign the right permissions in Role Assignments, as shown in the next screenshot
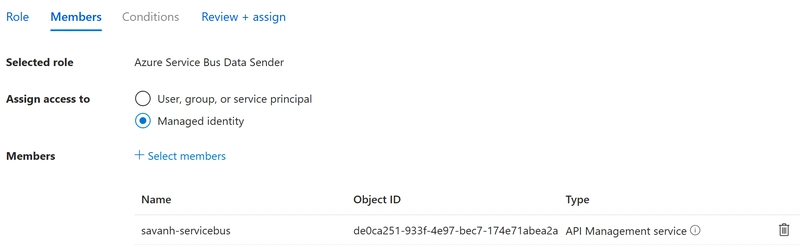
The result should be looking like the following

In case you use a User Assigned managed identity, the client id of the role should be stored as it will be used in the APIM policy , to authenticate against the API of Servicebus (here: 60ec8160***). (If needed.
The XML policy explained
Validating the schema
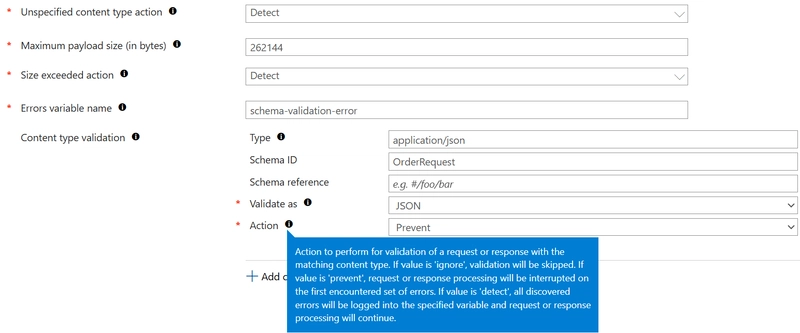
As we're not having custom code, hosted in an API to perform validation, we have to fall back on the out of the box schema validation, provided by Azure API Management. This way, we will ensure only valid messages are delivered into our messaging backend. This comes with limitations as we are not returning a 404, in case the ArticleNumber does not exist, for example. So, those exceptions have to be handled asynchronously.
<validate-content unspecified-content-type-action="detect" max-size="262144" size-exceeded-action="detect" errors-variable-name="schema-validation-error">
    <content type="application/json" validate-as="json" action="prevent" schema-id="OrderRequest" allow-additional-properties="false" />
</validate-content>
When the request is not valid, an HTTP 400 (BadRequest) will be returned to the caller of the API. We also indicate
Add tracing
The next fragment, just adds a trace that will be integrated in the APIM trace and even a connected Application Insights instance.
<trace source="Order create">Request validated</trace>
Configure managed identity authentication
The authentication-managed-identity fragment, enables the authentication of the Azure APIM managed identity (system identity in our case) against the Azure Service Bus resource. A call to the Microsoft Entra ID happens and the result is being stored in the sbBearerToken variable, to be used in the next step.
<authentication-managed-identity resource="https://servicebus.azure.net" output-token-variable-name="sbBearerToken" ignore-error="false" />
Setting the Service Bus Authorization header
In this step, we are setting (and overriding, should it exist) the Authorization header on the outgoing HTTP call that will be made.
<set-header name="Authorization" exists-action="override">
    <value>@{return $"Bearer {(String)context.Variables["sbBearerToken "]}";}</value>
</set-header>
Configure the actual Service Bus entity url
Two steps are taken to define the actual entity url for the service call.
<set-backend-service base-url="https://{{serviceBusNamespaceFQDN}}" />
<rewrite-uri template="/orders/messages?api-version=2015-01" />
We are setting the base-url of the backend service to the https address of the service bus. (the {{serviceBusNamespaceFQDN}} value is retrieved from a namedvalue, as to configure this with the IaC pipelines.
After that, we are providing the name of the topic or queue to which we want to send the incoming message. (As per following document, the 2015-01 is still the latest version).
Adding custom message properties
If you want to add custom message properties, you can do so by adding HTTP headers with the correct name and value to the HTTP request.
This is what happens in the last snippet.
<set-header name="MessageType" exists-action="override">
    <value>Order</value>
</set-header>
Setting the retry policies
For certain HTTP status codes, we are indicating a retry policy to be used. This is certainly relevant for the 429 status code (throttling), but can also be enabled for the other ones.
This snippet is to be set on the backend node.
<retry condition="@(new List<int>() { 408, 429, 500, 502, 503, 504 }.Contains(context.Response.StatusCode))" count="2" interval="1" max-interval="10" delta="1">
    <forward-request buffer-request-body="true" />
</retry>
Testing
When testing the API call from the Azure API portal, we can clearly see the message appear on our subscription (linked to the Orders topic we were sending to). We can also see the MessageType custom property in the Service Bus explorer view.

Conclusions
This approach clearly helps in directly exposing a Service Bus entity, while still abstracting that as an implementation detail and maintaing some basic validation on the incoming request.
However, that validation is somewhat limited and lacks certain synchronous validation logic (even business logic) to be executed, which is what you typically would use a custom WebAPI project for (that then would forward the validated - or enriched - request to the Service Bus.)


Top comments (0)