This article is the continuation of WordPress with Docker, AWS (ECS, Code Pipeline, Load Balancer, RDS, EFS) Complete Series. For better understating, please start from the beginning of the series.
In this article, we will create an ECS task definition containing our WordPress Docker image reference from ECR, Environment variables such as Database credentials, EFS volume mount for our plugins storage (Don’t worry I will shed more light on this later) and some WordPress website constants such as WP_SITE_URL etc.
If you have used Docker Compose before, ECS Task Definition concept is quite similar to that.
Fasten your seat belts, there will be some steps involved to get the ECS Task Definition setup.
Before we began
In the task definition, we will pass some environment variables such as Database host, Database name, user, password, some WordPress constants such as website URL etc.
The first thing we need is the WEBSITE_URL. In the beginning, we can use the DNS name of our Load Balancer.
Go to your EC2 console and select Load Balancer. You will be able to see the DNS name of your Load Balancer here. Please take a note of this URL.
We can change this URL once our domain is linked to the Load Balancer. This can be easily done by using AWS route 53 later.
We also need our Database credentials. Go to RDS from service tab and select Database. Click on the database you have created. Under Connectivity & security section, you will find the URL there. We will be using this URL soon.
Create Task Definition
Go to ECS from your AWS Service tab and select Task Definitions, now click on Create New Task Definition
Step 1: Select launch type compatibility
We will choose EC2 on the next step
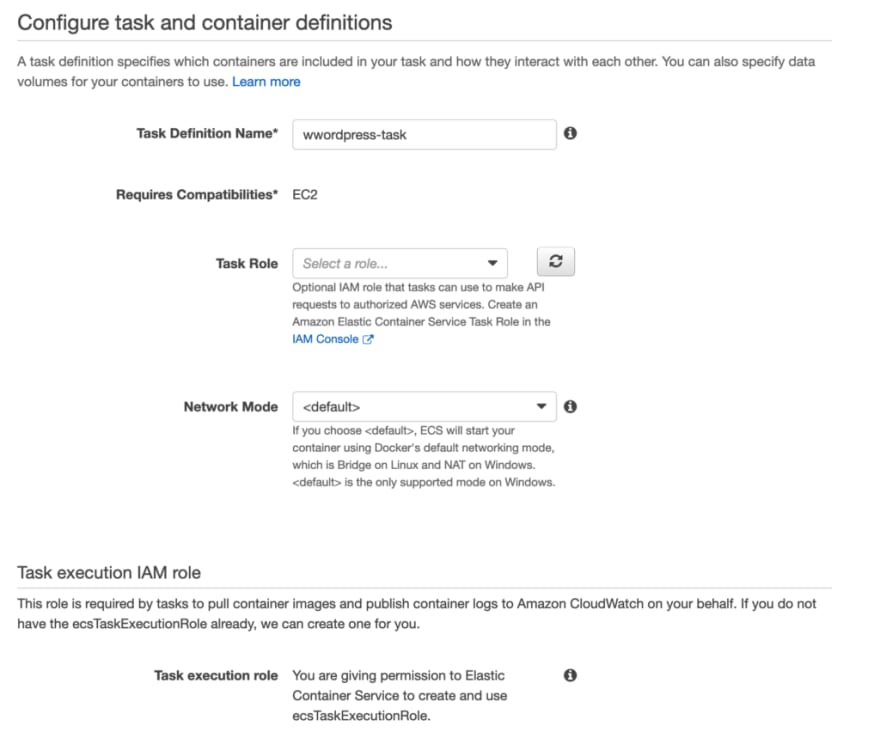
Step 2: Configure task and container definitions
We will add a container which have our Docker Project along with some configurations.
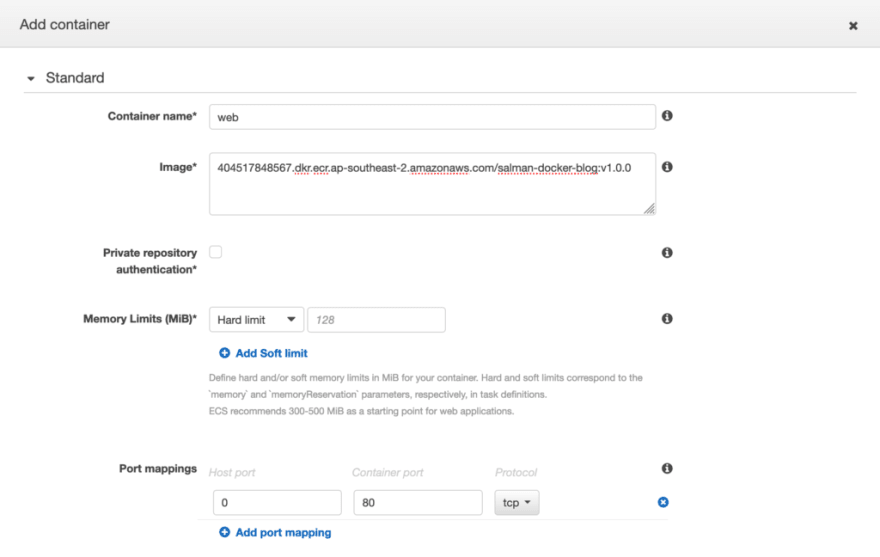
You can give any name to your container, in our case we have used web. In the image field, paste your ECR repository’s latest version link. Please refer to Build and Push wordpress project to AWS ECR Push to AWS ECR ! section.
The reason to add 0 -> 80 in the port mappings is to map any port from outside world (Load Balancer in our case) to container’s port 80.
Environment
This is the most important part of our container, we will pass the Database credentials to our Docker Image file along with some other configurations.
We will set the following environment variables:
- WORDPRESS_DB_HOST (RDS end point URL)
- Go to RDS from service tab and select Database. Click on the database you have created. Under Connectivity & security section, you will find the URL.
- WORDPRESS_DB_NAME
- WORDPRESS_DB_USER
- WORDPRESS_DB_PASSWORD
- The database name, user and password you have already set while creating the RDS DB
WORDPRESS_CONFIG_EXTRA
define( 'WP_HOME', 'http://wwordpress-elb-1695594798.ap-southeast-2.elb.amazonaws.com
' ); define( 'WP_SITEURL', 'http://wwordpress-elb-1695594798.ap-southeast-2.elb.amazonaws.com
' ); define('CONCATENATE_SCRIPTS', false); define('WPINV_USE_PHP_SESSIONS', false);define('FS_METHOD', 'direct');
Replace wwordpress-elb-1695594798.ap-southeast-2.elb.amazonaws.com with your Load DNS URL
If your wordpress website requires setting up any constant, WORDPRESS_CONFIG_EXTRA is where you can append it.
AWS Logs
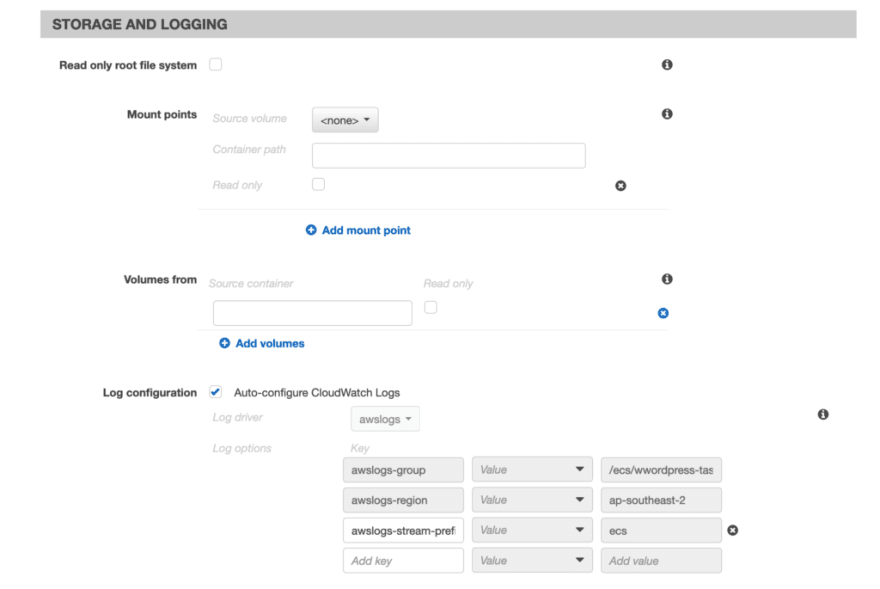
Scroll down to the STORAGE AND LOGGING section and enable AWS logs. This will help to troubleshoot if there’s any issue with your website.
Click on Add and we’re almost done.
Volumes for Cache and Plugins
Now its time to use a centralized storage for plugins. This is one of the biggest challenges I have faced when it comes to develop a high traffic multi instance WordPress website which can scale up and scale down on demand.
Now its time to use our EFS file system we have created for Plugins storage and cache.
We will have to create two volumes i.e. efs-plugins and efs-cache within our container. for that, Scroll down and click on Configure Via JSON button
find “volumes”: [] and add update this JSON array
 "volumes": [
        {
            "name": "efs-plugins",
            "host": null,
            "dockerVolumeConfiguration": {
                "autoprovision": null,
                "labels": null,
                "scope": "task",
                "driver": "local",
                "driverOpts": {
                    "type": "nfs",
                    "device": ":/",
                    "o": "addr=fs-565d626f.efs.ap-southeast-2.amazonaws.com,nfsvers=4.1,rsize=1048576,wsize=1048576,hard,timeo=600,retrans=2,noresvport"
                }
            }
        },
        {
            "name": "efs-cache",
            "host": null,
            "dockerVolumeConfiguration": {
                "autoprovision": null,
                "labels": null,
                "scope": "task",
                "driver": "local",
                "driverOpts": {
                    "type": "nfs",
                    "device": ":/cache",
                    "o": "addr=fs-565d626f.efs.ap-southeast-2.amazonaws.com,nfsvers=4.1,rsize=1048576,wsize=1048576,hard,timeo=600,retrans=2,noresvport"
                }
            }
        }
    ],
Replace fs-565d626f.efs.ap-southeast-2.amazonaws.com with your EFS volume URL.
Volumes have been added now we need to mount these volumes. find “mountPoints”: [] in the JSON and update it with the following.
 "mountPoints": [
                {
                    "readOnly": false,
                    "containerPath": "/var/www/html/wp-content/plugins",
                    "sourceVolume": "efs-plugins"
                },
                {
                    "readOnly": false,
                    "containerPath": "/var/www/html/wp-content/cache",
                    "sourceVolume": "efs-cache"
                }
            ],
Hit Save and then click on create. Our task definition is now created and ready to rock and roll very soon !!
Previous
Create Load Balancer for WordPress website


Top comments (0)