
Without Continuous Integration or CI, developers would need to manually coordinate, communicate, and test while contributing code to the end product each time. This, in turn, affects the production and causes a delay in release. So it is crucial to use a Continuous Integration & Continuous Delivery tool with Selenium to automate the tests continuously. According to the recent survey by Atlassian – 75 percent of production teams face bugs, glitches, or delays at release time.
With Bitbucket CI coming into the picture, it will go a long way in helping developers with their daily operations. To ensure faster and smoother delivery, organizations use Selenium Grid Cloud to automate their test suite. It allows you to run tests faster, with fewer errors in a robust manner. In this article, you’ll learn how to integrate Bitbucket CI with the Selenium Grid cloud. We will offer a step-by-step walkthrough to guide you through the entire process. Let’s get to it, shall we?
Before moving towards the integration of Bitbucket pipeline with Selenium, we think it’s a good idea to define a few terms. Let us start with Bitbucket Pipelines.
What Is Bitbucket Pipelines? Why Do We Need It?
Bitbucket Pipelines is a CI/CD tool that allows you to create, test, and deploy your code automatically based on your file configuration. Every commit that you make would trigger a Bitbucket pipeline, and your build process would start. The build process involves a series of steps running sequentially. Once the build process is successful, your automation test would be executed. You need to make edits to the Bitbucket YAML file for each commit, which is located at your root repository. Here are the six sparkling features of Bitbucket CI:
- Built-in CI / CD platform – you never have to care about maintaining existing infrastructure, which means more time to concentrate on other activities.
- Flexibility – provides integration with tools like Jira, Trello, Bamboo, and cloud hosting providers like AWS, Google Cloud, and Microsoft Azure.
- Code review – which lets you create pull requests and gives you code feedback from your team members.
- Robust security mechanisms – providing dual authentication features and IP Whitelisting.
- Issue tracker – you can track your project issues, report bugs, and perform operations related to your projects.
- Free unlimited storage – for public and private repositories with up to five members and 1GB storage for Git Large File Storage (LFS) with 50 build minutes for pipelines as well.
Bitbucket provides free private repositories for up to five members, so keep that in mind. Otherwise, you will be charged.
For this post, we assumed that you already have a Bitbucket repository for your project, which will be integrated with Selenium Grid. We will complete the integration process in mainly two steps:
- Setup for integrating LambdaTest with Bitbucket Pipelines
- Parallel execution on LambdaTest Selenium Grid
Why Choose Selenium Cloud To Run The Tests?
If you have an extensive application to test, you need to concentrate more on usability and performance testing. You need to have a good understanding of the test scope, knowing if you want to try on different browsers, computers, or operating systems. And if you try to do it all on your own, it might be a tedious task. Selenium can be integrated with cloud services to test your web applications to get testing benefits across multiple browsers and platforms with high speed.
LambdaTest is a cloud-based cross browser testing platform which allows you to check browser compatibility of your website or web pages for 2000+ browsers, operating systems or a combination of both. This is the major advantage of choosing a Selenium grid cloud and being able to run tests parallely on multiple browsers or devices, without the hassle of adding any infrastructure.
How To Run Test Scripts With BitBucket Pipelines In Selenium?
Now that you understand why choosing a Selenium grid cloud might be beneficial for you, let’s apply the above-discussed things in practical terms. We will use the Test Project on BitBucket Pipelines for our demo of integrating the Bitbucket pipeline with Selenium, which uses the Selenium-Nightwatch-js library package. We have used LambdaTest Tunnel and Selenium tests written in the Nightwatch JS framework to ensure seamless integration.
Let us see the steps to integrate Bitbucket CI with Selenium Grid using LambdaTest:
Forking Or Cloning The BitBucket Pipeline Repository
The very first step is to copy the existing Bitbucket Pipeline repository. This can be done by either forking or by cloning the repository. If you want to work in a branch of the Bitbucket repository without copying it, use forking. Else if you want to copy the complete repository and then work, use cloning. In this post, we will use forking.
Forking a repository produces a copy of your project. You will use the fork to work on new functionalities and send pull requests visible in your project. By forking, you can make changes to the project within the Bitbucket without cloning into your local system.
Make sure you fork the Test Project to your Bitbucket cloud interface.
Setting Up The Environment Variables
Environment variables are the location where sensitive configuration information can be stored. These variables are available to the entire system and are often used to store credentials. Let’s say that you are the developer of a web application that uses a database to store information, and you are using a service like Github or Bitbucket to store your source code. Well, it would mean that your database password is embedded in your code, which also means that someone with access to the source code might see your credentials.
The environment variables are the solution to this problem. You can use these variables to store confidential information, such as provac the key that is needed to connect to a database or the credentials to deploy to production servers, etc. These variables are not laid out directly in the code, but those stored outside can be used directly in the code by mentioning just the variable name—your git.
For this post, we need to set the LamdaTest credentials as the environment variables i.e. your LambdaTest username, access key, and HubURL. Set the environment variables in the Repository Settings > Repository Variables as shown below:
For Linux/Mac:
$ export LT_USERNAME= {your lambdatest username}
        $ export LT_ACCESS_KEY= {your lambdatest access_key}
For Windows:
$ set LT_USERNAME= {your lambdatest username}
        $ set LT_ACCESS_KEY= {your lambdatest access_key}
Note: You can get these values from your profile page on LambdaTest.
How To Configure The Pipeline In BitBucket CI?
After importing the Bitbucket repository and setting the environment variables, we need to fetch and edit the yml file to run our automation tests using the NightwatchJS framework on LambdaTest Selenium Grid.
To trigger our BitBucket Pipeline, we will need to make changes in this bitbucket-pipeline.yml file directly through Bitbucket Cloud Interface. You can find the following components in the YAML file.
- Docker image: A node.js docker image is used, showing which node version is used.
- Script: This is the section where you run your tests sequentially.
- Caches: It is a place where you place your third-parties libraries, helping you save time in the build process.
- After-script: It runs when anyone of your test steps runs or fails.
Here is the edited bitbucket-pipeline.yml file. Just copy paste the below file:
# This is a sample build configuration for JavaScript.
# Check our guides at https://confluence.atlassian.com/x/14UWN for more examples.
# Only use spaces to indent your .yml configuration.
# -----
# You can specify a custom docker image from Docker Hub as your build environment.
image: node:10.15.3
 pipelines:
  default:
    - step:
        name: Run Sample Test Case
        caches:
          - node
        script:
           - echo ‘ Salman Khan LambdaTest’
          - npm install
          - npm run start:test:server
          - ./run_tunnel.sh # only needed when testing a locally hosted website
          - npm test
        after-script:
          # only needed when testing with tunnel
          - PORT=$(head -1 /tmp/port)
          - status_code=$(curl --request DELETE --write-out %{http_code} --silent --output /dev/null http://127.0.0.1:$PORT/api/v1.0/stop)
          - if [[ "$status_code" -ne 200 ]]; then  pkill LT; fi
          - rm /tmp/port
In the above code, just for the demo purpose, I have edited the bitbucket-pipeline.yml file and added the below command in the script section:
- echo ‘Salman Khan LambdaTest’
We can add custom test scripts in the place of this code for automation purposes. Let us now see how the above code works:
- A node docker image is used and the dependencies are installed.
- A node http-server is started on port 8888 that servers the todo app.
- To enable LambdaTest browsers and let devices access the local server, the LambdaTest Tunnel is downloaded, extracted and executed so as to establish a secure connection to LambdaTest Tunnel Servers.
- It then runs a NightwatchJS test on LambdaTest Selenium grid.
- After the script is executed the tunnel client is closed.
How To Execute The Pipeline?
Once we have edited the yml file, our test scripts are ready to be executed. Now we need to press the commit button to execute the edited pipeline. Once you hit the commit button, your pipeline will get triggered, the automation tests will be executed and run, and you can see your build in the Pipeline section to integrate Bitbucket pipeline with Selenium.
In the below image, you can see the edited bitbucket-pipelines.yml file and the commit button being pressed.

How To View The Build & Test Logs?
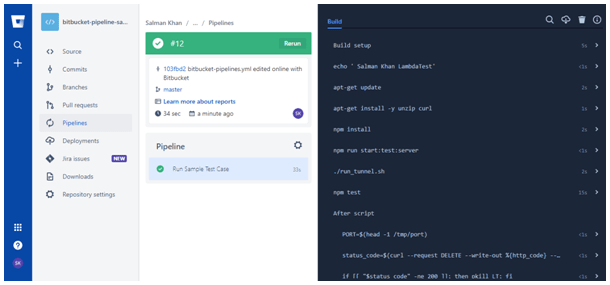
Once the commit has been done, the pipeline gets triggered, and the tests are executed. To view the tests along with their details, go to the Pipelines tab from the left bar. Here, you can see the table with all the tests which are currently running and also which have been running in the past, along with their complete log and status. You can see this data from the left side of the screen:
The pipeline list shows the complete details of the pipeline, its status, starting time, and the duration for which this pipeline was executed. Let us see the detail about each column – one-by-one:
- Pipeline: It shows the build message and the information about the branch from which the build was sent and the information about the most recent commit.
- Status: The current Status of your build process.
- Started: It displays information about the time when the build was started.
- Duration: It displays the build time-duration.
Let us see this with the help of an image:

You can also view the additional details about any pipeline along with the script that has been executed. Once you have built your test, you will be able check your commands, test logs, and configuration in the Status section, notifying that your Sample test case is executed successfully.
How To View The Test Logs From LambdaTest Tunnel?
Since we have integrated the Bitbucket CI with Selenium Grid using the LambdaTest tunnel, we can view the pipelines executed and their details in the LambdaTest portal. For this, login to your LambdaTest portal using your credentials, and go to the Automation dashboard from the left bar. In the Automation dashboard, you’ll find lists of your recent and past automation tests – the ones that have successfully executed.

How To Perform Parallel Testing With LambdaTest On Selenium Grid?
As technology advances, testing solutions are becoming quite flexible. But one area where they still lack flexibility is running several tests in parallel. There will be some scalability problems in parallel testing on a local Selenium grid, as you can’t cover every major browser, version, and OS. Let’s fasten our process and see how to execute multiple test cases parallely with the LambdaTest Selenium grid’s help to perform parallel tests on multiple browsers and their different versions.
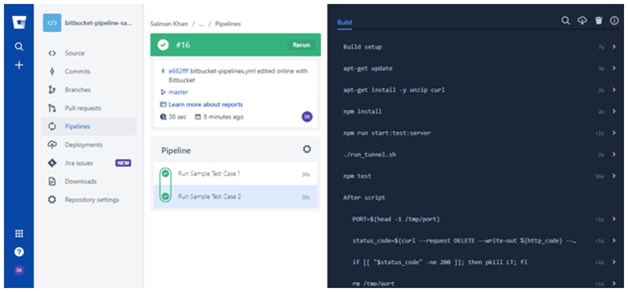
Configuring The Pipelines For Parallel Testing
You can see the two sample files Sample Test Case 1 and Sample Test Case 2 in the snippets given below. To perform parallel testing, we are going to make edits in the bitbucket-pipeline.yml file as we did in the case of a single test case.
# This is a sample build configuration for JavaScript.
# Check our guides at https://confluence.atlassian.com/x/14UWN for more examples.
# Only use spaces to indent your .yml configuration.
# -----
# You can specify a custom docker image from Docker Hub as your build environment.
image: node:10.15.3

pipelines:
  default:
    - parallel:      # these 2 steps will run in parallel
      - step:
          name: Run Sample Test Case 1
          caches:
            - node
          script:
            - apt-get update
            - apt-get install -y unzip curl
            - npm install
            - npm run start:test:server
            - ./run_tunnel.sh  # only needed when testing a locally hosted website
            - npm test
          after-script:
            # only needed when testing with tunnel
            - PORT=$(head -1 /tmp/port)
            - status_code=$(curl --request DELETE --write-out %{http_code} --silent --output /dev/null http://127.0.0.1:$PORT/api/v1.0/stop)
            - if [[ "$status_code" -ne 200 ]]; then  pkill LT; fi
            - rm /tmp/port
      - step:
            name: Run Sample Test Case 2
            caches:
              - node
            script:
              - apt-get update
              - apt-get install -y unzip curl
              - npm install
              - npm run start:test:server
              - ./run_tunnel.sh  # only needed when testing a locally hosted website
              - npm test
            after-script:
              # only needed when testing with tunnel
              - PORT=$(head -1 /tmp/port)
              - status_code=$(curl --request DELETE --write-out %{http_code} --silent --output /dev/null http://127.0.0.1:$PORT/api/v1.0/stop)
              - if [[ "$status_code" -ne 200 ]]; then  pkill LT; fi
              - rm /tmp/port
Paste the above code in the Bitbucket-pipeline.yml file and hit the Commit button. Your build process will start and parallel tests will be executed successfully.
If you visit the Automation dashboard, you will notice that your parallel tests are executed.
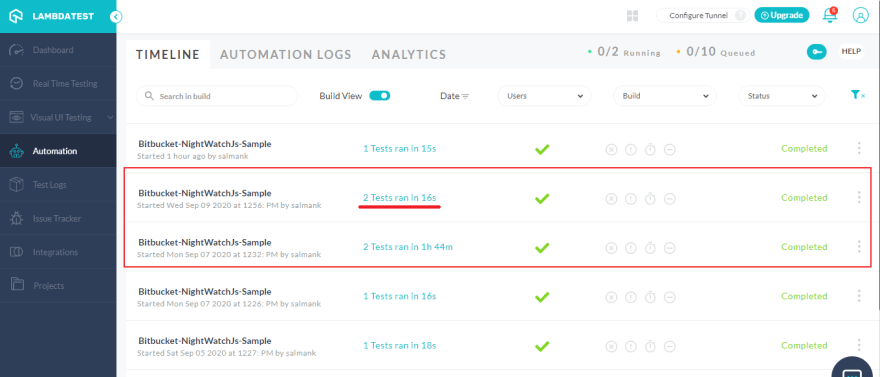
Here you can see that for parallel testing, the Automation dashboard shows the number of tests executed parallely. In the above code example, we have executed 2 single tests parallely. Hence we can see the text “2 Tests ran in 16s”, which means that 2 single tests have run concurrently in 16s duration by the name “Bitbucket-NightWatchJs-Sample”.
Conclusion
We have discussed the importance of Bitbucket pipeline integration with Selenium, how it can be leveraged using the Selenium Grid cloud. The need for parallel and cross-browser testing uses cloud services such as LambdaTest and its uses to integrate bitbucket pipelines. By following this guide, we hope you will easily integrate the Bitbucket pipeline with the Selenium grid cloud. If you have any issues or questions, don’t hesitate to reach out via the comment section.
Happy testing!

Top comments (0)