This blog post will take you through the full steps on installing and configuring Kasten, the container based enterprise backup software now owned by Veeam Software
This deployment will be for VMware Tanzu Kubernetes Grid which is running on top of VMware vSphere.
You can read how to create backup policies and restore your data in this blog post.
For the data protection demo, I’ll be using my trusty Pac-Man application that has data persistence using MongoDB.
Installing Kasten on Tanzu Kubernetes Grid
In this guide, I am going to use Helm, you can learn how to install it here.
Add the Kasten Helm charts repo.
helm repo add kasten https://charts.kasten.io/
Create a Kubernetes namespace called “kasten-io”
kubectl create namespace kasten-io
Next we are going to use Helm to install the Kasten software into our Tanzu Kubernetes Grid cluster.
helm install k10 kasten/k10 --namespace=kasten-io \
--set externalGateway.create=true \ --set auth.tokenAuth.enabled=true \--set global.persistence.storageClass=<storage-class-name>
Breaking down the command arguments;
- –set externalGateway.crete=true
- This creates an external service to use ServiceType=LoadBalancer to allow external access to the Kasten K10 Dashboard outside of your cluster.
- –set auth.tokenAuth.enabled=true
- This sets the authentication type of the Kasten Dashboard.
- –set global.persistence.storageClass=
- This sets the storage class to be used for the PV/PVCs to be created for the Kasten install. (In a TKG guest cluster there may not be a default storage class.)
You will be presented an output similar to the below.
NAME: k10
LAST DEPLOYED: Fri Feb 26 01:17:55 2021
NAMESPACE: kasten-io
STATUS: deployed
REVISION: 1
TEST SUITE: None
NOTES:
Thank you for installing Kasten’s K10 Data Management Platform!

Documentation can be found at https://docs.kasten.io/.

How to access the K10 Dashboard:

The K10 dashboard is not exposed externally. To establish a connection to it use the following

`kubectl --namespace kasten-io port-forward service/gateway 8080:8000`

The Kasten dashboard will be available at: `http://127.0.0.1:8080/k10/#/`

The K10 Dashboard is accessible via a LoadBalancer. Find the service's EXTERNAL IP using:
`kubectl get svc gateway-ext --namespace kasten-io -o wide`
And use it in following URL
`http://SERVICE_EXTERNAL_IP/k10/#/`
It will take a few minutes for your pods to be running, you can review with the following command;
kubectl get pods -n kasten-io
Next we need to get our LoadBalancer IP address for the External Web Front End, so that we can connect to the Kasten K10 Dashboard.
kubectl get svc -n kasten-io
If you don’t have a load-balancer available, then you can use the “kubectl port-forward” options, as described in the install output from helm.
Before we browse to our FQDN we also need to get the token from our user to access the environmment. For this example I am going to use the default user “k10-k10”, which has full administrator privileges to Kasten. You have the ability to create a new user with the correct level of access also, see here.
sa_secret=$(kubectl get serviceaccount k10-k10 -o jsonpath="{.secrets[0].name}" --namespace kasten-io)

kubectl get secret $sa_secret --namespace kasten-io -ojsonpath="{.data.token}{'\n'}" | base64 --decode
The first command passes our secret into a variable, which is reference in the second command.
Extract your token as per the below.
# sa_secret=$(kubectl get serviceaccount k10-k10 -o jsonpath="{.secrets[0].name}" --namespace kasten-io)

# kubectl get secret $sa_secret --namespace kasten-io -ojsonpath="{.data.token}{'\n'}" | base64 --decode

eyJhbGciOiJSUzI1NiIsImtpZCI6IjlPQy1MZUhMa3BaVXNoS29Wc1dqWVA0LXRIN3BOUHp5ZWFqRVd6SXlOVW8ifQ.eyJpc3MiOiJrdWJlcm5ldGVzL3NlcnZpY2VhY2NvdW50Iiwia3ViZXJuZXRlcy5pby9zZXJ2aWNlYWNjb3VudC9uYW1lc3BhY2UiOiJrYXN0ZW4taW8iLCJrdWJlcm5ldGVzLmlvL3NlcnZpY2VhY2NvdW50L3NlY3JldC5uYW1lIjoia
.....
aPRjztGna0cTK8OwwUYYAxqKXWrQOactAbsFQ7fi0bR-9Uiywta3gCfbXh7EkJShVpakpRQTcWppmqczRg_dqVtBvQeBnAWlhCpd7bC58LXS_Yd3Geciq4OZg

#
Login to your Kasten K10 Dashboard using the token.
- http://{LB_IPaddr}/k10
Accept the EULA.
Configuring Kasten to integrate with VMware vSphere
Currently the VMware CSI Driver does not support snapshot first class disks (FCD) at the Kubernetes layer. However Kasten can snapshot the FCD by using its integration into vSphere by calling the vCenter API. To enable this capability we need to configure an infrastructure profile.
- Click the “Settings” link in the top right-hand corner of the dashboard.
- Click the Infrastructure tab on the left-hand side menu.
- Click New Profile button.
This will open up a configuration pane on the right-hand side of the dashboard.
- Provide a profile name
- Provide your vCenter Server details and authentication details
- Click validate and save once done.
Once saved, you will be taken back to the dashboard and shown a successful notification pop-up.
Create a location profile to enable backup storage
We will now create a location profile.
Kasten out of the box will create a snapshot that resides with the Kubernetes cluster, however to provide a complete backup of your data, a location profile provides Kasten and the protection policies access to external object storage or external NFS file storage (tech preview).
- Select the Settings Link (click in the top right hand corner if needed).
- Click the Locations Tab.
- Click the New Profile button.
A dialog box will appear on the right-hand side of the dashboard interface.
Select your Cloud Storage Provider of choice and enter the necessary details. Click validate and save.
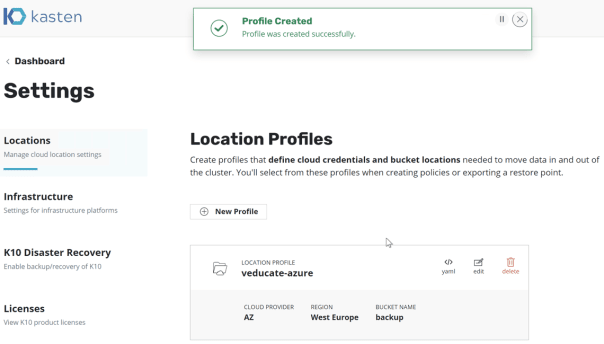
You will then see a Profile Created message if this is successful.
Creating Backup Policies, protecting and restoring your data
Now we have deployed our Kasten environment to our VMware Tanzu Kubernetes platform, and setting up the base configuration, we move onto the next phase:
Regards
The post Installing and configuring Kasten to protect container workloads on VMware Tanzu Kubernetes Grid appeared first on vEducate.co.uk.


Top comments (0)