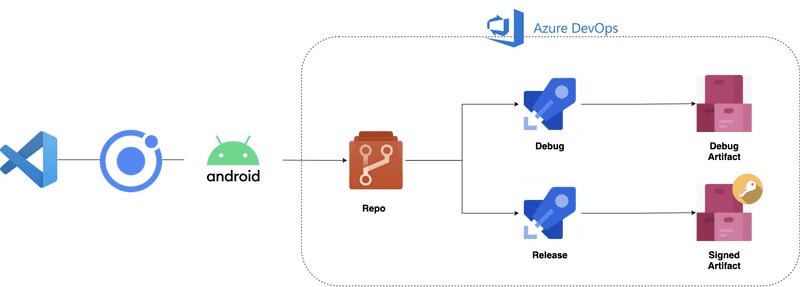
In this article, we will create an Azure Pipeline for an Ionic app using the new Azure pipelines YAML templates. We will also cover signing a release build of the published artifacts (APK signing). I have summarised the goals of this blog post in the diagram below.
A picture is worth a thousand words. Any points for my diagramming skills? 💯😅
Our main goals are to;
- Scaffold an Ionic app
- Generate the Android app
- Set up Azure pipelines
- Sign the release APKs
💡 You can follow along with my completed project repository in here.
Scaffold an Ionic App
Let’s get the initial setup out of the way! Ionic docs already have got a great getting started guide. In this step, we are not going to do anything fancy in Ionic’s side of things. We will just scaffold a basic app and use Capacitor to generate an Android app. If you have already got an existing Ionic app, you can skip ahead to the “Create the Azure Pipeline” section.
1. Creating a blank Ionic app
ionic start sampleapp blank --capacitor --type=ionic-angular
As you can see, there’s nothing fancy here. Just a blank Ionic+Angular project with Capacitor integration.
2. Set Project ID (optional) - You don’t need to change the appId for this tutorial, but I like to set it anyway.
{
...
  "appId": "com.sahan.sampleapp",
...
}
Open up capacitor.config.json file and change the appId property to whatever suits you.
3. Add Capacitor - Android Project
If you haven’t set up your environment for Android development, please follow this guide to do so.
ionic build && ionic cap add android
Note the ionic build command here. We first need to issue the ionic build command before adding the Android project for the first time. With the initial ionic cap add android command it will copy the required web assets into the native project.
💡 It’s now recommended to keep your native projects in source control.
If you make any changes to your Ionic project, you can use the ionic cap copy command to copy any changed web assets or ionic cap sync if you are using/updated any native dependencies.
After these steps, your project structure should look like the following.
Create the Azure Pipeline
For this tutorial, I will create a single azure-pipelines.yml file and build-publish two Android apps, one of Debug configuration and another for Release.
1. Creating the initial structure of the azure-pipelines.yml
Let’s first create a folder called infrastructure at the root of our solution structure. We will use this folder to keep all our Azure Pipeline line YAML files. We will then add two additional YAML files called ionic-android-debug-build.yml and ionic-android-release-build.yml. I will explain why we do this in a second. Your file structure should look like this.
For our initial step, we will create the barebones structure of our azure-pipelines.yml file
trigger:
- main

variables:
  vmImageName: 'windows-latest'
  projectName: 'SampleApp'

stages:
  - stage: Build
    displayName: Build Ionic - Android projects
    jobs:
      # Debug build
      - job: Build_Ionic_Android_Debug
        variables:
          - name: buildConfiguration
            value: Debug
        displayName: Build Debug
        pool:
          vmImage: $(vmImageName)
        steps:
          - template: ionic-android-debug-build.yml

      # Release build
      - job: Build_Ionic_Android_Release
        variables:
          - name: buildConfiguration
            value: Release
        displayName: Build Release
        pool:
          vmImage: $(vmImageName)
        steps:
          - template: ionic-android-release-build.yml
Here’s a rough explanation of the structure of the above file.
-
trigger: We trigger our pipeline whenever a change happens to themainbranch -
variables: We have defined two global variables which can be reused in our stages
stages: This is where we define our stages. Initially, we have added Build stage. Later we will add another stage called Deploy
-
jobs: We have two jobs calledDebugandRelease. -
jobs:steps: Note how we give our template path with atemplateattribute. This way, we don’t need to keep everything in one YAML file.
💡 Tip: If you are using the
scripttask you will sometimes find that any multiline commands won’t run. Only the first one would get picked up. You can append your commands with&&or use a PowerShell task as shown in this tutorial.
2. Create ionic-android-debug-build.yml
steps:
  - script: npm install -g @ionic/cli
    displayName: 'Install Ionic CLI'

  - task: Npm@1
    inputs:
      workingDir: '$(Build.SourcesDirectory)/$(projectName)'
      command: install
    displayName: 'NPM Install'

  - powershell: |
      ionic cap build android --no-open
      npx cap sync
      cd android
      ./gradlew assemble$(buildConfiguration)
    workingDirectory: $(Build.SourcesDirectory)/$(projectName)
    displayName: 'Build Android Project'

  - task: CopyFiles@2
    inputs:
      SourceFolder: '$(Build.SourcesDirectory)/$(projectName)/android/app/build/outputs/apk/$(buildConfiguration)'
      contents: "**/app-$(buildConfiguration).apk"
      targetFolder: "$(Build.ArtifactStagingDirectory)/$(projectName)"
    displayName: "Copy unsigned APK to staging directory"

  - task: PublishBuildArtifacts@1
    inputs:
      PathtoPublish: "$(Build.ArtifactStagingDirectory)/$(projectName)"
      ArtifactName: "$(projectName)"
      publishLocation: "Container"
    displayName: "Publish artifacts"
We use the gradelw utility that comes with the android project to build it. This is a wrapper around Gradle which invokes it with any parameters we have given (in our case assembleDebug or assembleRelease). If Gradle is not found in your system (or in a build agent) it will also download it from a distribution server.
The ionic-android-release-build.yml is pretty much the same configuration except for some extra flags to do the release build. We will go through this file in the Signing step.
Now, let go ahead and commit the changes. You might want to create a new Azure Pipeline if you haven’t already. Once the pipeline is run, you will be able to see all green (hopefully). 😀
If you have a look at the build artifacts, you will find the debug and release build APKs all in one place now. Next, we will have a look at signing the APK files.
Signing the APK
If you are publishing your app to the Play Store, we need to consider signing our APKs. Ionic’s official documentation already covers this step, so we will look at how we can automate this step.
1. Generating the .keystore file
If you are doing this for the first time, you need to create the private .keystore file used for signing the APK. You can use the keytool file that comes with the Android SDK:
keytool -genkey -v -keystore my-release-key.keystore -alias alias_name -keyalg RSA -keysize 2048 -validity 10000
Remember to take note of the following when you are generating this file.
- Keystore Password
- Keystore Alias
- Key Password
We will be putting these into pipeline variables as our next step.
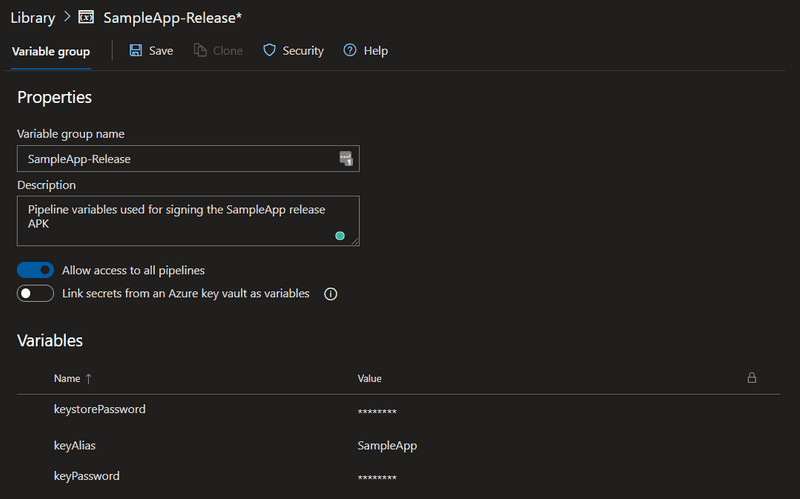
2. Creating the pipeline variables
Once you have generated the keystore file, you can navigate to the Library section of your project in Azure DevOps.
Make sure to put in the keystorePassword, keyAlias and keyPassword variables which we created in the above step.
After that, you need to upload your keystore file to Secure files section. We will later access this file in the Android signing task.
3. Add the signing task
We will be using the AndroidSigning@3 task to sign our release build. It’s pretty straight forward task to use and the parameters we need to send are as follows.
- task: AndroidSigning@3
    inputs:
      apkFiles: '$(Build.SourcesDirectory)/$(projectName)/android/app/build/outputs/apk/$(buildConfiguration)/*.apk'
      apksign: true
      apksignerKeystoreFile: '${{ parameters.keystoreFileName }}'
      apksignerKeystorePassword: '${{ parameters.keystorePassword }}'
      apksignerKeystoreAlias: '${{ parameters.keyAlias }}'
      apksignerKeyPassword: '${{ parameters.keyPassword }}'
      apksignerArguments: --out $(Build.SourcesDirectory)/$(projectName)/android/app/build/outputs/apk/$(buildConfiguration)/$(projectName)-$(buildConfiguration).apk --verbose
      zipalign: true
    displayName: 'Sign the APK'
Notice how we are linking the variables we created in the Library section. Now, our final ionic-android-release-build.yml file would look like the following.
parameters:
  - name: keystoreFileName
    displayName: "The keystore file name for signing the apk"
    type: string
  - name: keystorePassword
    displayName: "Password for the keystore"
    type: string
  - name: keyAlias
    displayName: "Key alias"
    type: string
  - name: keyPassword
    displayName: "Key password"

steps:
  - script: npm install -g @ionic/cli
    displayName: 'Install Ionic CLI'

  - task: Npm@1
    inputs:
      workingDir: '$(Build.SourcesDirectory)/$(projectName)'
      command: install
    displayName: 'NPM Install'

  - powershell: |
      ionic cap build android --prod --no-open
      npx cap sync
      cd android
      ./gradlew assemble$(buildConfiguration)
    workingDirectory: $(Build.SourcesDirectory)/$(projectName)
    displayName: 'Build Android Project'

  - task: AndroidSigning@3
    inputs:
      apkFiles: '$(Build.SourcesDirectory)/$(projectName)/android/app/build/outputs/apk/$(buildConfiguration)/*.apk'
      apksign: true
      apksignerKeystoreFile: '${{ parameters.keystoreFileName }}'
      apksignerKeystorePassword: '${{ parameters.keystorePassword }}'
      apksignerKeystoreAlias: '${{ parameters.keyAlias }}'
      apksignerKeyPassword: '${{ parameters.keyPassword }}'
      apksignerArguments: --out $(Build.SourcesDirectory)/$(projectName)/android/app/build/outputs/apk/$(buildConfiguration)/$(projectName)-$(buildConfiguration).apk --verbose
      zipalign: true
    displayName: 'Sign the APK'

  - task: CopyFiles@2
    inputs:
      SourceFolder: '$(Build.SourcesDirectory)/$(projectName)/android/app/build/outputs/apk/$(buildConfiguration)'
      contents: "**/$(projectName)-$(buildConfiguration).apk"
      targetFolder: "$(Build.ArtifactStagingDirectory)/$(projectName)"
    displayName: "Copy unsigned APK to staging directory"

  - task: PublishBuildArtifacts@1
    inputs:
      PathtoPublish: "$(Build.ArtifactStagingDirectory)/$(projectName)"
      ArtifactName: "$(projectName)"
      publishLocation: "Container"
    displayName: "Publish artifacts"
💡 Tip: I found that I can’t make the file name coming from the variable group. Which means you need to have it hardcoded in the azure-pipelines.yml file
First, we need to tell the azure-pipeline.yml which variable group to use. Here’s a small excerpt of that.
# other tasks removed for brevity
- job: Build_Ionic_Android_Release
  variables:
    - group: SampleApp-Release
    - name: buildConfiguration
      value: Release
💡 Note that the notation for defining a variable can take two variants. If you are not using a group you could simply write it as
buildConfiguration: Release. If you are using thegroupattribute, you need to use the notation I have shown in the above snippet. I had to learn it the hard way 😂
You would have also noticed that we are using parameters here. These will be injected in the azure-pipeline.yml file.
# other tasks removed for brevity
steps:
  - template: ionic-android-release-build.yml
    parameters:
      keystoreFileName: 'sampleapp-release-key.keystore'
      keystorePassword: $(keystorePassword)
      keyAlias: $(keyAlias)
      keyPassword: $(keyPassword)
Once you push your changes to the repo, Azure DevOps would ask you to permit your pipeline to access the secure file which we added in the above step. Click on View and permit it. Alternatively, you could also use Azure KeyVault for storing secrets.
The completed YAML files can be found in my repo over here. Once the pipeline is completed, you can have a look at the artifacts. Voilà! We have the signed APKs
Conclusion
In summary, we created a blank Ionic app, set up Azure DevOps pipeline YAML files and published the signed artifacts. You can use the same structure to add an iOS project as well. However, the build steps could be more involved and cumbersome to get right initially. In my next article, we will look at how we can integrate with Microsft App Center for distribution.
If you have any feedback or questions, let me know in the comments below. Until next time 👋


Top comments (0)