Initiating a React project is typically an almost effortless process, largely thanks to the outstanding create-react-app tool. However, while employing it to kickstart yet another empty React project a few days ago, I had an epiphany. I realized that beyond having a vague understanding, I had never delved deep into the inner workings. So, I decided to do just that, and now I can initiate new React projects without relying on magical tools. This article serves as a manifestation of the insights I've gained in the process.
What is Webpack and Babel why do we need to know about these?
When I embarked on my coding journey and began learning JavaScript, I didn't pay much attention to file structure. For most of my tutorial projects, I used to write all the code in a single file, resulting in a massive monolithic JavaScript file that proved to be quite challenging to maintain.
It wasn't until I delved into learning React that I truly grasped the importance of writing organized code. I learned to break down code into smaller, manageable components and then import and use them effectively. Usually, when we start our React projects, we rely on the magical "create-react-app" tool, which automates many tasks, including bundling. This convenience, however, often shields us from the underlying processes. As a developer, I believe it's valuable to understand how these mechanisms work and how to set up a React project from scratch without relying on the "create-react-app" template.
Webpack:
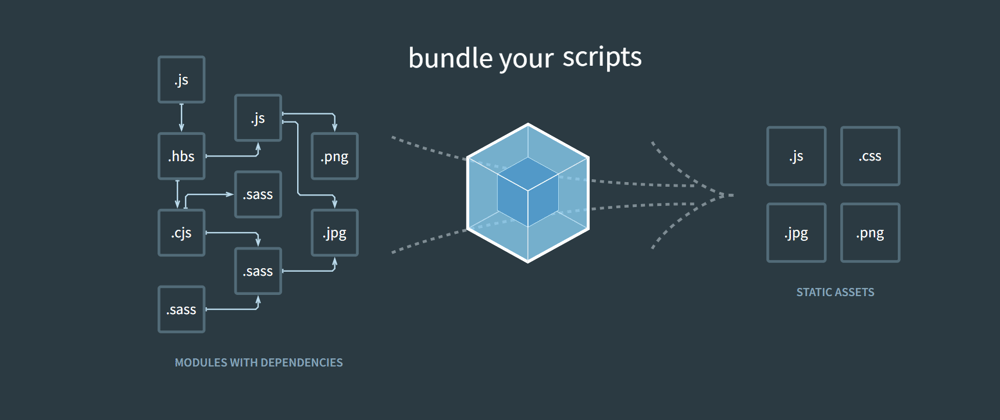
Webpack is a popular open-source JavaScript module bundler. It is primarily used to bundle JavaScript files and assets, such as CSS stylesheets, images, and more into a 'bundle' which we can deploy. As I discussed before that writing monolithic JavaScript is a wrong and inconvenient practice and instead we use code splitting where we write smaller chunks as components into different files and then use require() or import statements to connect them together. So, when we require or import anything from a file, it forms a dependency graph with that file as well as assets(if any).Webpack uses this dependency graph based on import or require and creates a bundle of our JavaScript code and assets. Alongside, it also performs some other optimizations on top of it.
Babel:
Babel is a JavaScript transpiler which transplies the latest features of JavaScript such as ES6+ and jsx formats into ES5 syntax which is understandable by all kinds browsers.
Let's start configuring React with Webpack and Babel
First you need to have npm and node installed in your system. Now, create a folder and run npm init -y to create package.json
mkdir react-app-webpack-setup
cd react-app-webpack-setup
npm init -y
You will get a package.json like this -
{
"name": "sample",
"version": "1.0.0",
"description": "",
"main": "index.js",
"scripts": {
"test": "echo \"Error: no test specified\" && exit 1"
},
"keywords": [],
"author": "",
"license": "ISC"
}
After that, create a .gitignore file in the root directory and put the following into that file -
node_modules
dist
Now let's start with Babel first. Now-a-days, we write most of our JavaScript code in modern ES6 syntax and in React, we usually use jsx format which are not supported by many browsers. This is where Babel comes into play and it helps transpiling modern JavaScript into a format which is understandable by browsers. Let's install Babel like this -
npm install --save-dev @babel/core @babel/cli @babel/preset-env @babel/preset-react
@babel/core: It contains the main functionality of Babel.
@babel/cli: It allows us to use Babel from terminal.
@babel/preset-env: This preset transforms modern ES6 syntax into common JavaScript.
@babel/preset-react: This preset transforms jsx format into vanilla JavaScript.
Now, create a file .babelrc in the root directory and set it up as following to tell the babel transpiler what presets to use to transpile the code:
{
    "presets": ["@babel/preset-env", "@babel/preset-react"]
}
We are done with our babel setup for now. Let's start with installing and setting up the Webpack now -
npm i webpack webpack-cli webpack-dev-server --save-dev
webpack: It is the main module bundler.
webpack-cli: It is the command line interface for webpack.
webpack-dev-server: It provides a development server for live reloading.
Now, install React and ReactDOM by running the follwing command on terminal -
npm i react react-dom
After installing, create a folder src in the root directory and put these three files into that folder as following -
index.html
<!DOCTYPE html>
<html lang="en">
<head>
    <meta charset="UTF-8">
    <meta name="viewport" content="width=device-width, initial-scale=1.0">
    <title>React setup with Webpack and Babel</title>
</head>
<body>
    <div id="root"></div>
</body>
</html>
App.js
import React from 'react'

const App = () => {
  return (
    <div>
      <h1>Introduction to setup React with Webpack and Babel</h1>
    </div>
  )
}

export default App
index.js
import React from "react";
import ReactDOM from "react-dom";
import App from "./App";
ReactDOM.render(<App />, document.getElementById('root'));
Now we need to create a file webpack.config.js and set it up properly to tell webpack what to do with our source code. But before that we will install some loaders and plugins which will be needed to bundle our JavaScript files as well as static assets.
npm i --save-dev style-loader css-loader sass-loader babel-loader
css-loader: It collects CSS from all the CSS files in the app and bundle it into one file.
style-loader: It puts all stylings inside style tag in index.html file which will be created after bundling.
sass-loader: It is a package which converts sass into css. Though we don't need it in this sample project but still I will set it up.
babel-loader: It is a package that transpiles JavaScript using babel and webpack.
npm i html-webpack-plugin --save-dev
html-webpack-plugin: This plugin automatically creates an HTML file that serves the JavaScript bundles created by Webpack.
webpack.config.js
const path = require('path')
const HtmlWebpackPlugin = require('html-webpack-plugin')

module.exports = {
    entry: "./src/index.js",
    module: {
        rules: [
            {
                test: /\.(js|jsx)$/,
                exclude: /node_modules/,
                use: "babel-loader"
            },
            {
                test: /\css$/,
                use: [
                    "style-loader",  // 2. Injects styles into DOM
                    "css-loader"    // 1. Turns css into commonjs
                ]
            },
            {
                test: /\.scss$/i,
                use: [
                    "style-loader", // 3. Injects styles into DOM
                    "css-loader",  // 2. Turns css into commonjs
                    "sass-loader" // 1. Turns sass into css
                ],
            },
            {
                test: /\.svg$/,
                loader: 'svg-inline-loader'
            }
        ]
    },
    resolve: {
        extensions: [".js", ".jsx", ".mjs",
        ".json"],
        symlinks: false,
        cacheWithContext: false,
    },
    output: {
        path: path.resolve(__dirname, 'dist'),
        filename: "bundle.[contenthash].js"
    },
    plugins: [
        new HtmlWebpackPlugin({
            template: "./src/index.html"
        })
    ]
}
entry: Here we need to provide the entry path for the webpack.
module: Here we need to add the loaders as needed under rules.
For css & sass loader, always follow the right sequence as shown otherwise there will be issues.
resolve: Here we need to define the extensions which are there in the project. If you are using typescript, then also add .ts and .tsx in the extensions array.
output: Here we need to provide the output path for the bundle created by webpack. If you follow carefully, I have used the output file name as bundle.[contenthash].js. The contenthash keyword will create a fresh new bundle file after each build followed by a unique name and the latest bundle file will be used in the created index.html.
plugins: Here we need to serve the plugins needed.
Now, we are done with the setup of the webpack.config.js file and finally let's setup the package.json by adding the follwing scripts to run and build the project -
package.json
  "scripts": {
    "start": "webpack-dev-server --mode development --open --hot",
    "build": "webpack --mode production"
  }
- The open flag is used to open the browser just after the server has started and the hot flag is used to enable the hot module replacement feature of webpack which basically updates only the changed code instead of updating the entire code again and again.
Now, to run the application, use the following command -
npm start
open the server and you should be seeing this -

Yay! you have successfully setup React with Webpack and Babel and you can start building new React project on top of it.
If you want to create a new build, then run the following command -
npm run build
This blog is all about basic setup for React with webpack and Babel. But, there are a lot of things which can be done on top it like adding a redux-boilerplate which I will discuss in future.
You can get the code for this sample project in the following github link -
https://github.com/sagnik26/React-with-Webpack-and-Babel-setup


Top comments (0)