
Introduction: -
AWS Patch Manager automates the patching process for AWS-managed Linux and Windows instances. It patches the instances with security and non-security updates. By using patch manager, we can scan instances for missing patches, or we can use patch manager to scan and install all missing patches on our AWS-managed VMs.
Prerequisites:-
- AWS VM is up and running (In our scenario, we are using CentOs). All the OS which are supported for installation of the patch manager can be checked on this link.
- You have SSH access to VM.
- You have AWS access to create S3 Bucket, IAM role and Policies.
Assuming that you have all the prerequisites, we can now move forward with installing Patch Manager on our machine.
Installation: -
To install the AWS System Manager Agent on our machine, we need to run the SSM agent install command on our machine. If you are using CentOS 7, then you can download the below-mentioned command and run it on your machine. Otherwise, you can get your command from this link.
You can use the below-mentioned command if you are using a CentOS 7 VM.
sudo yum install -y https://s3.amazonaws.com/ec2-downloads-windows/SSMAgent/latest/linux_amd64/amazon-ssm-agent.rpm
Once the command is installed run the following commands: -
sudo systemctl daemon-reload && sudo systemctl restart amazon-ssm-agent
And you will get an output like this: -

If you get an output like the service is inactive: -
● amazon-ssm-agent.service - amazon-ssm-agent
 Loaded: loaded (/etc/systemd/system/amazon-ssm-agent.service; enabled; vendor preset: disabled)
 Active: inactive (dead) since Tue 2022–04–19 15:58:44 UTC; 2s ago
 - truncated -
To activate the agent run the below-mentioned command: -
sudo systemctl enable amazon-ssm-agent
sudo systemctl daemon-reload && sudo systemctl restart amazon-ssm-agent
IAM Instance Role:-
Assuming that your SSM agent is up and running. Now we need to create an IAM Instance Profile so that our machine can communicate with the patch manager.
To communicate the IAM role, log in to your AWS console and navigate to the IAM section. Once you reach there, click on "Roles" under "Access Management".
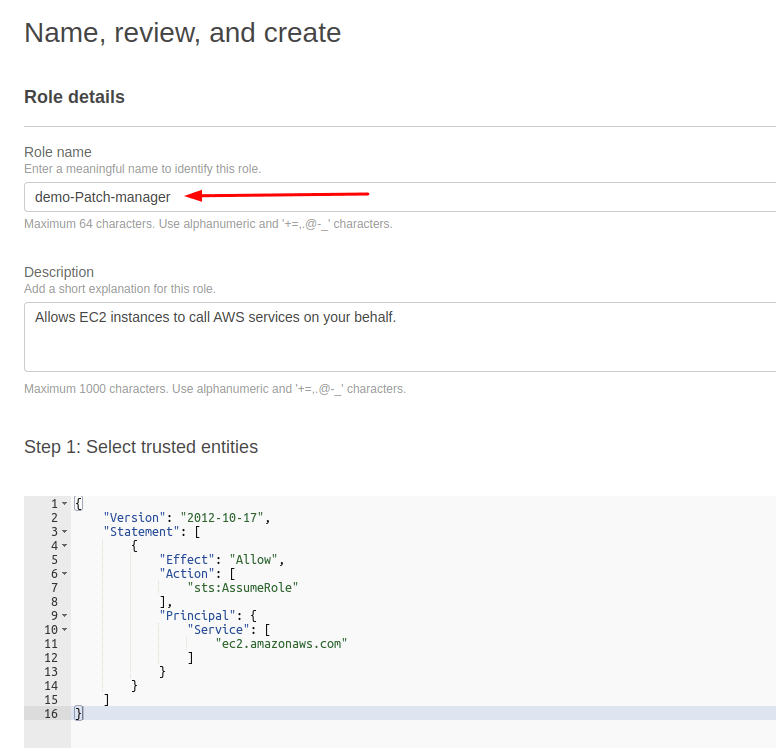
Click on "Create role", A window will appear to select "Select the trusted entity". Select the trusted entity type "AWS Service" and under the use case, select "EC2."
Once you are done with the selection, click on "Next."

Now a new window will appear; from this window, you can add permission to your role. Here, search for "AmazonEC2RoleforSSM".

Select the policy and click "Next" then give your role a name. In our scenario, we are using the "demo-Patch-manager" name.
Scroll down and click on "Create Role" and your role will be created.

Now we need to attach the newly created role to the instance. For this, navigate to the EC2 Console and select the instance that you want to add to your patch manager.

After selecting the instance, click on "Action" and then navigate to "Security", Under the security option, select "Modify IAM role".
In the new window, select the IAM role that you have created in the previous step, and then click on "Update IAM Role" and your IAM role will get attached to the machine.

Patching:-
To patch, your instance goes to the "AWS Systems Manager" on the AWS console. Then click on "Patch Manager" under "Node Management."

Under Patch Manager, select "Configure patching".

A new window will open, Here you need to select the instance that you want to patch.

In our scenario, our instance is "demo-patch," so we have selected that instance.
In the next option, we need to select the patching window and whether we want to install the patch or just scan the machine.

In our scenario, we are using the option "Skip scheduling and patch instance now". You can schedule the patch according to your requirements.
Under "Patching Operation," click on "Scan and Install" so that it can scan the machine and update the patches. If you only want to scan the machine and generate a list of patches that are available for installation, then select "Scan only."
Once you have selected all the requirements, click on "Configure Patching".
Verification: -
To verify the status of your patch command. Navigate to "Run Command" under "Node Management", in the "AWS Systems Manager" window.

Select the command and click on "View details."

In this window, you can check the status of the patch command.

As you can see, our command was successful, which means our instance was patched successfully.
I hope you found this post informative and engaging. I would love to hear your thoughts on this post, so do start a conversation on Twitter or LinkedIn :)
Here are some of my other articles that you may find interesting.
OpenTelemetry Auto Instrumentation
Until Next time...

Top comments (0)