This post was originally published on my blog
I built a web service called Reaktr that enables users to create audio-reactive video like the demo below:
It can capture every frame of the 3D scene rendered on the browser and encode them into an MP4 video.
I managed this feature to work with the help of WebCodecs API. Most of the APIs are still experimental but available on Chrome.
You can record the viewport of the browser by MediaRecorder but it may be unstable (frames are skipped) and the quality is limited depending on the spec of the user's device. Another method is performing rendering on a server, but it requires a powerful and expensive GPU.
WebCodecs is only supported by Chromium browsers as of 2022-11-30.
The strategy
On the other hand, performing everything on the user's browser enables cost-effective and high-quality rendering (speed depends on the spec of the device, though).
Here's the strategy I did in Reaktr:
- Render the 3D scene by Three.js on the HTML Canvas
- On every frame, create a new
VideoFramefrom the Canvas (its constructor accepts Canvas as the first parameter) - Pass the frame to
VideoEncoder.prototype.encodemethod to get anEncodedVideoChunk. - Pass the chunk to WebM Writer to compose a WebM file.
- Mux the WebM and audio file on AWS Elemental Convert into an MP4 file.
- Upload the MP4 file to S3.
I could mux the video and audio on the browser into an MP4 with MP4Box.js, but somehow it was misformatted and weirdly played with some players. I gave up and relied on Elemental Convert as it's not so expensive.
I found webm-muxer while writing this post and it seems great! I'll try it later.
Source and demo
See the full code and try the demo on the links below:
https://github.com/sabigara/capture-and-encode
https://capture-and-encode.vercel.app/
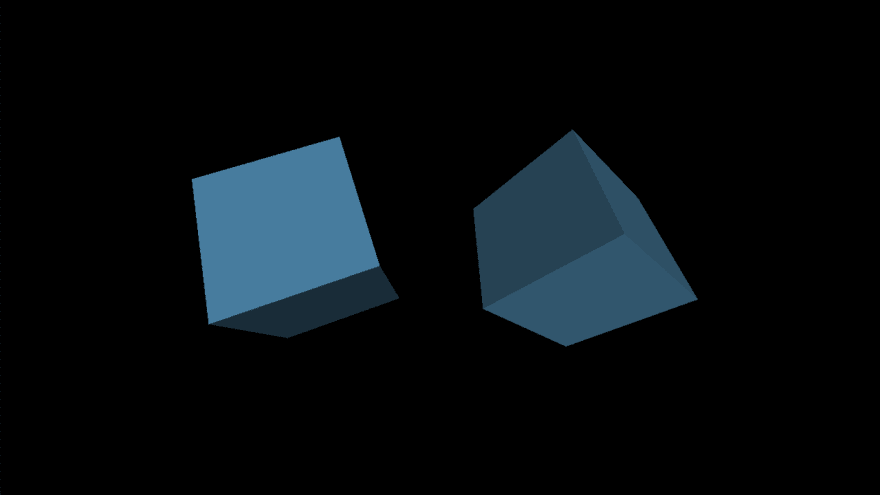
Create a Three.js scene with two rotating cubes
First, let's create a 3D scene to be captured. I think anything drawn on HTML Canvas can be captured, but this time I'd like to render rotating cubes by Three.js.
import * as THREE from "three"
import "./styles.css"

const appElm = document.getElementById("app")!

const size = {
  width: 1280,
  height: 720,
} as const

function initScene() {
  const scene = new THREE.Scene()
  const camera = new THREE.PerspectiveCamera(75, 16 / 9, 0.1, 1000)
  camera.position.z = 2.5

  const light = new THREE.DirectionalLight(0xffffff, 1)
  light.position.set(0, 0, 2)

  scene.add(light)

  const renderer = new THREE.WebGLRenderer()
  renderer.setSize(size.width, size.height)
  appElm.appendChild(renderer.domElement)

  const cubes = [makeCube([-1, 0, 0]), makeCube([1, 0, 0])]
  scene.add(...cubes)

  return {
    renderer,
    scene,
    camera,
    cubes,
  }
}

function makeCube(position: [number, number, number]) {
  const geometry = new THREE.BoxGeometry(1, 1, 1)
  const material = new THREE.MeshStandardMaterial({
    color: 0x3283a8,
  })

  const cube = new THREE.Mesh(geometry, material)
  cube.position.set(...position)
  return cube
}

const { renderer, cubes, scene, camera } = initScene()

async function onFrame() {
  cubes.forEach((cube, i) => {
    const speed = 0.01 * (i + 1)
    cube.rotation.x += speed
    cube.rotation.y += speed
  })
  renderer.render(scene, camera)

  requestAnimationFrame(onFrame)
}

requestAnimationFrame(onFrame)
Modify WebM Writer to support EncodedVideoChunk
WebM Writer is a great library for building a WebM video on the browser. However, it's a little bit slow because it depends on HTMLCanvasElement.prototype.toDataURL.
Fortunately, @tungs has shared a patch that adds support for EncodedVideoChunk.
Thanks to the addChunk method, we can now take full advantage of the speed of WebCodecs!
Implement Encoder class
The following is the implementation of Encoder class.
Here is what this class does:
- Composes suitable options for
VideoEncoderandWebMWriter - Exposes
addFramemethod that is called after a frame is drawn on the passed Canvas - Encodes the frames into chunks and passes the chunks to
WebMWriterto create a video file - Makes the file downloadable when finished
Modify onFrame to call addFrame
Initialize an encoder with options and call addFrame before requesting the next animation frame.
const encoder = new Encoder({
  canvas: renderer.domElement,
  duration: 5,
  framerate: 60,
  videoBitrate: 5_000_000,
})
await encoder.prepare()
let recording = false

async function onFrame() {
  // ...
  renderer.render(scene, camera)

  let finished = false
  if (recording) {
    finished = await encoder.addFrame()
  }
  if (!recording || !finished) {
    requestAnimationFrame(onFrame)
  }
}
When the recording variable is true, the encoder will keep adding frames and automatically emits a video file when its length reached the number specified with the duration option.
You don't have to worry about the execution time of the function as the next frame will never be drawn while processing
addFrame. So, even cheap machines can reliably capture the animation, unlike real-time recording which might end up with a laggy result.
5 seconds after turning on the recording flag, the following video will be downloaded:
That's it!
Thanks to WebCodecs and WebM Writer, I could take full advantage of GPU without writing so much code by myself.
I hope other browsers than Chrome add support for WebCodecs soon!

Top comments (0)