This post is a detailed explanation and walkthrough of how I set up my Rust development environment and workflow with Neovim.
Prerquisites
-
Have the following installed:
- Rust.
- Neovim v0.7.0+.
- A Neovim package manager, like wbthomason/packer.nvim.
-
Have basic knowledge about Neovim and Lua:
- How to navigate with the keyboard.
- How to install / remove plugins.
- How to create and edit Lua config files.
- Here is a great tutorial that helped me with these basics.
Why Neovim
Like many developers, I went through a phase of looking for the ideal development set of tools that would be convenient and enjoyable, but most of all, that would boost my productivity.
After extensively trying many text editors and IDEs, I have decided to give Neovim a serious shot and invest time and effort in learning and customizing it heavily.
I have to say, it was no easy feat... But it is also a great experience!
Neovim is a very sophisticated tool that is extremely customizable but carries a steep learning curve. However, once you're past the basics and force yourself some muscle memory it is unbelievably fast. All the effort pays off massively.
I am, by no means, an expert user of Neovim, but with every keystroke I get faster and more productive.
And I think that is the key thing that makes Neovim a different beast: it forces you to change and adapt, and you actually see and feel yourself getting better and better!
Anyways, here are my Pros and Cons about Neovim...
Pros:
- Lighting fast.
- Extremely configurable and customizable.
- Massive ecosystem of plugins.
- Cross-platform support.
- Support for almost any programming language out there.
- Forces productive habits upon you.
- Abundant documentation and community support.
- It is free and open source.
Cons:
- Significant up-front time investment in learning.
- Abundance of choice in customization options can be distracting.
- Steep learning curve.
- Demands commitment and patience in creating new muscle memory.
Why Neovim for Rust Development
Okay, the above points are all valid from a general point of view, but why is Neovim great specifically for a Rust development workflow? Here are my reasons:
- Neovim natively supports LSP in versions 0.5+
-
rust-analyzer is supported through Neovim's LSP, which essentially give us:
- Code completion.
- Some refactoring.
- Code analysis and linting.
- Go to definition.
- Code actions.
- Access to documentation.
- Show and go to references.
- Snippets support.
- Better syntax highlighting.
- Code formatting.
-
rust-tools is a fantastic plugin to setup
rust-analyzerwith Neovim's LSP . - Integrated terminal.
- Access to Cargo commands.
-
RustfmtOn Save. - Rust debugging via:
- CodeLLDB debugger with
- Vimspector plugin, or
- nvim-DAP plugin .
- TOML language support.
In essence, we have all the functionality that is needed from an IDE to develop Rust with productivity.
Here are a couple screenshots using my current setup:
- openSUSE Tumbleweed operating system.
- XFCE desktop environment.
- Alacritty terminal.
Rust development with Neovim and Vimspector
![Rust development with Neovim and [voldikss/vim-floaterm] float terminal plugin](https://res.cloudinary.com/practicaldev/image/fetch/s--zcumCcGE--/c_limit%2Cf_auto%2Cfl_progressive%2Cq_auto%2Cw_880/https://dev-to-uploads.s3.amazonaws.com/uploads/articles/s6lpsrx491mqfyyd3uw9.png)
Rust development with Neovim and voldikss/vim-floaterm float terminal plugin
Set Up Rust with Neovim
To make things more digestible, here the major activities that what we are going to do:
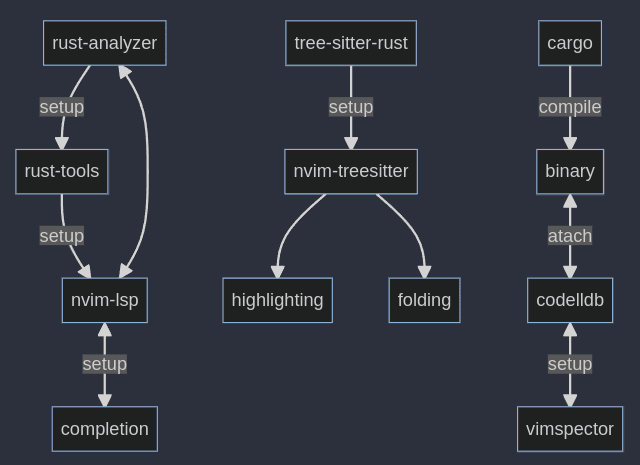
Rust and Neovim Set Up Diagram - made with https://mermaid.live
- Download and setup
rust-analyzerandcodelldbusing Neovim's plugins. - Attach Neovim to
rust-analyzer. - Install Neovim's
completeandsnippetsplugins. - Install Neovim's
tree-sitterand set it up withtree-sitter-rustparser. - Set up
vimspectorto work withcodelldbto debug Rust and Rust Tests.
But before we go into the details, here is my Neovim .config/nvim folder so that the filenames below make sense:
.config/nvim on main [!] via 🌙 v5.4.4
λ tree -L 2
.
├── init.lua
├── lua
│ ├── keys.lua
│ ├── opts.lua
│ ├── plug.lua
│ └── vars.lua
└── plugin
└── packer_compiled.lua
1. Download rust-analyzer and CodeLLDB with Neovim's plugins
The first Neovim plugin, other than Packer (the package manager), we need is Mason:
- williamboman/mason.nvim a plugin to install and manage LSP servers, debuggers and linters.
- williamboman/mason-lspconfig.nvim to complement Manson with other goodies.
Here is the Lua code to install these -and other- plugins using Packer:
.config/nvim/lua/plug.lua:
return require('packer').startup(function()
    -- other plugins...

    use 'williamboman/mason.nvim'
    use 'williamboman/mason-lspconfig.nvim'

   -- other plugins...
end)
Then we just save :w, reload :luafile % and install with :PackerInstall.
I could use other package managers to install plugins or LSPs, however, I prefer Packer and Mason because they are written entirely in Lua, are getting traction within the Neovim developer community, and they work great.
Once Mason is installed, we use it to install and manage rust-analyzer and CodeLLDB:
On Neovim command mode we input :MasonInstall rust-analyzer codelldb.
When Manson finishes, we we can check with :Mason that we have rust-analyzer and CodeLLDB installed.

Mason installing rust-analyzer and CodeLLDB for Neovim
2. Attaching Neovim to rust-analyzer
Next, we continue by installing two essential plugins to attach rust-analyzer to Neovim's LSP:
- neovim/nvim-lspconfig a collection of LSP configs.
- simrat39/rust-tools.nvim tools to automatically set up lspconfig for rust-analyzer.
Here is the Lua code to install these packages using Packer:
.config/nvim/lua/plug.lua:
return require('packer').startup(function()
    -- other plugins...

    use 'neovim/nvim-lspconfig'
    use 'simrat39/rust-tools.nvim'

    -- other plugins...
end)
Now, we need to setup Neovim so that it can interact with rust-analyzer:
.config/nvim/init.lua
local rt = {
    server = {
        settings = {
            on_attach = function(_, bufnr)
                -- Hover actions
                vim.keymap.set("n", "<C-space>", rt.hover_actions.hover_actions, { buffer = bufnr })
                -- Code action groups
                vim.keymap.set("n", "<Leader>a", rt.code_action_group.code_action_group, { buffer = bufnr })
                require 'illuminate'.on_attach(client)
            end,
            ["rust-analyzer"] = {
                checkOnSave = {
                    command = "clippy"
                },
            },
        }
    },
}
require('rust-tools').setup(rt)
Further customization options are available via rust-tools configuration.
However, I prefer to leave the defaults in rust-tools, and configure instead through Neovim's Diagnostics API:
.config/nvim/init.lua
-- LSP Diagnostics Options Setup
local sign = function(opts)
vim.fn.sign_define(opts.name, {
texthl = opts.name,
text = opts.text,
numhl = ''
})
end
sign({name = 'DiagnosticSignError', text = ''})
sign({name = 'DiagnosticSignWarn', text = ''})
sign({name = 'DiagnosticSignHint', text = ''})
sign({name = 'DiagnosticSignInfo', text = ''})
vim.diagnostic.config({
virtual_text = false,
signs = true,
update_in_insert = true,
underline = true,
severity_sort = false,
float = {
border = 'rounded',
source = 'always',
header = '',
prefix = '',
},
})
vim.cmd([[
set signcolumn=yes
autocmd CursorHold * lua vim.diagnostic.open_float(nil, { focusable = false })
]])
3. Install the Complete and Snippets plugins' suite:
The following set of plugins allow us to query Neovim's LSPs, and other sources, to present the auto-complete drop-down menu while typing code.
Thanks to these plugins, and because we have already attached rust-analyzer to Neovim's LSP, we will be able to get nice IDE-like auto-completion when we work on a Cargo project:
- hrsh7th/cmp-buffer
- hrsh7th/cmp-nvim-lsp
- hrsh7th/cmp-nvim-lsp-signature-help
- hrsh7th/cmp-nvim-lua
- hrsh7th/cmp-path
- hrsh7th/cmp-vsnip
- hrsh7th/nvim-cmp
- hrsh7th/vim-vsnip
.config/nvim/lua/plug.lua:
return require('packer').startup(function()
    -- other plugins...

    -- Completion framework:
    use 'hrsh7th/nvim-cmp'

    -- LSP completion source:
    use 'hrsh7th/cmp-nvim-lsp'

    -- Useful completion sources:
    use 'hrsh7th/cmp-nvim-lua'
    use 'hrsh7th/cmp-nvim-lsp-signature-help'
    use 'hrsh7th/cmp-vsnip'
    use 'hrsh7th/cmp-path'
    use 'hrsh7th/cmp-buffer'
    use 'hrsh7th/vim-vsnip'

    -- other plugins...
end)
And now, we need to set them up in our configuration files:
First in our Neovim APIs:
.config/nvim/lua/opts.lua
--Set completeopt to have a better completion experience
-- :help completeopt
-- menuone: popup even when there's only one match
-- noinsert: Do not insert text until a selection is made
-- noselect: Do not select, force to select one from the menu
-- shortness: avoid showing extra messages when using completion
-- updatetime: set updatetime for CursorHold
vim.opt.completeopt = {'menuone', 'noselect', 'noinsert'}
vim.opt.shortmess = vim.opt.shortmess + { c = true}
vim.api.nvim_set_option('updatetime', 300)

-- Fixed column for diagnostics to appear
-- Show autodiagnostic popup on cursor hover_range
-- Goto previous / next diagnostic warning / error
-- Show inlay_hints more frequently
vim.cmd([[
set signcolumn=yes
autocmd CursorHold * lua vim.diagnostic.open_float(nil, { focusable = false })
]])
And then in our completion plugins:
.config/nvim/init.lua
-- Completion Plugin Setup
local cmp = require'cmp'
cmp.setup({
  -- Enable LSP snippets
  snippet = {
    expand = function(args)
        vim.fn["vsnip#anonymous"](args.body)
    end,
  },
  mapping = {
    ['<C-p>'] = cmp.mapping.select_prev_item(),
    ['<C-n>'] = cmp.mapping.select_next_item(),
    -- Add tab support
    ['<S-Tab>'] = cmp.mapping.select_prev_item(),
    ['<Tab>'] = cmp.mapping.select_next_item(),
    ['<C-S-f>'] = cmp.mapping.scroll_docs(-4),
    ['<C-f>'] = cmp.mapping.scroll_docs(4),
    ['<C-Space>'] = cmp.mapping.complete(),
    ['<C-e>'] = cmp.mapping.close(),
    ['<CR>'] = cmp.mapping.confirm({
      behavior = cmp.ConfirmBehavior.Insert,
      select = true,
    })
  },
  -- Installed sources:
  sources = {
    { name = 'path' },                              -- file paths
    { name = 'nvim_lsp', keyword_length = 3 },      -- from language server
    { name = 'nvim_lsp_signature_help'},            -- display function signatures with current parameter emphasized
    { name = 'nvim_lua', keyword_length = 2},       -- complete neovim's Lua runtime API such vim.lsp.*
    { name = 'buffer', keyword_length = 2 },        -- source current buffer
    { name = 'vsnip', keyword_length = 2 },         -- nvim-cmp source for vim-vsnip
    { name = 'calc'},                               -- source for math calculation
  },
  window = {
      completion = cmp.config.window.bordered(),
      documentation = cmp.config.window.bordered(),
  },
  formatting = {
      fields = {'menu', 'abbr', 'kind'},
      format = function(entry, item)
          local menu_icon ={
              nvim_lsp = 'λ',
              vsnip = '⋗',
              buffer = 'Ω',
              path = '🖫',
          }
          item.menu = menu_icon[entry.source.name]
          return item
      end,
  },
})
With this setup we are now able to have real-time completion capabilities sourcing from rust-analyzer and we can review the associated documentation that pops up:

Rust real-time completion in Neovim
4. Install Tree-sitter and set it up with the tree-sitter-rust parser
Tree-sitter is a fantastic parser generation and incremental parsing library, that supports Rust language bindings and has an available parser Rust tree-sitter-rust.
Neovim's support of Tree-sitter is, at the time of this post, experimental and should be treated as such; however, I have found no issues so far with my setup.
First we need to insall the nvim-treesitter/nvim-treesitter plugin:
.config/nvim/lua/plug.lua:
return require('packer').startup(function()
    -- other plugins...

    use 'nvim-treesitter/nvim-treesitter'

    -- other plugins...
end)
And then configure it... .config/nvim/init.lua
-- Treesitter Plugin Setup
require('nvim-treesitter.configs').setup {
  ensure_installed = { "lua", "rust", "toml" },
  auto_install = true,
  highlight = {
    enable = true,
    additional_vim_regex_highlighting=false,
  },
  ident = { enable = true },
  rainbow = {
    enable = true,
    extended_mode = true,
    max_file_lines = nil,
  }
}
We need to be sure that the ensure_installed = {... "rust", "toml" ...} variable is part of the setup function and that "rust" and "toml" languages are included...
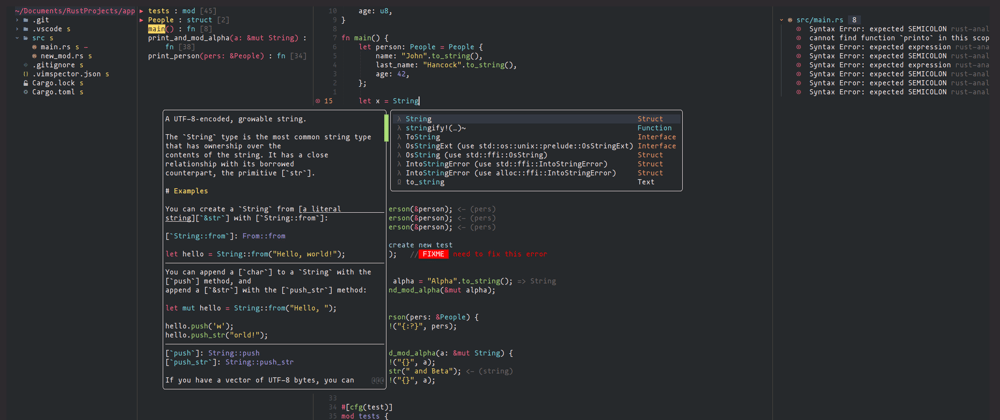
nvim-treesitter allows us to install the tree-sitter-rust parser, effectively enabling all the benefits of Tree-sitter for Rust in Neovim!
We can also check the status of our parsers with :TSInstallInfo and update them with :TSUpdate on the command prompt.
nvim-treesitter also provides a nice view of our parsers with the :checkhealth command and the specific support (e.g. Highlights, Folds, etc.) for each language:
nvim-treesitter: require("nvim-treesitter.health").check()
========================================================================
## Installation
  - WARNING: `tree-sitter` executable not found (parser generator, only needed for :TSInstallFromGrammar, not required for :TSInstall)
  - OK: `node` found v17.7.1 (only needed for :TSInstallFromGrammar)
  - OK: `git` executable found.
  - OK: `cc` executable found. Selected from { vim.NIL, "cc", "gcc", "clang", "cl", "zig" }
    Version: cc (SUSE Linux) 12.1.1 20220721 [revision 4f15d2234608e82159d030dadb17af678cfad626]
  - OK: Neovim was compiled with tree-sitter runtime ABI version 14 (required >=13). Parsers must be compatible with runtime ABI.

## Parser/Features H L F I J
  - toml           ✓ ✓ ✓ ✓ ✓
  - lua            ✓ ✓ ✓ ✓ ✓
  - rust           ✓ ✓ ✓ ✓ ✓

  Legend: H[ighlight], L[ocals], F[olds], I[ndents], In[j]ections
         +) multiple parsers found, only one will be used
         x) errors found in the query, try to run :TSUpdate {lang}
And we can customize as we please.
In my case, I am connecting the folding API in Neovim to the Tree-sitters folding functions:
.config/nvim/lua/opts.lua
-- Treesitter folding
vim.wo.foldmethod = 'expr'
vim.wo.foldexpr = 'nvim_treesitter#foldexpr()'
And here is the result of my Rust code being folded in Neovim using Tree-sitter:

Rust code folding in Neovim using Tree-sitter
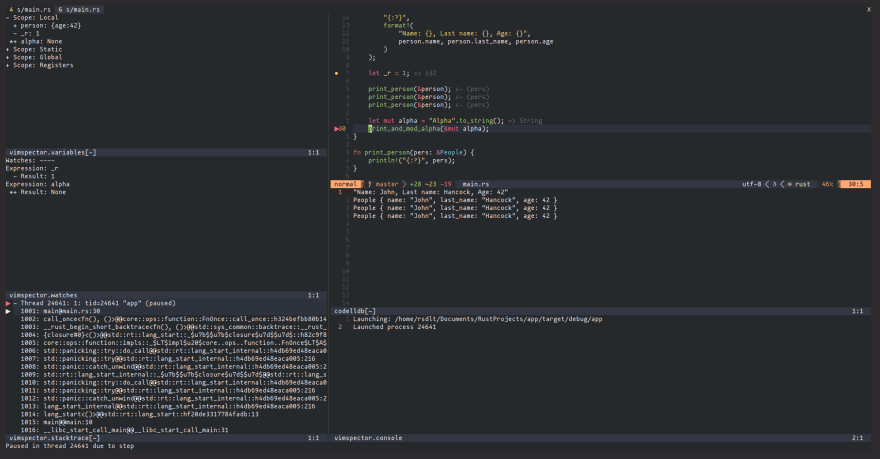
5. Set up Vimspector and CodeLLDB to debug Rust and Rust Tests
Okay, now comes one of the most impotart features of any IDE: having a debugger a couple of clicks away to troubleshoot your code.
As of today, my prefered method is to use the Vimspector plugin with CodeLLDB.
There is also the alternative to use nvim-DAP instead of Vimspector. It looks like a fantastic initiative that is getting traction, but I still have not enabled it in my workflow. Definitely worth a look!
Remember that we already installed CodeLLDB via Mason, so now we just need to install the Vimspector plugin:
.config/nvim/lua/plug.lua:
return require('packer').startup(function()
    -- other plugins...

    use 'puremourning/vimspector'

    -- other plugins...
end)
Second, we can configure Vimspector UI and keymap options to our liking:
.config/nvim/lua/opts.lua:
-- Vimspector options
vim.cmd([[
let g:vimspector_sidebar_width = 85
let g:vimspector_bottombar_height = 15
let g:vimspector_terminal_maxwidth = 70
]])
.config/nvim/lua/keys.lua
-- Vimspector
vim.cmd([[
nmap <F9> <cmd>call vimspector#Launch()<cr>
nmap <F5> <cmd>call vimspector#StepOver()<cr>
nmap <F8> <cmd>call vimspector#Reset()<cr>
nmap <F11> <cmd>call vimspector#StepOver()<cr>")
nmap <F12> <cmd>call vimspector#StepOut()<cr>")
nmap <F10> <cmd>call vimspector#StepInto()<cr>")
]])
map('n', "Db", ":call vimspector#ToggleBreakpoint()<cr>")
map('n', "Dw", ":call vimspector#AddWatch()<cr>")
map('n', "De", ":call vimspector#Evaluate()<cr>")
And finally, the tricky part:
- Compile our Rust project with
cargo build,cargo run,cargo test, so that we can produce a binary. - Create a
.vimspector.jsonfile at the root of your Cargo directory. - Attach CodeLLDB and your Rust application binary to Vimspector in the
.vimspector.jsonfile. - Create a debugger breakpoint in your code with
:call vimspector#ToggleBreakpoint(). - Launch Vimspector and start debugging with
:call vimspector#Launch().
app/.vimspector.json
{
  "configurations": {
    "launch": {
      "adapter": "CodeLLDB",
      "filetypes": [ "rust" ],
      "configuration": {
        "request": "launch",
        "program": "${workspaceRoot}/target/debug/app"
      }
    }
  }
}
And, if everything went well we should be greeted by a new debugging session of our Rust code in Neovim.

Rust debugging in Neovim with Vimspector and CodeLLDB
If we want to debug Rust Tests we need to:
- Compile the test with
cargo test. - Locate the binary produced and printed by the
cargo testcommand (target/debug/deps/app-0683da2c6affeec0in the example below). - Update
.vimspector.jsonto attach the test binary to the debugging session. - Set a breakpoint inside our test scope and launch Vimspector.
 λ cargo test
   Compiling app v0.1.0 (/home/rsdlt/Documents/RustProjects/app)
    Finished test [unoptimized + debuginfo] target(s) in 0.26s
     Running unittests src/main.rs (target/debug/deps/app-0683da2c6affeec0)

running 2 tests
test tests::first_test ... ok
test tests::test_persona ... ok

test result: ok. 2 passed; 0 failed; 0 ignored; 0 measured; 0 filtered out; finished in 0.00s
app/.vimspector.json
{
  "configurations": {
    "launch": {
      "adapter": "CodeLLDB",
      "filetypes": [ "rust" ],
      "configuration": {
        "request": "launch",
        "program": "${workspaceRoot}/target/debug/deps/app-0683da2c6affeec0"
      }
    }
  }
}
And again, if everything is properly configured we are greeted with a debugging session of a Rust Test:

Debugging a Rust Test in Neovim with Vimspector and CodeLLDB
Phew, the hard part is over...
Cargo Power with Terminal Access
One of my favorite plugins in Neovim is voldikss/vim-floaterm. I just love the capability to hit a keystroke and have a terminal prompt pop-up right in front of me to input a fast command and then return to my code just as quickly...
In Rust development I mainly use the terminal to execute Cargo commands like cargo run, cargo build, cargo check and cargo test, among others.
To install this plugin:
.config/nvim/lua/plug.lua:
return require('packer').startup(function()
    -- other plugins...

    use 'voldikss/vim-floaterm'

    -- other plugins...
end)
And I have it configured so that I can toggle the terminal pop-up by just pressing t after creating a session with <leader>ft:
-- FloaTerm configuration
map('n', "<leader>ft", ":FloatermNew --name=myfloat --height=0.8 --width=0.7 --autoclose=2 fish <CR> ")
map('n', "t", ":FloatermToggle myfloat<CR>")
map('t', "<Esc>", "<C-\\><C-n>:q<CR>")
Searching at the Speed of Rust
Rust is fast, and so should be getting anywhere in our code.
There are countless plugins and solutions to find and jump within a project. However, in my experience these two plugins are the most essential:
Telescope can leverage other plugins like BurntSushi/ripgrep and sharkdp/fd
Hop is unbelievably joyful, fun and effective to use.
Project status
I mainly use four plugins to keep my project nice and tidy:
- kyazdani42/nvim-tree.lua for the typical file explorer - but with the added benefit of displaying Git file status.
- preservim/tagbar for an overview of my project structure to quickly see my Structures, Traits, Functions, etc.
-
folke/todo-comments.nvim to neatly consolidate
TODOs,FIXMEs, etc. -
folke/trouble.nvim to show in a single panel my
rust-analyzererrors and warnings.
And of course, with just one keystroke we can toggle on / off each of these features really fast...

Rust in Neovim with File Explorer, Tagbar, TODOs and Trouble
Better Coding Experience
Other plugins that I use that make my coding experience more enjoyable are:
- lukas-reineke/indent-blankline.nvim to show and customize ident lines.
- windwp/nvim-autopairs for smart pairing of brackets.
- tpope/vim-surround to quickly add, remove or change brackets surrounding any text.
- RRethy/vim-illuminate to highlight other uses of word under cursor.
- numToStr/Comment.nvim to quickly comment / uncomment text.
Nice Look & Feel
And last, but not least, we can make Neovim look awesome with just a few plugins and tweaks:
- m-demare/hlargs.nvim to leverage Tree-sitter and highlight argument definitions.
- danilamihailov/beacon.nvim to highlight our prompt when we jump from one location to another.
- tanvirtin/monokai.nvim an awesome color theme (used in the screenshots of this post).
- navarasu/onedark.nvim another great and popular color theme.
- kyazdani42/nvim-web-devicons for cool icons in the file explorer and other places.
- lewis6991/impatient.nvim to make Neovim even faster.
Links, references and disclaimers:
Here is the full list of all the Neovim plugins I use as of the date of this post. The credit, and my gratitude, goes to all the hardworking developers that make these awesome open source tools:
Neovim Plugins:
(In alphabetical order)
- BurntSushi/ripgrep
- danilamihailov/beacon.nvim
- folke/todo-comments.nvim
- folke/trouble.nvim
- goolord/alpha-nvim
- hrsh7th/cmp-buffer
- hrsh7th/cmp-nvim-lsp
- hrsh7th/cmp-nvim-lsp-signature-help
- hrsh7th/cmp-nvim-lua
- hrsh7th/cmp-path
- hrsh7th/cmp-vsnip
- hrsh7th/nvim-cmp
- hrsh7th/vim-vsnip
- kyazdani42/nvim-tree.lua
- kyazdani42/nvim-web-devicons
- lewis6991/impatient.nvim
- lukas-reineke/indent-blankline.nvim
- m-demare/hlargs.nvim
- mfussenegger/nvim-dap
- navarasu/onedark.nvim
- neovim/nvim-lspconfig
- numToStr/Comment.nvim
- nvim-lua/plenary.nvim
- nvim-lua/popup.nvim
- nvim-lualine/lualine.nvim
- nvim-telescope/telescope.nvim
- nvim-telescope/telescope-fzf-native.nvim
- nvim-treesitter/nvim-treesitter
- phaazon/hop.nvim
- preservim/tagbar
- puremourning/vimspector
- RRethy/vim-illuminate
- sharkdp/fd
- simrat39/rust-tools.nvim
- tanvirtin/monokai.nvim
- tpope/vim-surround
- voldikss/vim-floaterm
- wbthomason/packer.nvim
- williamboman/mason.nvim
- williamboman/mason-lspconfig.nvim
- windwp/nvim-autopairs
A version of this post was orginally published on https://rsdlt.github.io


Top comments (5)
Thank you for your content. I'm using Rust with nvim recently for my development workflow. I see that when I open rust file that import a large codebase (solana program library) in background, rust-analyzer open a new instance for each buffer (background), and cause very high cpu (100% at all 12 threads) and ram (20gb for rust-analyzer). I dont see that problem with vscode (vscode just open an rust-analyzer instance). Did you face with that problem, and can you help me to fix it (or it's nvim-lsp feature???)???
I use vimplug, nvim-lsp (with lsp-saga and nvim-cmp) and rust-tool.
Thank you.
Hi and thanks for reading. With rust-analyzer I have not experienced an issue with CPU load, but I have noticed that it indeed opens a new instance per buffer consuming ~257M of RAM:
And something similar happens with other LSPs servers. For example, this is the load for Texlab with two buffers open:
However, I rarely have more than 5 or 6 buffers open simultaneously, so it has no impact on my workflow.
I would suggest that you open a report in the Neovim Core LSP repo
Hello friend. After a month facing with that problem, I've found that why my computer get burned when I open a large imported project. Because I use a plugin called lspsaga.nvim for better UI, and that plugin open a bunch of buffers (for better previewing experience), cause the rust-analyzer start a new process attached to each buffer. That is the reason I think till now. Just updating it's not a bug from nvim lsp config.
Thank you for your reply. I've just found that my project rely on a large code base from another crate, so that is the reason why that the rust-analyzer take a lot of resource. And ya the lsp start a new instance per buffer, but vscode open just one (according my experience), so that why I have an bad experience with that specific project in nvim.
Do you find this setup productive in a real-world work setting? I like the idea of using the "most optimal" setup but I am still wondering if it will translate over to my day-to-day engineering work within a large enterprise.
Great article by the way!