
This article was originally posted on my personal blog
Java DataBase Connectivity (JDBC)
What is JDBC ?
Java Database Connectivity is tool or an application programming interface
(API) that establishes a connection between a standard Database (say MYSQL) and a Java Application that intends
to use that database.
Need for JDBC ?
Before JDBC, ODBC API was the database API to connect and execute the query with the database. But, ODBC API uses ODBC driver which is written in C language (i.e. platform dependent and unsecured). That is why Java has defined its own API (JDBC API) that uses JDBC drivers (written in Java language)
We can use JDBC API to handle database using Java program and can perform the following activities:
- Connect to the DataBase
- Execute Queries and update statements to the database
- Retrieve the result receive from the database
So, we can make an analogy of JDBC as the API which will allow us to create our own MySQL workbench of sorts, or more realistically allow us to create the controller for the database in our application. (if we are building a MVC application)
Wait wait, what the hell is an API anyway ?
API (Application programming interface) is a document that contains a description of all the features of a product or software. It represents classes and interfaces that software programs can follow to communicate with each other. An API can be created for applications, libraries, operating systems, etc.
Let's perform a thought experiment, we went to restaurant and ordered some food the food here is the data that we want in programming terms now we ask the waiter to take our order and deliver a message to the kitchen the backend of an application. Tha backend does it's magic and get back out food or the data.
Here, the waiter is the API.
Now that we have a basic understand of what JDBC is let's move forward but before we can start coding there a few things that we need to know.
Data Types in JDBC
| SQL | Java |
|---|---|
| VARCHAR | java.lang.String |
| CHAR | java.sql.String |
| BIT | boolean |
| NUMERIC | java.math.BigDecimal |
| INTEGER | int |
| REAL | float |
| FLOAT | float |
| DOUBLE | double |
More Data Types
| BINARY | byte[] |
| DATE | java.sql.Date |
| TIMESTAMP | java.sql.Timestamp |
| ARRAY | java.sql.Array |
| REF | java.sql.Ref |
| STRUCT | java.sql.Struct |
| BIGINT | long |
| CLOB | java.sql.Clob |
| BLOB | java.sql.Blob |
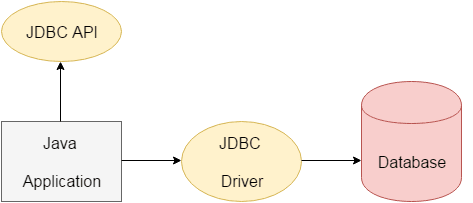
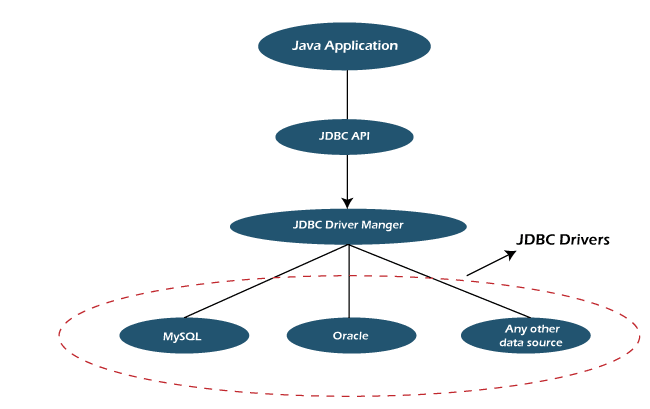
JDBC Architecture
Setting up the Dev Environment
Setting up Java Environment
- Download the Latest SDK
- Set
Java_Home - Set
Java Path
Setting up MySQL Environment
- Download the Latest MySQL Workbench
- Extract the file
- Run the setup file
Note:
You can use whichever Database application that you like as long as it is a SQL database
Steps to Connect JDBC
- Importing Packages This procedure is followed to make sure the relevant packages are readily available for the API
- Load and Register Drivers The imported drivers need to be loaded and registered for establishing a connection between application and database
- Connecting Database After the first two steps, the next stage is to connect the data base. This can be done by getConnection()
- Writing the Queries Here, we write in the SQL Command or Query that we need to execute
- Executing the Queries Now the query from the API is executed using executeQuery()
-
Processing Request
After the above five request, the system basically does two things:
- Process Output Value
- Retrieve Values
- Closing Statement The resultSet and statement need to be closed explicitly.
- Closing Connections The last stage is to ourselves or the API from the Database
Let's Start Coding then 😃
Getting our Database Ready
- First we need to launch MySQL, which we can do by launching the MySQL workbench or through the terminal for the sake of simplicity of this tutorial we are gonna be using the terminal
- Now that MySQL is running, we can create a database named
universityby typing in the commandCREATE DATABASE university;, and then to check whether the database is running or not we can executeSHOW DATABASES;this is my output, notice theuniversitydatabase.
mysql> show databases;
+--------------------+
| Database |
+--------------------+
| information_schema |
| University |
| customerdb |
| mysql |
| openmrs |
| performance_schema |
| sys |
+--------------------+
7 rows in set (0.02 sec)
mysql>
- Next we will create a table named
engineeringStudentswith {id, department, first_name, last_name, passout_year, uni_rank} by executing the following command:
CREATE TABLE `customerdb`.`EngineeringStudents` (
`student_id` INT NOT NULL,
`department` VARCHAR(45) NOT NULL,
`first_name` VARCHAR(45) NOT NULL,
`last_name` VARCHAR(45) NOT NULL,
`passout_year` INT NOT NULL,
`university_rank` INT NOT NULL,
PRIMARY KEY (`student_id`),
UNIQUE INDEX `student_id_UNIQUE` (`student_id` ASC));
- Now the last step to make our Database ready is to insert some data into it, which we will be doing by the following commands
insert into engineeringstudents
   value(10201, 'CSE', 'Kiran', 'Acharya', 2018, 1272);
insert into engineeringstudents
   value(10202, 'ME', 'Jayson', 'Robert', 2020, 1249);
insert into engineeringstudents
   value(10203, 'CSE', 'Praveen', 'Kumar', 2017, 1238);
insert into engineeringstudents
   value(10204, 'ECE', 'Rajesh', 'Kumar', 2019, 1243);
insert into engineeringstudents
   value(10205, 'CSE', 'Trevor', 'Krugar', 2018, 1000);
insert into engineeringstudents
   value(10206, 'CSE', 'Jogn', 'Denver', 2018, 1);
insert into engineeringstudents
   value(10207, 'ECE', 'Jennifer', 'Charles', 2019, 13232);
The Java Module 🥲
Creating the Module
- You can use any IDE/Text Editor that you want, although I would recommend you download and install IntelliJ IDEA CE
- Launch the IDE
- Next, create a Java Project (Not a Maven or Gradle etc)
- I am going to call it jdbc-intro
- And then create a
JDBCdirectory with aJDBC.javaclass in it, the directory structure should look like this:
|-- jdbc-intro
    |-- lib
    |-- src
        |-- JDBC
            |-- JDBC.java
Creating a basic SQL query in Java
- Now, we would start writing the code in the
src/JDBC/JDBC.javafile:
package JDBC;

import java.sql.*;

public class JDBC {
    public static void main(String args[]) throws SQLException {
        String url = "jdbc:mysql://localhost:3306/customerdb";
        String uname = "root";
        String password = "password";
        String query = "select * from engineeringstudents";
    }
}
- This code is pretty self explanatory, except for the
import java.sql.*;line. - This is the line that provides us all of the function that are present in the JDBC Library/API
-
But we haven't added JDBC to our project, which we are going to using a
JAR- First we will download the Jar file for JDBC from this link
- Next, to add this JAR file to our project we can follow this article on GFG
Checking if our package is imported correctly by using the
try and catchblock which find the packageclassName
package JDBC;

import java.sql.*;

public class JDBC {
    public static void main(String args[]) throws SQLException {
        String url = "jdbc:mysql://localhost:3306/customerdb";
        String uname = "root";
        String password = "password";
        String query = "select * from engineeringstudents";

        // Checking if the package is present
        try {
            Class.forName("com.mysql.jdbc.Driver");
        } catch (ClassNotFoundException e) {
            e.printStackTrace();
        }
    }
}
Connecting to the Database and printing the result to the console
- To create a connection to the database we use the Connection class present in the JDBC Driver and pass the url, uname and password to the getConnection() method in the DriverManager
- Then to convert our query String into a JDBC Statement we are going to use the Statement class and createStatement() method
Connection con = DriverManager.getConnection(url, uname, password );
Statement statement = con.createStatement();
- Now that we have created a Query Statement, it need to be executed and result stored in a variable, which will be of the the type ResultSet which is also provided by the JDBC Driver
- The
statementis to be executed using the executeQuery() method by providing it the query as a parameter
ResultSet result = statement.executeQuery(query);
- Now, the only thing remaining is to print the result obtained to the console.
-
while(result.next())this part is pretty self explanatory, until the next result is null- We will will iterate over all the 6 properties: {id, department, first_name, last_name, passout_year, uni_rank} which can be accessed by the result.getString(index) method by passing the index to it.
- Then we will concatenate this result into a temporary variable.
- When the iteration is completed (no more properties of index: i remains) we can print this temporary variable
while(result.next()) {
      String UniversityData =  "";
      for(int i=1; i <= 6; i++) {
         UniversityData += result.getString(i) + ":";
      }
      System.out.println(UniversityData);
}
Final Code
package JDBC;

import java.sql.*;

public class JDBC {
    public static void main(String args[]) throws SQLException {
        String url = "jdbc:mysql://localhost:3306/customerdb";
        String uname = "root";
        String password = System.getenv("SQLPassword");
        String query = "select * from engineeringstudents";

        try {
            Class.forName("com.mysql.jdbc.Driver");
        } catch (ClassNotFoundException e) {
            e.printStackTrace();
        }

        try {
            Connection con = DriverManager.getConnection(url, uname, password );
            Statement statement = con.createStatement();

            ResultSet result = statement.executeQuery(query);

            while(result.next()) {
                String UniversityData =  "";
                for(int i=1; i <= 6; i++) {
                    UniversityData += result.getString(i) + ":";
                }
                System.out.println(UniversityData);
            }

        } catch (SQLException e) {
            e.printStackTrace();
        }
    }
}

Top comments (0)