
Preface
I recently watched an awesome video overview/demo of one of AWS’s newer services — Amazon ML. If you have ~50 minutes on hand to watch the above video and follow along I highly suggest it, if not read the rest of my blog post for a much briefer summary.
So what is Amazon ML?
Amazon Machine Learning is a service that makes it easy for developers of all skill levels to use machine learning technology. Amazon Machine Learning provides visualization tools and wizards that guide you through the process of creating machine learning (ML) models without having to learn complex ML algorithms and technology. Once your models are ready, Amazon Machine Learning makes it easy to obtain predictions for your application using simple APIs, without having to implement custom prediction generation code, or manage any infrastructure.
In other words, it’s machine learning as a service. For those familiar with machine learning, Amazon’s service doesn’t yet provide any sort of deep learning models, only regression and classification models. Nonetheless, you can do some fairly powerful stuff with these shallow learning models.
Overview
In the video linked above the speaker goes through an example in which he builds a model to automatically classify tweets directed at AWS customer support as actionable or not actionable. You can probably imagine a few different use cases for a model like this, one being a great way to save your customer support agents time filtering through garbage social media data to find actual customer issues/problems. I’ll go through the same example with my own company’s (Weebly) twitter data below.
The entire process of creating our ML model can be boiled down to 4 simple steps:
- Collect our Data
- Classify Our Data
- Feed our classified data to Amazon’s ML engine
- Test it out!
Collecting our Data
First we need some actual data to work with. Since we’ll be using twitter data, we can take advantage of the Twitter API to get a large subset of tweets that meet our requirement (i.e. tweets directed @weebly). This means you’ll have to register an developer application on twitter to get your relevant API keys and tokens. Once you do that you can start fetching the data you need from twitter. Below is a little ruby script to get all the tweets we care about and save them to a CSV.
# Twitter client gem - https://github.com/sferik/twitter
client = Twitter::REST::Client.new do |config|
  config.consumer_key        = "API_KEY"
  config.consumer_secret     = "SECRET"
  config.access_token        = "ACCESS_TOKEN"
  config.access_token_secret = "ACCESS_TOKEN_SECRET"
end

CSV.open("weebly_tweets", "wb") do |csv|
  csv << ["username", "tweet"] # first row
  client.search("@weebly", lang: "en").collect do |tweet|
    csv << [tweet.user.screen_name, tweet.text]
  end
end
Awesome, now we have a CSV with thousands of rows of tweets. Time for the classification portion.
Data Classification
Now that we have all our tweets in a CSV we need to classify them as actionable or not. One way we could do this is to create a third column in our CSV and manually go through all the tweets and classify them ourselves… that sounds pretty awful though. Fortunately Amazon has another pretty handy service called Amazon Mechanical Turk. Using this service we can hire people to classify these tweets for us at a price we determine (often as low as a couple of cents per tweet). You can choose how many different people should be hired to classify your tweets, at what cost, and various other configurations. Below are some screenshots from the Mechanical Turk interface:
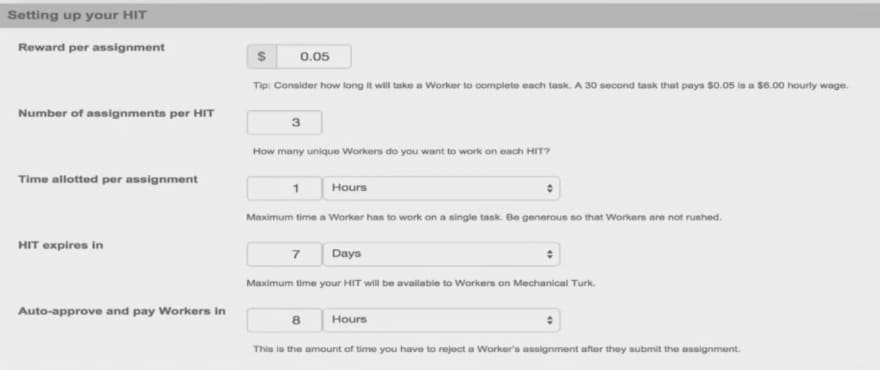
configure HIT (Human Intelligence Task)

HIT instructions
One important thing that’s easy to forget when creating machine learning models is making sure you have a good clean data set. I’m fairly new to creating ML models and in pretty much every instance I’ve worked on a model I end up constantly going back to the original data set and re running the model because of some data cleaning I did after the fact. Some early filtering on your data could end up in big wins down the line with your models performance, and save you lots of time. One example — the first time I fetched all this twitter data I noticed lots of tweets in Chinese. Unless our customer support agents speak Chinese this data will only pollute our model. Another example is that I noticed lots of tweets that were automatically generated by Weebly’s Blog Platform’s “share†feature — these could be easily filtered out of data set by a simple check for certain text (“blog post shared via @weeblyâ€). Our model could easily learn to classify these appropriately but we could save time calculating our model by filtering out these tweets beforehand, and more importantly we could save money if we are paying a third party classification service to classify our data.
Creating Our Model
Once we’ve got all our data classified and an additional column in our csv with the labeled data, we can begin to actually create our model. As of the date I’m writing this, Amazon ML models need to pull data from either S3 or RedShift. I created a new s3 bucket quickly and placed by weebly_tweets.csv there.
From the Amazon ML console you can select “Create new Model and Datasourceâ€. From there we can follow the fairly straightforward steps in creating our model. Note — we can do all of the below via Amazon’s API, but for clarity and easier visualization I’ll use the console.

In this first step we simply enter the location of our data and name this new Datasource. The steps after this will just have you confirm your columns and their data types, as well as identify the target column (the output). After creating our Datasource we’ll finally get to the point of actually being able to create our model.
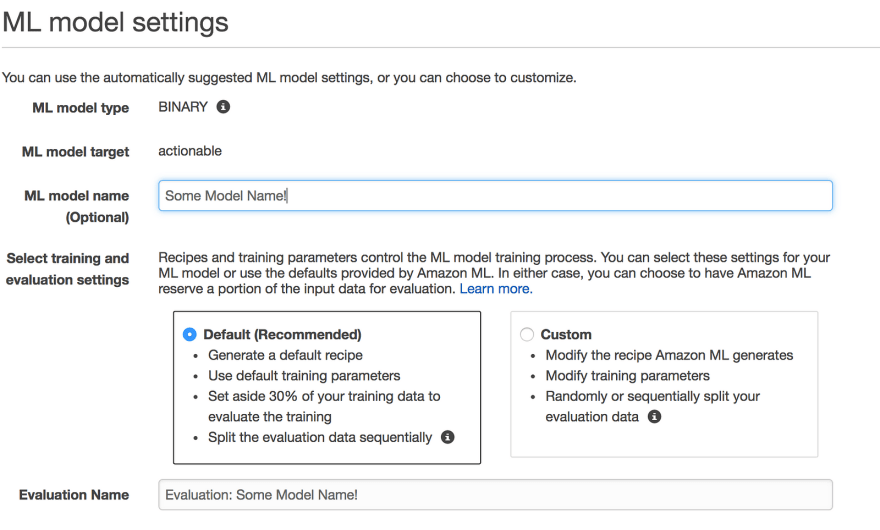
The screenshot above is the initial screen you’ll see when creating a model. Choosing the default training and evaluation settings basically means you let Amazon configure everything about your model. If you choose custom you can change things like your regularization parameter, the training data vs evaluation data split, whether to randomly or sequentially choose training data, and more. The first time around I would suggest choosing Default and letting Amazon configure things for you — if you aren’t happy with your results then you can start trying to work on some customizations.
Once you finish creating your model- boom! Amazon will start putting it’s servers to work on training your model. Depending on how much data you feed it, this step can take awhile. Running binary classification on a couple thousand tweets took about ~7 minutes or so. Once it’s done we can check out how our model performed.
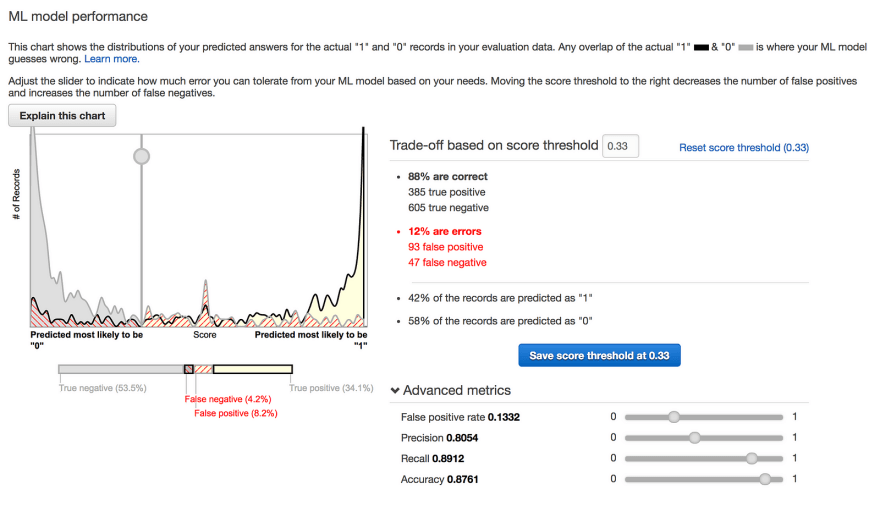
Amazon will give you a nice little chart explaining your models performance on the evaluation data set. As you can see from the screenshot above, our modeled classified tweets as actionable at an 88% correct rate — that’s pretty cool. From this model performance screen you can also modify your model’s threshold to give you more or less false positives/negatives. In the case of actionable tweets, I figured it’s better to have more false positives (a tweet is marked actionable when it’s not), rather than false negatives (a tweet is marked not actionable and it was), so I modified my model to err on the side of false positives.
Testing our Model/Where do we go from here?
Cool we’ve got a model that works well… now what? For starters we can try out real time predictions right in the Amazon console.
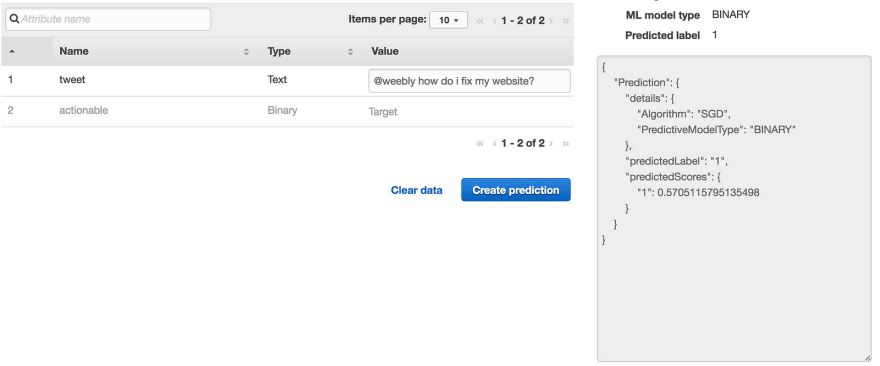
In this instance (above) I tested “@weebly how do I fix my website?†and correctly got a prediction of actionable (1 is actionable, 0 is not). In the “predictedScores†blob you can get a closer look at how the model actually scored your data. The closer to 1 our score was the more confident the model was that it was actionable, and same for zero.

As you can see in this example (“@weebly I love dogs!â€) the model very confidently predicted that this is not an actionable tweet.
We can also interact with this model via Amazons API (maybe will save this for a separate post) so it’s actually useful in a production environment.
Conclusion
Amazon ML is extremely easy to use. It’s still in it’s infancy so the amount of customization and insight into your model you have is still little compared to when using services like tensorflow or scikit-learn. Overall, it’s a great way to easily compute basic ML models, and quickly integrate your models into application layer code.


Top comments (2)
I have been meaning to check out AWS ML for a few months now and this post is a great intro for it, thank you! It helps me to understand it at a high level and how I could use it.
Great write up! I spent three years working on the Mechanical Turk team so I'm always happy to see it get some love. 😊