
Hooks allow you to use state in functional components and avoid the need for class components. They also add a lot of convenience to working with state. I wanted to quickly get the gist of how to use them, so I made a little RPG store/cart app. The shop contains a few items (classic Zelda stuff) and displays their names and prices. The cart displays the item name, quantity, and total item cost (item price x quantity) as well as a cart total. Items can be added and removed from the cart and the cart total will adjust accordingly.
First, an Intro to useState, useEffect, and useReducer
In this first part I'll explain how useState, useEffect, and useReducer work, and the second part will be how I went about my actual project.
useState
useState returns 2 elements: the current state and a function to update the state. When initializing state, you create a variable and set it equal to useState, which is passed the values you want to keep track of.
const state = useState({ username: '', email: '' }) stores an object containing username and email properties. You can choose any name that fits; it doesn't have to be state.
In order to retrieve the values, you have to target the first element of the state variable you created: state[0], and to update the state you target the second element, which is the function to set the state: state[1]. You can see in the example below how the input elements are using the values from state, and handleChange returns state[1] which is setting the new value for whichever input is being updated.
import React, { useState } from 'react'; // <- destructure useState to use it in your functional component

function App() {
  const state = useState({ username: '', email: '' });

  const handleChange = e => {
    const { value, name } = e.target;

    return state[1](prevState => ({
      ...prevState, // spread first before setting new values or they will be overwritten
      [name]: value
    }));

  }

  return (
    <div className="App">
      <form>
        <label>Username:</label>
        <input type="text" name="username" value={state[0].username} onChange={handleChange} />
        <br />
        <label>Email:</label>
        <input type="email" name="email" value={state[0].email} onChange={handleChange} />
      </form>
    </div>
  );
}
Since all your state is in a single object you have to remember to spread the previous state into the new object or it will be overwritten, just like you see in handleChange.
Having to use state[0] and state[1] seems like a recipe for disaster. You could store them in new, more descriptive variables instead:
const state = useState({ username: '', email: '' });
const stateValues = state[0];
const setStateValues = state[1];
However, I don't know if this is bad practice or not, I haven't seen it. I usually see the following method used instead, where useState is destructured:
import React, { useState } from 'react';

function App() {
  const [username, setUsername] = useState('');
  const [email, setEmail] = useState('');

  return (
    <div className="App">
      <form>
        <label>Username:</label>
        <input type="text" name="username" value={username} onChange={e => setUsername(e.target.value)} />
        <br />
        <label>Email:</label>
        <input type="email" name="email" value={email} onChange={e => setEmail(e.target.value)} />
      </form>
    </div>
  );
}
This seems nicer because nothing is tied together and you don't have to worry about maintaining the previous state to avoid overwriting other properties. The downside to this method is that your properties aren't named in the React debugger.
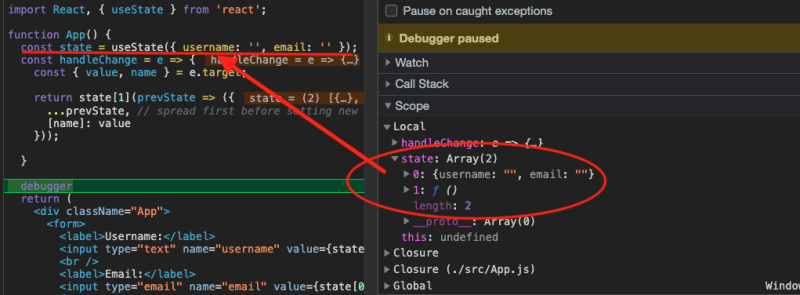
If you set everything as a single object you can see the names of each property:

If you separate each bit of state, it's harder to debug because you can't tell what value belongs to which property:

useEffect
useEffect is a hook to manage side effects and can be used similar to componentDidMount, componentDidUpdate, and componentWillUnmount. It executes after every component render cycle. It takes 2 arguments: The first is a function in which you put whatever you want it to do, and the second (optional) argument is an array that contains dependencies which trigger a re-render if they are changed. If you don't include a second argument, the useEffect will trigger after every re-render. If you specify an empty array [] it will run once, like componentDidMount.
In this example I'm fetching the first 20 Pokémon from PokéApi when the app first loads. It will only run once because the useEffect has no dependencies.
import React, { useState, useEffect } from 'react'; // <- import useEffect

function App() {

  const [pokemon, setPokemon] = useState([]); // <- initialize to empty array

  // this useEffect runs when the app first loads
  useEffect(() => {
    fetch('https://pokeapi.co/api/v2/pokemon?limit=20&offset=0')
      .then(res => res.json())
      .then(data => {
        setPokemon(data.results);
      })
}, []); // <- empty array means don't run this again

  // other code here...
}
Below is an example of triggering the useEffect whenever the url variable changes. Here I'm setting it to the nextUrl, which is a value from the PokéApi that's used to get the next set of Pokémon.
  const [pokemon, setPokemon] = useState([]); // <- initialize to empty array
  const [url, setUrl] = useState('https://pokeapi.co/api/v2/pokemon?limit=20&offset=0');
  const [nextUrl, setNextUrl] = useState(null);

  useEffect(() => {
    fetch(url)
      .then(res => res.json())
      .then(data => {
        setPokemon(data.results);
        setNextUrl(data.next);
      })
  }, [url]); // <- trigger whenever the url changes
useReducer
useReducer is an alternative to useState; it provides a convenient way to handle updating state without worrying about unexpected changes being made. It's useful for when you're mainting more complex state or if you have a lot of nested components to pass props through.
useReducer takes a function, called a reducer, and an initial value. It returns the current state and a dispatch method.
The reducer is a function that's responsible for making changes to the state. Its parameters are the current state and an action. The action is an object with conventionally named type and payload properties. The type is used in a switch statement to make the appropriate changes, and the payload is a value needed to make the changes.
In order to make changes, you dispatch the action and payload to the reducer, using the dispatch method.
Below is an example of a Todo List.
At the top is an object called ACTIONS, which just helps so you don't have to constantly write your actions as strings that you might type incorrectly. Plus, if you need to change something you can do it once at the top without breaking the rest of the app.
Underneath is the reducer function. todos is the current state of the todos. You can see in the App function where the todos state is set up: const [todos, dispatch] = useReducer(reducer, []). reducer is the function to dispatch and [] is what todos is initialized to.
In the switch statement you can see that if action.type is equal to ACTION.ADD then a new todo will be created and a new array will be returned containing the previous state of the todos along with the new todo. Each case returns state in whatever way you want to alter it for that action. The default returns the state as is.
If you look down in the return statement of App, you can see where all the todos are being displayed, the dispatch method is being passed to each todo. This is convenient because you don't have to pass a bunch of different methods down to the Todo component; you can just pass dispatch and pass whatever necessary type and payload you need and the reducer will take care of the rest.
// ===== App.js =====
import React, { useState, useReducer } from 'react';
import Todo from './Todo';

export const ACTIONS = {
  ADD: 'add',
  TOGGLE: 'toggle',
  DELETE: 'delete',
}

function reducer(todos, action) {
  switch (action.type) {
    case ACTIONS.ADD:
      return [...todos, newTodo(action.payload.task)]
    case ACTIONS.TOGGLE:
      return todos.map(t => (
        t.id === action.payload.id ?
          { ...t, complete: !t.complete } : t
      ));
    case ACTIONS.DELETE:
      return todos.filter(t => (t.id !== action.payload.id));
    default:
      return todos;
  }
}

function newTodo(task) {
  return { id: Date.now(), complete: false, task }
}

function App() {
  const [todos, dispatch] = useReducer(reducer, []);
  const [task, setTask] = useState('');

  function handleSubmit(e) {
    e.preventDefault();
    dispatch({ type: ACTIONS.ADD, payload: { task } });
    setTask('');
  }

  return (
    <div className="App">
      <form onSubmit={handleSubmit}>
        <input type="text" value={task} onChange={e => setTask(e.target.value)} />
      </form>

      <h1>Things To Do:</h1>
      <ul>
        {
          todos.length > 0 ?
            todos.map(t => <Todo key={t.id} todo={t} dispatch={dispatch} />)
            :
            "All done with tasks!"
        }
      </ul>
    </div>
  );
}

export default App;
Here in the Todo component, you can see that the Toggle and Delete buttons each have an onClick that runs the dispatch method, and each passes the appropriate action as type.
// ===== Todo.js =====
import React from 'react'
import { ACTIONS } from './App';

export default function Todo({ todo, dispatch }) {
  return (
    <li>
      {todo.task}

      <button onClick={() => dispatch({ type: ACTIONS.TOGGLE, payload: { id: todo.id } })}>Toggle</button>

      <button onClick={() => dispatch({ type: ACTIONS.DELETE, payload: { id: todo.id } })}>Delete</button>
    </li>
  )
}
There's more you can do with hooks, including building your own. I encourage you to check out the official docs and the resources below to learn more.


Latest comments (0)