Most up to date post is here: https://robertmarshall.dev/blog/deploy-gatsby-aws-with-ci-without-amplify
At the time of writing, AWS Amplify has an issue within its build which means it crashes if there are too many files to transfer to the S3 bucket. This is a shame as Amplify is fairly plug and play, and using other AWS services to create the same outcome can be a bit trickier. The error that I came across looked like this:
Deploy fails with “[ERROR]: Failed to deploy
If you ran into the same problem as me and Amplify is continually failing, here is a step by step walk-through of what you need to do to use AWS CodePipeline. To get your project deployed, with no more downtime.
I have included as much information as I could so that these stages can be followed by anyone, to help get your project up and running smoothly.
Adding buildspec.yml to Project
Before doing anything with AWS, a buildspec file needs to be created in the root of the Gatsby project. This file is used by AWS CodePipeline during the build process, and allows commands to be attached to stages within the build.
Create a file named ‘buildspec.yml’ and add the following code to it:
version: 0.2
artifacts:
    base-directory: public
    files:
        - '**/*'
phases:
    install:
        commands:
            - touch .npmignore
            - npm install -g gatsby
    pre_build:
        commands:
            - npm install
    build:
        commands:
            - npm run build
            - aws s3 sync ./public $ENV_BUCKET --delete --exclude 'node_modules/*'
Save this file, and commit it to your project repo on the branch you want to be deployed.
What is the buildspec.js file doing?
It starts off by setting the buildspec version to 0.2. This is an internal AWS version number, rather than the version of your file. This should never change.
The artifact settings are then managed. The artifact is the file created by the build process. In this case it will be a ZIP file that will be unzipped when it is passed to the destination. As Gatsby builds out to a ‘public’ folder, this folder should be set as the base. Then all files from this folder need to be included.
Within the ‘phases’ section, three commands are used. Install, Pre build and Build. Within the Install phase Gatsby is installed globally, and the .npmignore file is created. Once this is complete, all NPM packages are installed within pre_build. Then in the build phase two commands are chained together. This is to ensure that if the build fails – no files are transferred.
The final command of the build phase uses AWS Sync to deploy the build files from the artifact, to the bucket specified at a later stage. The –delete flag means that any files in future builds that are outdated will be removed. Node_nodules is excluded from the process, even though only the ‘/public’ folder is being moved, and it will save time. AWS Sync will loop through all files, even those not needed.
Setting up the S3 Bucket
Once you have created the buildspec.js file outlined in the above stage it is time to get started with AWS. The first step is to create a S3 Bucket. A bucket is used to hold the files created by the Gatsby build.
To create a bucket you need to:
- Navigate to the S3 section within AWS
- Click ‘Create Bucket’.
- Enter your bucket name
- Pick the region that you want to host your files in.
Any region can be accessed from anywhere, however it is best to pick the region that is closest to your market. If you have multiple markets, you may be best with multiple buckets – this allows you to optimise latency, minimise costs and address regulatory requirements for each region. This is not covered in this article.
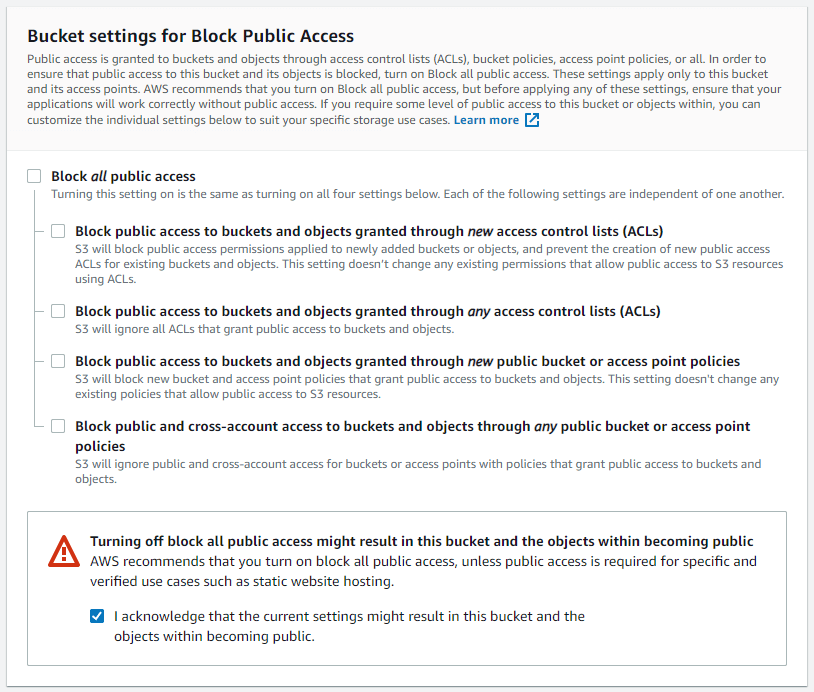
The bucket also needs to be given full public access. The reason buckets are usually locked down is to stop information being leaked. However, as this is a static site that is not something to worry about. All files need to be accessed for the site to run.
To set up the correct access you need to:
- Uncheck ‘Block all public access’
- Check the scary looking warning block at the bottom.
Once the bucket has been created you need to tell AWS that this bucket is to be used for hosting a static website.
- Go to the ‘properties’ for that bucket
- Click ‘Static website hosting’.
- Select ‘Use this bucket to host a website’
- Enter “index.html” as the index document.
- Enter ‘404.html’ as the error document.
Once you have completed the above, you need to update the policy of the bucket. This will set read access for anyone in the world. The steps to do this are:
- Navigate to S3 in the AWS Console.
- Click into your bucket.
- Click the “Permissions” section.
- Select “Bucket Policy”.
- Add the following Bucket Policy (update with your bucket name) and then Save
{
    "Version": "2012-10-17",
    "Statement": [
        {
            "Effect": "Allow",
            "Principal": {
                "AWS": "*"
            },
            "Action": "s3:*",
            "Resource": [
                "arn:aws:s3:::YOURBUCKETNAME",
                "arn:aws:s3:::YOURBUCKETNAME/*"
            ]
        }
    ]
}
Setting Up CodePipeline
AWS CodePipeline is a fully managed CI (Continuous Delivery) service that automates releases. It removes a lot of the complexity around rolling out applications, making it far easier and quicker to deploy them.
We want CodePipeline to listen to your repository, and any time a new commit is made to your branch of choice the build process will run. The files generated will be deployed from CodePipeline to the S3 bucket.
To set up the CodePipeline, follow these instructions.
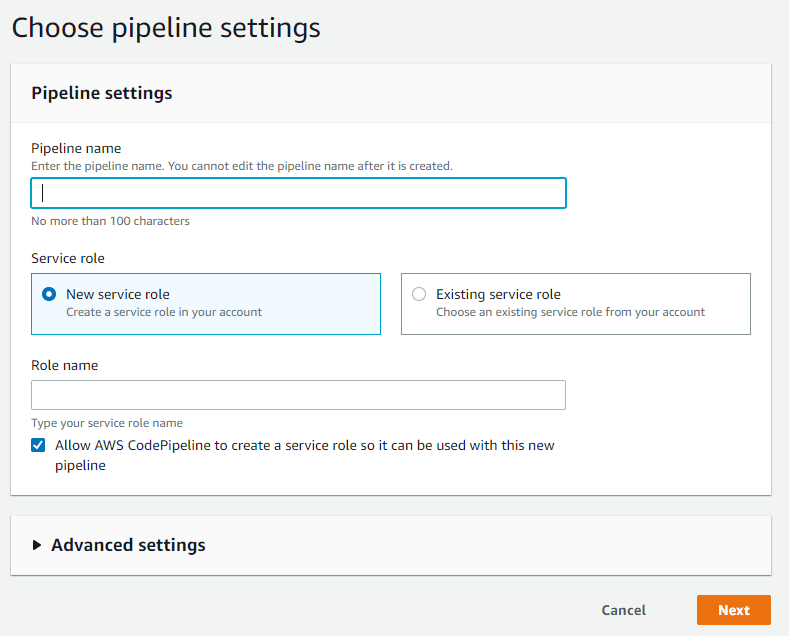
- Navigate to Developer Tools/CodePipeline
- Click ‘Create Pipeline’
- Enter your pipeline name
- Click Next
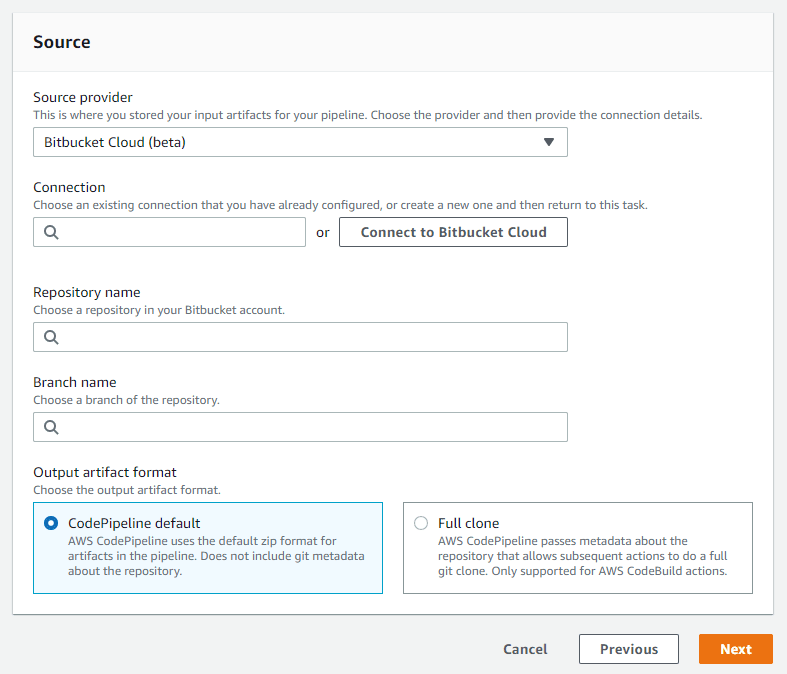
Now it is time to connect your source. In this example I will be using Bitbucket Cloud, but Github is also an option.
- Select the source provider
- Click ‘Connect’ for the Connection field
- A new modal will open, click ‘Install App’ to link to your repo account.
It is important to note at this stage that you can only connect to repos that the account you are connecting to owns (if using Bitbucket). It is not enough to have been given admin access.
Once you have connected the account successfully, now you need to add the repo and branch.
- Search for the repo in the search field (if it doesn’t show up, its because you do not own it)
- Select the branch you want to connect to.
- Leave the rest as default and click ‘next
Add a build stage
At this point, you need to create the build process for your Gatsby project. It is relatively straight forward. Although AWS says it is optional, we require it for our project.
- Select a Build provider – AWS Codebuild
- Select your region
- Click ‘create a project’ – This is the name of your build process.
You will now be shown a popup modal. Enter the following details:
- Name of the project
- Move down to ‘Environment’ section
- Select ‘Managed Image’
- Operating System – Ubunto
- Runtime(s) – Standard
- Image: aws/codebuild/standard:4.0
- Move to the bottom and click ‘continue to codepipeline’
Next add your environment variables, This are things specific to you, that you may have added into your build.
There is one variable that you MUST add, and that is the bucket name that this deployment is passing the static files to. This is set by:
- Click ‘Add environment variables’
- Set the name as ENV_BUCKET
- Set the value as your bucket name (including s3:// at the front – eg ‘s3://MYBUCKETNAME’)
- Leave type set to Plaintext.
Add Deploy Stage
Once you have added your environment variables, click Next at the bottom right and you will be taken to the Add Deploy Stage screen.
As all of the deployment is managed through AWS Sync, a deploy stage is not needed.
Click ‘Skip deploy stage’.
Lets Go
Double check all of the settings on the final screen, and if there are no mistakes press ‘Create pipeline’.
This will create the pipeline and trigger the first build of the static site. Now any time a commit is pushed to this particular branch the build will trigger and re-deploy.
If you need this to happen across multiple branches, repeat the process on a new branch!
I hope this helped get you moving. Let me know if I can be anymore help by contacting me on twitter @robertmars


Top comments (0)