
Manage your users in your SvelteKit app with AWS Cognito.
Why Cognito?
To be honest, in my case, it’s just because we’re using AWS at Koa Health and it was the natural choice. I have many things to say about AWS Cognito, both good and bad, but this won’t be the article covering that 😉.
Well, hopefully, chances are that you may be already using AWS as your main cloud provider and this post can help you to integrate AWS Cognito in you SvelteKit app.
Disclaimer
I’m starting with Svelte so if you have any suggestions to improve what I’ll show here, you’re more than welcome to write a comment or contact me.
Alternatively, feel free to take a look at the GitHub repository hosting the final project and open an issue there if you prefer.
Setting up the SvelteKit app
We’re just going to use SvelteKit to build a simple app that will authenticate users, so let’s start with with some simple commands to create the project:
npm init svelte@next sveltekit-cognito-auth
# I'm choosing the Skeleton project,
# opting out of TypeScript for this tutorial
# and using ESlint and Prettier support
cd sveltekit-cogniton-auth
npm install
You can find here more details about how to get started with SvelteKit in case you want to learn more about it.
For now, let’s open the src/index.svelte file, delete its content and build this spartan UI:
<script>
    // we'll edit this later
    let user;
</script>

<svelte:head>
    <title>SvelteKit - Cognito</title>
</svelte:head>

{#if !user}
    <button>Log In with Cognito</button>
{:else}
    <button>Log Out</button>
{/if}
The idea here is to have a button that will trigger the Cognito authentication flow and another one that will log out the user. As simple as that!
For the moment, we’re going to skip all the logic to show one button or the other but we will come back to it later.
Let’s check that our app is working:
npm run dev -- --open
Hopefully, you should see a page with a button that says Log In with Cognito.
Setting up Cognito
Let’s create and configure our Cognito User Pool now.
First of all, let’s introduce the pool name: sveltekit-pool.

For this example, we’re going to use these simple settings.
Remember to tick the email checkbox in the Attributes section.

We’ll also relax the Password Policy to allow users to choose their own passwords without many hassles, so uncheck all the checkboxes related to the password strength.

Let’ press the Next Step button until we arrive to the App Clients section and let’s add one app client.
Leave it everything as it is and set the name that you want. For this example, I’m using sveltekit. Fairly original, isn’t it? 😉

Setting up the App Client
There are still a couple of things to do in our Cognito Pool. Ideally, we’d like to use the Cognito Hosted UI which will simplify a lot the Sign Up and Sign In flows.
For the moment, bear with me, fill the App Client settings with the following values and just click Save:

A couple of things to note here:
- The callback url will be a backend endpoint we’ll be exposing in our app.
- The Sign Out url is the final url to be redirected to once we’ve signed out from Cognito
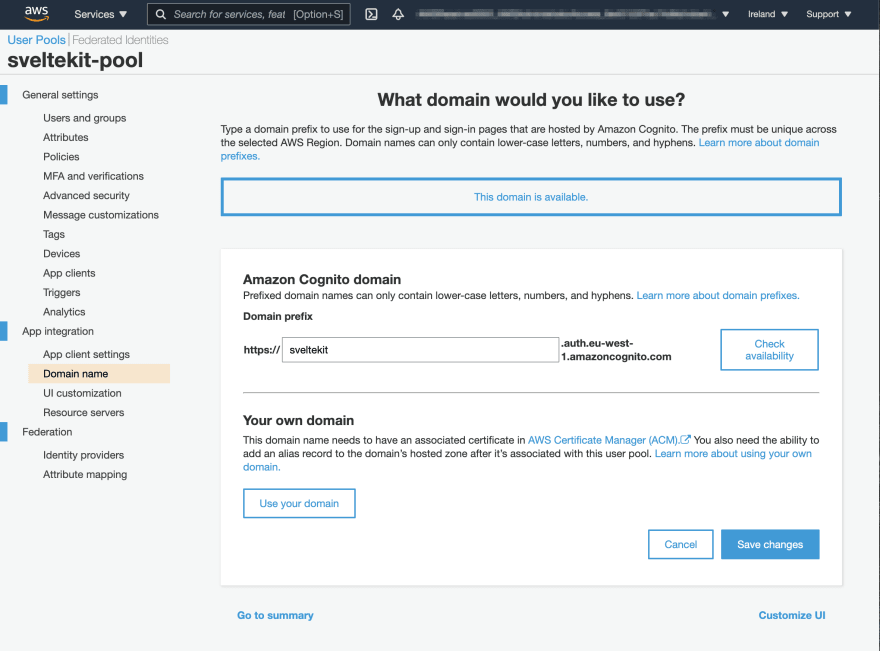
Finally, for the Cognito Hosted UI to work, we need to set up a domain. Note that the domain you choose is subjected to availability.
Let’s move away from Cognito for the moment and let’s focus again on our Svelte app.
Leveraging SvelteKit Auth library
Luckily for us, RaviAnand Mohabir has created a super cool library called SvelteKit Auth, based on NextAuth.js, which will allow us to use some of the most popular identity providers, such as Google, Twitch, Facebook, Twitter and Reddit.
But not only that, it also provides a generic OAuth2 provider that we will leverage to authenticate our users with Cognito.
The library handles all the OAuth2 flow for you, including the redirects, the token exchange and the user profile retrieval.
Let’s add the dependency to our app before we continue:
npm i sk-auth --save
Creating our Cognito Provider
Let’s create a new file called src/lib/auth.js and paste the following code:
import { SvelteKitAuth, Providers } from 'sk-auth';

// this is the domain we set up in our Cognito Pool
const DOMAIN = 'sveltekit.auth.eu-west-1.amazoncognito.com';

// these are the configuration seetings for our OAUTH2 provider
const config = {
    accessTokenUrl: `https://${DOMAIN}/oauth2/token`,
    profileUrl: `https://${DOMAIN}/oauth2/userInfo`,
    authorizationUrl: `https://${DOMAIN}/oauth2/authorize`,
    redirect: 'https://robertohuertas.com',
    clientId: import.meta.env.VITE_CLIENT_ID,
    clientSecret: import.meta.env.VITE_CLIENT_SECRET,
    scope: ['openid', 'email'],
    id: 'cognito', // IMPORTANT: this is the id that we'll use to identify our provider
    contentType: 'application/x-www-form-urlencoded'
};

const oauthProvider = new Providers.OAuth2Provider(config);

// exposing our auth object
export const appAuth = new SvelteKitAuth({
    providers: [oauthProvider]
});
Probably, if it’s the first time you’ve seen something like import.meta.env.VITE_whatever, you’ll be wondering what the hell is that.
Basically, it’s the way to get some environment variables from an .env file in your root.
You can find more info about it in the SvelteKit FAQs.
So make sure to add the following to your .env file:
VITE_CLIENT_ID=<your_client_id>
VITE_CLIENT_SECRET=<your_client_secret>
Exposing the Auth object endpoints
Now, let’s create a new file called src/routes/api/auth/[...auth].js.
If that felt strange to you, you have to know that this kind of naming is a routing convention from SvelteKit.
You can use this piece of code to expose the auth endpoint:
// we're importing our auth object here
import { appAuth } from '$lib/auth';
// and exposing the get and post method handlers
export const { get, post } = appAuth;
Using the Auth object getSession method
The Auth object exposes a getSession method that we can use in our hooks.js file in order to return a session that it’s accessible on the client.
As we have used the Skeleton project, we don’t have any hooks.js file yet. Let’s create one in the src folder and add this code:
import { appAuth } from '$lib/auth';
export const { getSession } = appAuth;
With this, the claims of the access token will be available on the session store.
Adding some interaction in the UI
We’re going to add now some actions to the buttons in our UI, so let’s open our src/index.svelte file and edit it:
<script>
    import { signOut as authSignOut } from 'sk-auth/client';
    import { session } from '$app/stores';

    // getting the user from the session store
    $: user = $session.user;

    function signIn() {
        location.assign('/api/auth/signin/cognito?redirect=/');
    }

    function signOut() {
        authSignOut().then(session.set);
    }
</script>

<svelte:head>
    <title>SvelteKit - Cognito</title>
</svelte:head>

{#if !user}
    <button on:click="{signIn}">Log In with Cognito</button>
{:else}
    <h2>Welcome {user.email}!</h2>
    <p>Your username is {user.username} and your email has been verified: {user.email_verified}</p>
    <button on:click={signOut}>Log Out</button>
{/if}
Notice that we’ve added some actions to the buttons which are fairly self-explanatory.
The signIn action will redirect the user to our api/auth endpoint (the one we set up in the previous step) with signin and cognito as parameters (remember that we set the id of our provider to cognito).
Finally, the redirect querystring parameter will tell the endpoint to redirect the user to our / route once the user is authenticated.
Let’s run the app and click over the Log In with Cognito button. You should see the Cognito Hosted UI:

As we don’t have any account yet, let’s click over the Sign Up link and create a test user.

Use a real email address as Cognito will send you a verification email with a code you’ll need to enter in the UI.

Once you’ve confirmed your email, you’ll be redirected to the / route but, this time, you should see something like this:

If you check your Cognito pool, you should be able to see the user you just created.

Note that SvelteKit Auth will set an HttpOnly cookie in order to manage the session for you.

Conclusion
As you can see, setting up an OAuth2 provider is pretty easy with SvelteKit Auth. If you need further adjustments, check out the repository. If you take a look at the example app, you’ll see plenty of ways to adjust your flow.
As a final note, I would like to mention that our Log Out button is not really logging out our user from Cognito as we’re only removing the cookie from our browser. So if you try to log in again, you’ll probably be logged in without having to introduce any credentials.
As a way to mitigate this, you can clear the Cognito Hosted UI domain cookies or you just can extend the log out functionality by calling the logout endpoint from AWS Cognito. Give it a try!
--
Originally published at robertohuertas.com on Jul 25, 2021.

Oldest comments (0)