I’ve been discussing using GitHub Actions in a secure way for a while now, and I got a question on how to improve your usage of actions. I wanted to capture that info in an easy to follow set of steps, so here we go:
- Default demo examples: version pinning or by branch
- Review the source code and trust the publisher / action
- SHA hashes
- Dependabot for actions
- Fork the repo and take control
- github-fork-updater
- Internal marketplace
- Request actions process

Photo by Markus Spiske on Unsplash
I’ll go over each of these below and give some more context. With that you should be able to determine where you or your company is at this scale. I’d love to what your next step will be, so please let me know on Twitter!
1) Default demo examples: version pinning or by branch
This is currently where all the demos start: use version pinning (now required) or by branch:
    - uses: actions/checkout@v1
    - uses: actions/checkout@main
The engine and UI now force you to use one of these ways, or fail to start the workflow or save it.
The first line is referencing a version which was used to publish the action as a release. You can find all the released version in the action repository itself: link. Often the release will have release notes and a list of the commits that made it to the new release. Actions should be following semantic versioning which means that you can use v2 to always use the latest compatible version with v2. So if the publisher releases v2.14.17, the runner will use that version.
The second line references a specific branch in the actions’ repository.
For both options, the runners will download the entire repository by calling either git checkout (if git is installed on the runner) or downloading the status of the repository as a tarball. The runner is open source, so you can follow along with the steps it is taking.
The issue with using both, is that you are pulling in arbitrary code from the internet! Even if you follow best practices, you should look at what the action is doing for you. GitHub as no documented process for publishing an action or a security check on them: anyone can set up a public repository with the right content and then everyone can use it. Very helpful to get started fast, but security is not part of that picture!
Why is this first level so bad?
As I said, the methods above always use a version of the action as is. The branching method uses whatever was pushed last to that branch. So even if you have just reviewed it and start using it, a newer version might just have been pushed to that branch. This happens without you knowing of it at all! Anything can happen between you reviewing it and you using it. A vulnerability in a package the action is using might be found, or the maintainer decides to export all environment variables to their own server. Or maybe even the maintainer hands over the code to a third party so they can do the maintenance. You never know, but might be using an action in production that is not what you intended.
For version pinning the same principle applies: you might even pin a specific version, say v2.1.4 and think you’re now safe: you are not! The version of a release comes from a git tag. Git tags can be reused! They are flexible by design, so the maintainer cant tag code and push that as v2.1.4. Then, even months later decide to add some code, maybe introduce a vulnerability and reuse the same tag! Then the runner will download the version of the repository as it is with that tag linked to it and you are running code in your workflow that you never intended.
2) Review the source code and trust the publisher / action
The first step in being better at using actions in a secure way is to review the source code: know what the action will be doing on your behalf! The repo is open source, so go to the repo:

Did you know you can even use the action call it self to find the repo? The uses statement can be partially copied behind github.com to have the direct link to the repo! So this uses: actions/checkout@v1 becomes this github.com/actions/checkout!
Now find the action.yml in the root and find it’s entry point under runs, for example the checkout action:
runs:
  using: node12
  main: dist/index.js
  post: dist/index.js
The using indicates that this action runs under node, so it is JavaScript based. This can be compiled TypeScript, so the next step is to look for the entry point and how it got there. Often you find a src folder and the TypeScript files in there (*.ts). Usually the starting file is then main.ts or index.ts.
In this case we see a main property that indicates the starting point when this action starts, so index.js in the dist folder. This already is a good change this action is build with TypeScript. You often can find where it actually starts by checking the packages.json file. For this action we find "main": "lib/main.js" in there, so we can find where it actually starts 😄. For TypeScript the file names just have the.ts` extension.
We also have a post definition here, which means that part of the action will also run at the end of a run:
To summarize, there is no verification or security label before someone can use an action, so you need to do your own due diligence! Check what the action is doing and make an informed decision if you can trust the action.
3) SHA hashes
Now that you have reviewed the actions’ source code, you need to make sure you always use that specific version of the action. This is where the SHA hashes come in. Each git commit gets its own unique SHA hash, based on the contents of the commit. That SHA hash is unique! Generating the same SHA hash with different contents is possible, but very hard to do. Having the contents of the repo as a pre-specified setup (with an ‘action.yml’ file for example), makes it very unlikely that you will get the same SHA hash for different code (we call that SHA collisions).
That means we can use the SHA hash to indicate a specific version of the action we will use. The runner will detect the SHA hash and use that to checkout the actions repository at runtime. Since adding or changing the code in the repo will mean a new SHA hash, you will always use the version you have reviewed.
You can find the SHA hashes in the history of the repo, by going to the commit history. Don’t use the short version of the hash, that was insecure (collisions more likely) and does no longer work.

You can then find the full SHA hash here: 
4) Dependabot for actions
Dependabot also supports actions as an ecosystem. It can run on a schedule and check all workflows in your repository for the actions you use. If you use version 2.1.5 of an action and the publisher has released version 2.1.6, Dependabot will create a Pull Request for you that updates the action to the latest version (major/minor updates configurable).
Dependabot supports all usage options for the actions that indicate a version:
- owner/action@pinned-version
- owner/action@SHA-hash
`
version: 2
updates:
- package-ecosystem: "github-actions" directory: ".github/workflows/" schedule: # Check for updates to GitHub Actions every weekday interval: "weekly"
`
The only downside is that in the Dependabot Pull Request, you only see the version number (or SHA hash) change in the PR. If the publisher has added commits or release notes, that will be available on the ‘Conversation’ tab of the PR. It’s up to you to check the actual code changes!

5) Fork the repo and take control
Now that you have at least a safer way of using actions (by reviewing their code and pinning it to the version you have reviewed), you are ready for the next step: taking full control over the action and any updates to them. This is one of the best practices for using actions and was always the initial guidance for using them: fork the repo!
By forking the action you have a full copy of it, so in case something happens (newer versions, or the maintainer deletes the repo), you workflows will continue to do their work happily. You are now also in control of any incoming updates. More on that in the next level. I always use an organization called org-name-actions for this, so that I have a single location for all the actions we use and an easy way to limit the use of ALL public actions (see next paragraph). Especially in an work setting, you do not want your GitHub users to just run any action from the public internet, you need to check these things first!
The nice thing is that you now can enforce that the users in your organization can only use the actions under your control. Go to your organization –> permissions –> actions permissions and select ‘Allow select actions’:

You can now enter the actions you want to allow for the selected repositories in your organization (you can also do this on the repo level). If someone triggers a workflow that does not adhere to these limitations, it will give an error and will not start. No action repos will even be downloaded on a runner.
You can go completely crazy in this list: |Setting|Description| |—|—| |owner/|All actions from this owner are allowed| |owner/action@|The action in the repo ‘action’ from this owner are allowed for all versions and all branches| |owner/action@main|The main branch of this action is allowed| |owner/action@v2|All versions for v2 are allowed for this action of this owner| |owner/action@SHA|Only this version is allowed for this action of this owner|
Note: ‘owner’ can be either an organization or a user account here.
6) github-fork-updater
Now that you have a fork of the repo, you need to maintain this fork. The best way of doing that is sharing any changes you make back to the publisher of the action (yeah for Open Source) by clearly communicating what you changed and why. Then send in a Pull Request.
You also want to incorporate incoming changes from the publisher back into the fork. You can wait until someone spots the message on the repo that says ‘you are x commits behind the parent repo’, but that doesn’t scale of course. There is also a big button on that banner that lets you pull in all the updates automatically.
DO NOT USE THAT BUTTON! Use the compare in the drop down first!
You’d be blindly pulling all the changes from the parent repo! I think the explanation from level 2 where clear: review what the action is doing for you! That means you need to check the incoming changes!
To scale this process, I have created the github-fork-updater repository that centralizes the process for you. It checks all forks on a schedule and will create an issue for you when there are updates. You can then review the incoming changes and decide to update the fork. More is explained in this blogpost.
7) Internal marketplace
The next maturity level is having a setup to let the users in your GitHub organization find the actions you have available in your actions-org. They can search the organization of course with the normal search options, but that means searching in all code in the repos, trying to find something that the action should do. You only want to search in the action.yml and the readme. Having a better search experience therefor is a nice way to send your users to a central location: the internal marketplace. Having all that data in a single location also has additional benefits. More on that later.
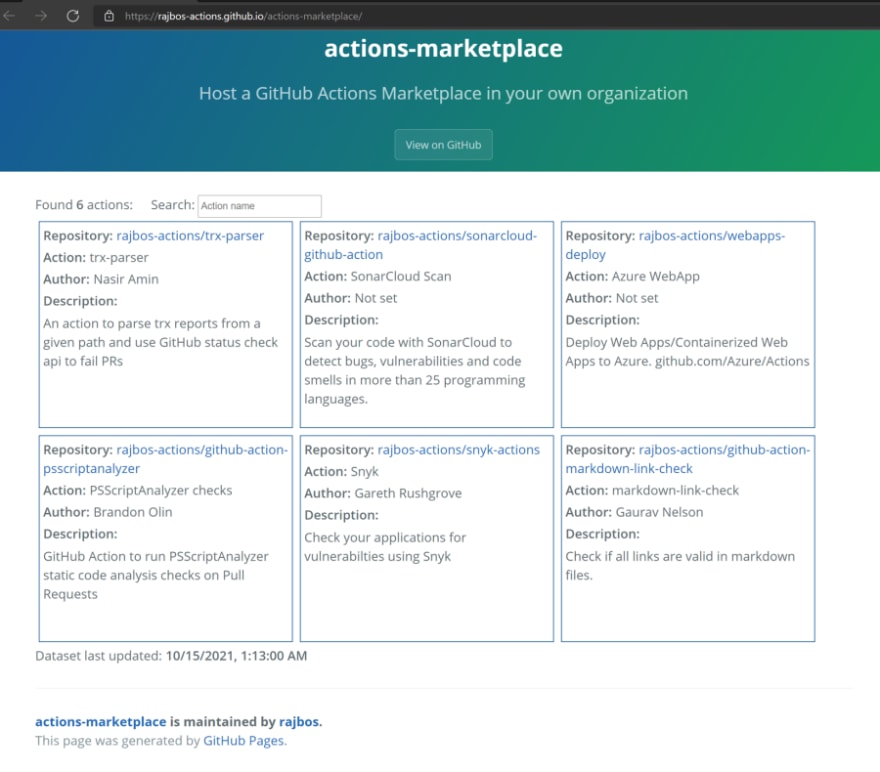
The internal marketplace groups all your (internal/private or public) actions in one place, with the information from the action.yml and the readme for users to search on. That way you can send your users here to find the actions already approved within your organization. Read more on the internal marketplace here.
Note: this is still work in progress, one of the things I still want to add is adding links to the internal usages of the actions in case a vulnerability is found or for implementation examples.
8) Request actions process
The last maturity level is setting up a good governance process to add actions to the internal marketplace. More information can be found in my blogpost on it here. We have create a repo for it where we can go and:
- Users create an issue to request a public action to be added to the internal marketplace
- An engineer with a security mindset (and training!) does a preliminary manual check on the actions’ source code.
- The engineer can request an automated scan
- The scan forks the action over to a test organization and enables Dependabot for the vulnerability alerts
- Runs a CodeQL scan
- Checks the actions repo for its own Dependabot and CodeQL setup
- Runs a Trivy scan on any containers in use
- Drops the results of the scans back into the request issue
- The engineer can make an informed decision to decide if they want to take on the risk of using the action
- On approval, the action gets automatically forked over to the org-actions organizations, where it will be useable and be picked up by the internal marketplace
Summary
The eight maturity levels is something that each action user hopefully goes through when they are told about the risks of using actions out of the box. For more insights on using actions with security in mind you can watch my GitHub Universe session on this exact topic.
I’d love to hear where you are on the maturity scale and how you intent to improve you security: let me know on Twitter or LinkedIn!


Top comments (3)
Have you thought about how you will handle problems discovered during your scan process? Let me give you an example (hypothetical) ... suppose someone requests you add an action. In scanning the action you discover that V1 contained a vulnerability. They have fixed it and V2 and V3 are fine. What do you do?
If you bring in the action, then you will always be vulnerable to someone referencing V1 or a sha1 that has the vulnerability.
I guess in this case the answer is "easy" ... you reject adding this action.
I suppose this also means if you have added and synced an action and then a future version adds a vulnerability that you detect then this also pretty much freezes the action on your instance to the last good version that you synced?
Yep. No way around that yet, except for checking all workflows in your org and alerting on the use of a vulnerable version, or removal of the entire action for internal use. Alternatively you could remove the tag (=version) from the forked repo, but that would defy the purpose (and users can still use a commit SHA with the vulnerable version).
For these reasons, I suggested GitHub to add a “disallow” list, next to the allow list of actions that cannot be used in your org/repo.
One way that may work is to explicitly add tags to the fork with the versions that are approved. Eg @v2-approved, and then limit the allow list to each forked action repo with those specific tags (@v2-approved or @approved*)