
I was playing around with some SVG (Scalable Vector Graphics) for some time and wanted to make a quick article about it. The problem was that I had no idea what to create using SVG. Fortunately, I stumbled upon one thread about sorting algorithms and thought it would be interesting to animate how sorting algorithms work.
Of course, I decided to go with the simples of the bunch, Bubble Sort, just to give it a try. To cut to the chase, you can check it out on the demo page.
How Bubble Sort works
Most of you already know about sorting algorithms, but let's just give a quick introduction to Bubble Sort so we understand how it works.
If you know how the Bubble Sort algorithm works, feel free to skip to the next section.
Bubble Sort is a straightforward sorting algorithm that involves repeatedly comparing and swapping adjacent elements in a list until the list is sorted.
Let's say we have following list of numbers:
[5, 6, 9, 2, 3]
The Bubble Sort algorithm will loop over this list a total of n - 1 times, where n is the number of elements in the list. This means, for our example, Bubble Sort will loop over the list four times in total.
Let's see what happens in the first pass through the list:
- It begins by comparing the first and second elements, starting with the first index (numbers 5 and 6). No swap is needed.
- Next, compare 6 and 9. No swap is needed.
- Next, compare 9 and 2. Swap the numbers since they are not ordered.
- Continue this process until the biggest numbers ”bubble” up to the top.
At the end of the first pass, we will have the following list of numbers:
[5, 6, 2, 3, 9]
For the second pass, exactly the same thing will happen, but in this case we do not have to compare with the last number in the list since we already know that it's the biggest number. At the end of the second pass, we will have the following list of numbers:
[5, 2, 3, 6, 9]
We are almost there; when the third pass starts, we do not have to check for the last two numbers in the list since we know that the list does not have bigger numbers. At the end of the third pass, we will have the following list of numbers:
[2, 3, 5, 6, 9]
Hmmm, it looks like the list is already sorted, and we did not even start the fourth pass. Well, that can happen, but it does not really matter.
There is nothing to prevent the algorithm from starting the final, forth, pass. At least it will be a quick one since we know that the last three numbers are already sorted. And as we expected, at the end of the fourth pass, the list stays the same.
Prepare wireframe
So, there is a simple question: how can we visualize the Bubble Sort algorithm? Let's start with the basics and define what we want to make. Take a look at the following image.

In the image, you can see the basic UI of our Bubble Sort visualization player. We will have two inputs that allow us to tweak player settings a little bit.
- Number of items - changes the number of items in the list.
- Animation speed - changes the time it takes for animation to finish a single step.
Underneath, we have three buttons that control the player.
- “Play” button - starts the visualization.
- “Pause” button - pauses the currently running visualization.
- “Stop” button - stops the currently running visualization and reset the player.
Finally, under the buttons, we have a player section where the visualization is going to be shown. Initially, the text “Press Play button to start” is shown. As soon as the “Play” button is pressed, we have to remove the text and start the player.
To make the article shorter, only important parts of the code will be shown. You can always find complete code on Github.
The wireframe is complete, and it helps us visualize what the end result should look like, but now it's time to bring it to life.
List and elements
When the “Play” button is clicked, we have to generate the list (array) that needs to be sorted, as well as the elements that have to be animated, and insert them into the player container.
Let's start by creating a random list of numbers that the Bubble Sort algorithm has to sort. A function to quickly generate the list can be created like this:
function createData(length = 15, maxNumber = 200) {
  return Array.from(
    { length },
    () => Math.round(Math.random() * maxNumber),
  );
}
The function is quite simple; it generates a list that has a certain length of elements. To limit the maximum number that can be generated, maxNumber is used.
This generated list of numbers will also be represented using SVG elements. Every list number will have its own corresponding SVG element. By animating these elements, we can visualize how the list itself is being sorted.

You can see different SVG elements used to represent one single number from the list. The exact number value is shown using the text element. This value is then visualized as a bar represented by the rect element, and finally, the g element is used to group both text and rect elements together so they can be easily animated to the correct positions during sorting.
Before we can focus on creating SVG elements, there are a couple of variables that we need to take care of. Consider the following image:
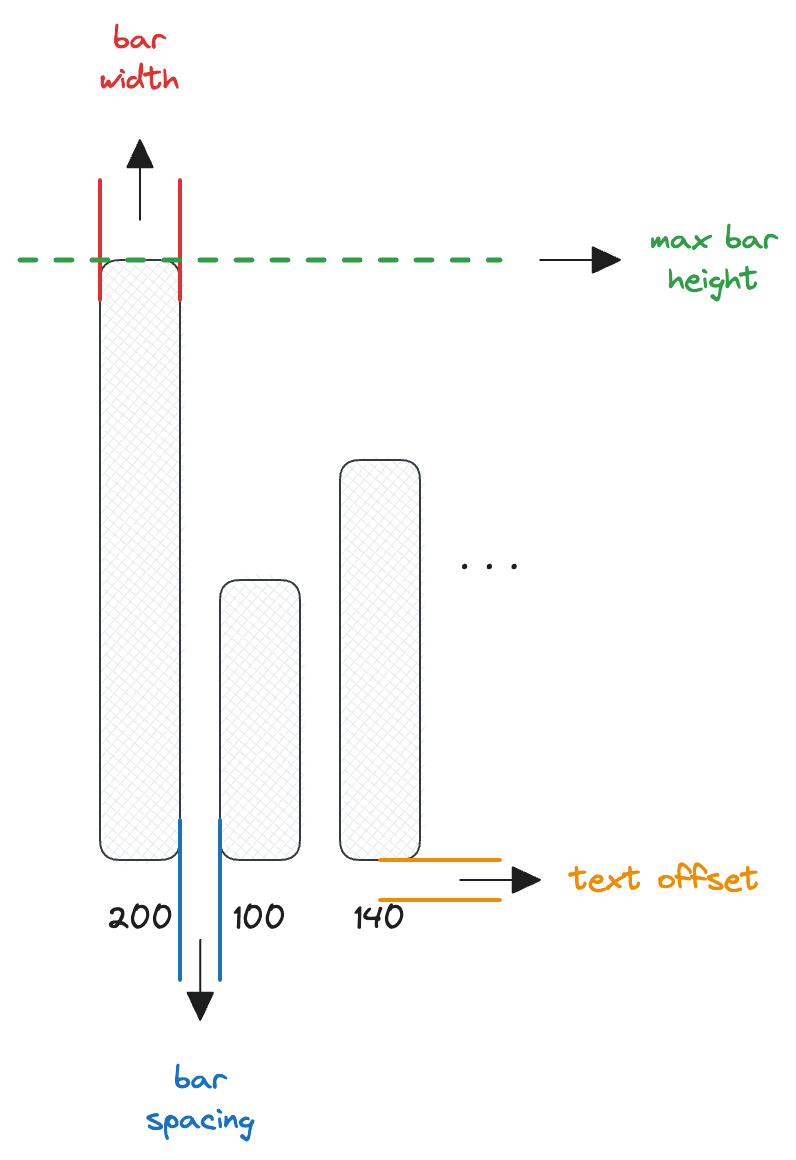
To properly layout elements, we have to define certain variables that describe how the elements are related to each other.
On the image, you can see that we need to define four different variables as follows:
- Bar with - width of the single bar.
- Bar spacing - spacing between neighboring bars.
- Text offset - space between the bar and correlated text.
- Maximal bar height - maximum height that a single bar can reach.
Using these variables, we can make sure that our SVG representation of the list looks consistent. This makes things easier when we need to apply animations.
Since SVG is basically a 2D (two-dimensional) graphic, we have to use the x and y axes to position our elements.

On the image, you can see how we can position our SVG elements inside the 2D coordinate system. You might notice that the 2D coordinate system on the image looks upside-down. This is because of the scroll behavior in the browser. As you scroll down, the y value is increasing; the more you scroll, the bigger the value of y.
To make sure that our elements are initially positioned at the same level on the y axis, we want to put them exactly where the maximum bar height is. From there, we can change the height property of the rect element to visualize the value.
To calculate the value for the x axis, we have to take into account the bar width, bar spacing, and position of the element in the list.
function createDOMElements(dataList, settings) {
  const { barWidth, barSpacing, textOffset, maxBarHeight } = settings;
  const svgContainer = document.createElementNS('http://www.w3.org/2000/svg', 'svg');

  /**
   * Create SVG group for each element in the array.
   * SVG group consists of the vertical bar (rect) and text.
   */
  for (let i = 0; i < dataList.length; i++) {
    const barHeight = dataList[i];
    const coordinateX = i * (barWidth + barSpacing);
    const coordinateY = maxBarHeight - barHeight;

    const svgRect = document.createElementNS('http://www.w3.org/2000/svg', 'rect');
    svgRect.setAttribute('y', coordinateY);
    svgRect.setAttribute('rx', '0.3rem');
    svgRect.setAttribute('width', barWidth);
    svgRect.setAttribute('height', barHeight);

    const svgText = document.createElementNS('http://www.w3.org/2000/svg', 'text');
    svgText.setAttribute('x', barWidth/2);
    svgText.setAttribute('y', maxBarHeight + textOffset);
    svgText.textContent = `${barHeight}`;

    const svgGroup = document.createElementNS('http://www.w3.org/2000/svg', 'g');
    svgGroup.setAttribute('class', 'bar')
    svgGroup.setAttribute('data-index', i)
    svgGroup.setAttribute('transform', `translate(${coordinateX} 0)`);
    svgGroup.appendChild(svgRect)
    svgGroup.appendChild(svgText)
    svgContainer.appendChild(svgGroup);
  }

  return svgContainer;
}
First, we create a svg element using the document.createElementNS API and save it into svgContainer. We will need it at the end of the function again.
After that, we loop over the dataList, which contains numbers that we want to visualize. For each item in the list, we have to do a couple of things:
- Calculate the x coordinate value using the formula: item index * (bar width + bar spacing), and save the result into
coordinateX. We have to use the item index,i, to make sure that the elements are not stacked on top of each other. - Calculate the y coordinate value using the formula: maximal bar height - item value, and save the result into
coordinateY. - Create a
rectelement and attach the required attributes. - Create a
textelement, attach the required attributes, and set thetextContentproperty. Thexattribute is set to half of bar width to keep the text in the center of the bar. And theyattribute is set to maximal bar height + text offset to keep it under the bar. - Create an
gelement and attach the required attributes. We use thedata-indexattribute to link thegelement with the corresponding item from the list. Also, thetransformattribute is initialized, as it will be used to update the element's position later on. - The
rectandtextelements are then appended to thegelement to keep them grouped with each other. - Finally, the grouped elements are then appended to the
svgContainercreated at the beginning.
Function will return the svgContainer itself, which can be inserted in the player container when the play button is pressed. With preparation done, we are ready to continue with the animation part.
Bubble Sort animation driver
To animate the Bubble Sort algorithm, we cannot just write a function that will do the sorting. We need to be able to control the algorithm and execute side effects at each iteration. To do this, we need to make some kind of “driver”.
For a driver to properly work, it needs to manage its internal state. Here are the things we need to take care of:
- Player element - HTML element where the animation player is located.
- Timer id - ID of the currently active timer.
- List - a list of numbers that is currently being sorted.
- Pause - a flag to indicate that the animation is paused.
- Loop index - index of the running loop.
- Remaining repetitions - the total number of remaining repetitions.
As we already know from the wireframe, we have three buttons: play, pause, and stop. This means that the driver needs to be able to properly respond to these buttons. For that, we can create corresponding functions.
function driver() {
  // Default settings
  let settings = {
    maxBarHeight: 200,
    barWidth: 30,
    barSpacing: 5,
    textOffset: 20,
    animationSpeed: 300,
    listLength: 10,
  }

  // Initial player state
  let playerState = {
    playerElement: document.getElementById('player-wrapper'),
    timerId: null,
  };

  // ...

  return {
    play(options = {}) {
      if (playerState.pause) {
        playerState.pause = false;
      } else {
        settings = { ...settings, ...options };

        // Extend player state before the next animation is started
        playerState = {
          ...playerState,
          list: createData(settings.listLength, settings.maxBarHeight),
          pause: false,
          loopIndex: 0,
          remainingRepetitions: settings.listLength - 1,
        }
      }

      bubbleSort();
    },
    stop() {
      // Clear scheduled timeout
      clearTimeout(playerState.timerId);
      playerState.pause = false;

      // Reset player container
      playerState.playerElement.classList.remove('scroll-x');
      playerState.playerElement.innerHTML = '<p>Press "Play" button to start</p>';
    },
    pause() {
      playerState.pause = true;
    }
  }
}
The driver function returns an object that provides methods for controlling the sorting animation. We can call the specific method when the corresponding button in the UI is clicked.
You might have noticed that in the play method, there is a call to the bubbleSort function. This function implements the Bubble Sort algorithm and controls the sorting animation.
function bubbleSort() {
  const { loopIndex, remainingRepetitions } = playerState;
  const svgContainer = getPlayerSvgContainer();
  adjustHorizontalScroll(svgContainer);

  // ...
}
We first have to create an SVG container element where the sorting visualization is displayed by calling the getPlayerSvgContainer function. This container will hold the bars that represent the data being sorted.
function getPlayerSvgContainer() {
  let svgContainer = playerState.playerElement.querySelector('svg');
  if (svgContainer === null) {
    svgContainer = createDOMElements(playerState.list, settings);
    playerState.playerElement.innerHTML = '';
    playerState.playerElement.append(svgContainer);
  }
  return svgContainer;
}
This function will return the existing svg element if it is found, or create a new one by calling the createDOMElements function.
Next, we have to adjust the horizontal scroll bar in case the svgContainer width is bigger than the wrapping player container. We can do that by calling the adjustHorizontalScroll function.
function adjustHorizontalScroll(svgContainer) {
  // Check content width
  const playerWrapperWidth = playerState.playerElement.clientWidth;
  const svgContainerWidth = svgContainer.clientWidth;

  // Allow horizontal scroll if player wrapper can not show all elements
  if (playerWrapperWidth > svgContainerWidth) {
    playerState.playerElement.classList.remove('scroll-x')
  } else {
    playerState.playerElement.classList.add('scroll-x')
  }
}
So far, so good. Let's continue with our bubbleSort function.
function bubbleSort() {
  // ...

  // Get SVG elements for sorting (SVG g elements)
  const elementsToSort = Array.from(svgContainer.children);

  // Check if list is sorted
  if (loopIndex >= remainingRepetitions) {
    elementsToSort.forEach(element => element.classList.add('swapped'));
    return;
  }

  const [leftElement, rightElement] = getBubbleSortElements(elementsToSort);

  // ...
}
We need to get SVG elements (representing the bars and their labels) from the SVG container. To do so, we can use the Array.from method by passing the svgContainer.children property.
Before we continue, we need to add an exit condition that is only true when the sorting process is complete. We can do that by checking if the current loopIndex is the same or bigger than the remainingRepetitions. If this is the case, we can mark all SVG elements as sorted by providing 'swapped' CSS class. If the exit condition is not satisfied, we continue with sorting.
To know if elements need to swap positions, we have to get two neighboring elements based on the loopIndex and compare them.
To get the needed elements, leftElement and rightElement, we can call the getBubbleSortElements function. This function uses the data-index attribute to match the corresponding element with the item from the list.
function getBubbleSortElements(svgElements) {
  const { loopIndex } = playerState;

  const leftElement = svgElements.find(
    element => Number(element.getAttribute('data-index')) === loopIndex
  );
  const rightElement = svgElements.find(
    element => Number(element.getAttribute('data-index')) === loopIndex + 1
  );
  return [leftElement, rightElement];
}
To visually indicate which elements are being compared in the current iteration, we do so by adding the CSS class 'current' to them.
function bubbleSort() {
  // ...

  // Mark elements as current
  leftElement.classList.add('current');
  rightElement.classList.add('current');

  // Player is paused, skip sorting for the moment
  if (playerState.pause) {
    return;
  }

  const didSwap = performSwapIfNeeded(leftElement, rightElement);

  // ...
}
When the elements are marked, it is a good time to handle the eventual pause event; in other words, if the pause button is clicked. We can do so by checking playerState.pause and exiting the function if the pause property is set.
When the play button is pressed again, the pause property will be set to false, and the bubbleSort function will be called again to resume sorting.
Next, we can finally swap elements if they are out of position. To do so, we call the performSwapIfNeeded function.
function performSwapIfNeeded(leftElement, rightElement) {
  const { list, loopIndex } = playerState;

  if (list[loopIndex] <= list[loopIndex + 1]) {
    return false;
  }

  [list[loopIndex], list[loopIndex + 1]] = [list[loopIndex + 1], list[loopIndex]];

  leftElement.setAttribute('transform', `translate(${(loopIndex + 1) * (settings.barWidth + settings.barSpacing)} 0)`);
  rightElement.setAttribute('transform', `translate(${loopIndex * (settings.barWidth + settings.barSpacing)} 0)`);

  leftElement.setAttribute('data-index', loopIndex + 1);
  rightElement.setAttribute('data-index', loopIndex);

  return true;
}
We pass leftElement and rightElement as arguments to the function. In the function, we can take the list and loopIndex directly from the playerState.
If the item at loopIndex is smaller than the item at loopIndex + 1, the function returns false, indicating that no swap occurred.
If a swap is needed, we have to update the list by swapping the positions of the two items in the list. By updating the transform attribute of leftElement and rightElement, we can adjust horizontal positions to visually reflect the updated order after the swap.

We also have to update the data-index attribute to match the corresponding elements with the items from the list. Finally, the function returns true to indicate that a swap occurred.
We now have to visually update affected elements and prepare the player state for the next invocation of the bubbleSort function.
Continuing, we have to schedule the timer for the next invocation of the bubbleSort function, update the player state, and set the correct CSS classes on the affected elements from the previous invocation.
// Update loop index
function bubbleSort() {
  // ...

  const didSwap = performSwapIfNeeded(leftElement, rightElement);
  playerState.timerId = setTimeout(() => {
    playerState.loopIndex++;

    if (playerState.loopIndex >= playerState.remainingRepetitions) {
      // Current repetition has finished
      if (didSwap) {
        leftElement.setAttribute('class', 'bar swapped');
        rightElement.classList.remove('current');
      } else {
        leftElement.classList.remove('current');
        rightElement.setAttribute('class', 'bar swapped');
      }

      playerState.remainingRepetitions--;
      playerState.loopIndex = 0;
    } else {
      // Current repetition still in progress
      leftElement.classList.remove('current');
      rightElement.classList.remove('current');
    }

    bubbleSort();
  }, settings.animationSpeed);
}
To schedule the next step of the sorting animation we can use setTimeout API. The timeout time will be set to the value of settings.animationSpeed property.
Let's focus on callback function that is triggered by setTimeout. First thing we have to do is to increment the loopIndex to move to the next step in the sorting process.
We can now check if the current repetition has finished and updates the visual representation of the elements.
- Depending on the
didSwapflag we can updateleftElementandrightElementby removing or setting'current'and'swapped'CSS classes. - Lastly we can decrement the
remainingRepetitionscounter and resetsloopIndexto 0.
If the current repetition is still in progress, we just have to remove the 'current' class from both leftElement and rightElement.
When the player state and visual elements are properly updated, we can call bubbleSort recursively to continue the animation with the next comparison.
Use the animation driver
To use the driver, we just need to call driver function which will return interface/object that contains play, pause and stop methods.
// Get DOM elements
const playButtonElement = document.getElementById('play-button');
const pauseButtonElement = document.getElementById('pause-button');
const stopButtonElement = document.getElementById('stop-button');
const listLengthInputElement = document.getElementById('list-length');
const animationSpeedInputElement = document.getElementById('animation-speed');

// Initialize driver to run Bubble Sort visualization
const bubbleSortDriver = driver();

// Call driver.play when play button is clicked
playButtonElement.addEventListener('click', (e) => {
  e.currentTarget.disabled = true;
  driver.play({
    listLength: parseInt(listLengthInputElement.value),
    animationSpeed: parseInt(animationSpeedInputElement.value)
  });
});

// Call driver.stop when stop is clicked
stopButtonElement.addEventListener('click', (e) => {
  e.currentTarget.disabled = true;
  driver.stop();
});

// Call driver.pause when pause is clicked
pauseButtonElement.addEventListener('click', (e) => {
  e.currentTarget.disabled = true;
  driver.pause();
});
We just need to make sure to call correct driver method depending the button that was clicked. Driver encapsulates all logic related to managing Bubble Sort visualization under the hood and exposes simple API that can be easily used.
Conclusion
In this article I tried to give a concrete example on how to use SVG elements to actually visualize data and algorithm in action. We used SVG elements to visualize Bubble Sort algorithm in action by creating an animation driver that can be control using buttons.
I hope you have a better idea about how to use SVG graphic and that this article was helpful is one way or another.
Check out other articles on wannabedev.io.

Top comments (0)