
With the recent release of Laravel 5.5 and Laravel Horizon, the framework now offer queue management. Laravel queues allow you to defer the processing of a time- consuming task (a good example is email sending) to a later time. This speeds up web request processing for your application.
In this article, I will create a user registration system, which sends a verification email to the user. To demonstrate the capabilities of Laravel queues and its impact on the application speed, I will let it manage the email sending process. so that the application performs faster.
For the purpose of this tutorial, I will use the Cloudways platform because it provides Supervised queue manager for Laravel applications. To begin, I will launch a Cloudways server with the Laravel application installed.
PS: If you need help with the signup and the server launch process, here’s a handy GIF:

Configure the .env file
Now that you have installed the Laravel application, the next step is database configuration.
I will use the Gmail to send verification emails. Open the Applications tab in the Cloudways platform. In the **Application Access **details, you will see the database path and credentials.
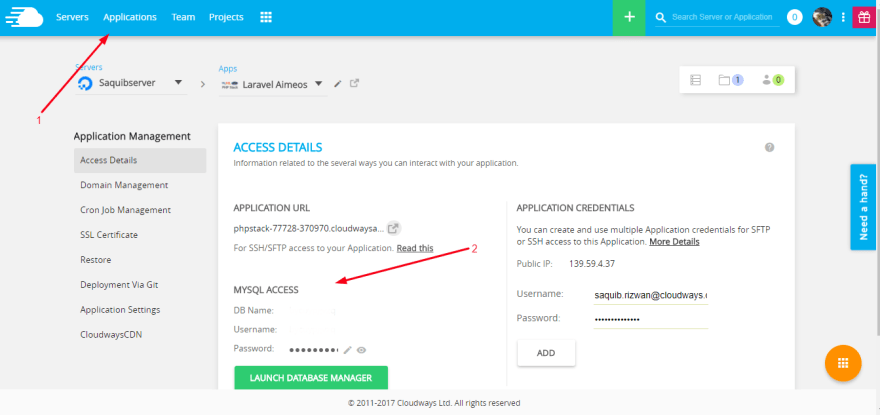
Now go to the .env file (located in the application’s public root folder) and add the credentials there:
QUEUE_DRIVER=database

DB_CONNECTION=mysql

DB_HOST=127.0.0.1

DB_PORT=3306

DB_DATABASE= your.database.name

DB_USERNAME= your.database.username

DB_PASSWORD= your.database.password

MAIL_DRIVER=smtp

MAIL_HOST=smtp.gmail.com

MAIL_PORT=587

MAIL_USERNAME=Saquib.gt@xyz.com

MAIL_PASSWORD=

MAIL_ENCRYPTION=tls

MAIL_FROM_ADDRESS=Saquib.gt@xyz.com

MAIL_FROM_NAME="Saquib Rizwan”
Creating Laravel Auth
To make the user registration system, the first thing I need to do is to create a Laravel auth using:
php artisan make:auth
Update the Users Table
Let’s first update the existing migration file for the user. Open the user table migration file (located in the database/migrations folder) and add two new columns in it, one for email tokens, and the second to check whether the user has been verified.
The following is the updated schema for the User table:
Schema::create(‘users’, function (Blueprint $table) {

$table->increments(‘id’);

$table->string(‘name’);

$table->string(‘email’)->unique();

$table->string(‘password’);

$table->tinyInteger(‘verified’)->default(0);

$table->string(‘email_token’)->nullable();

$table->rememberToken();

$table->timestamps();

});
Create Table for Queues
I will now add the table for queued jobs and failed job. For that, run the following Artisan commands:
php artisan queue:table

php artisan queue:failed-table
Migrate the Tables
Now that I have all the required tables, I will migrate it using the following Artisan command:
php artisan migrate

Once the command is completed, all the tables will be generated.
Create Mail And the View For Email Verifications
Since I have setup SMTP to send emails, it’s time to create an email class which will return view and token to be sent with the email. Run the following Artisan command to create the email setup:
php artisan make:mail EmailVerification
Once the command finishes, a new folder with the name Mail along with the **EmailVerification **class file will be created inside the app folder. I will call this file when sending email(s).
Update the EmailVerification Class
This class comes with two methods. The first is the constructor(), and the second is the build(), which will do most of the work. It binds the view with the email.
I will send a user token along with the view so that the user can be verified. For this, add a new protected variable in the class with the name $user:
protected $user;
Now, add a new $user parameter in the constructor and pass this to the class variable $user.
public function __construct($user)

{

//.

$this->user = $user;

}

Next, update the **build()** method so that it can return a view along with the user token.

public function build()

{

return $this->view(‘email.email’)->with([

‘email_token’ => $this->user->email_token,

]);

}
Create the Email Template
For creating the email template, create a new folder inside views folder with name email, and then create a new file inside this folder with the name email.blade.php. This file will contain the following simple template:
<h1>Click the Link To Verify Your Email</h1>

Click the following link to verify your email {{url(‘/verifyemail/’.$email_token)}}
The view for the email is now complete. Next, I will create a new queue that will send the email(s) to the registered users.
Create the SendVerficationEmail Queue Job
Now run the following Artisan command to make a new queue job
php artisan make:job SendVerificationEmail
When the command finishes, a new folder with the name Jobs appears inside the app folder along with the SendVerificationEmail job class. I will now edit this file so that it could be used to send an email.
First, add Mail and EmailVerification namespaces in it.
use Mail;

use App\Mail\EmailVerification;
Now create a new protected variable, $user (also created in the EmailVerification class). Next, add a new parameter $user in the constructor() and pass its value to the class $user variable:
protected $user;

public function __construct($user)

{

$this->user = $user;

}

Next, I will set up email sending process inside the **handle()** method.

public function handle()

{

$email = new EmailVerification($this->user);

Mail::to($this->user->email)->send($email);

}
The handle **function creates an instance of email verification template that is passed to **Mail for sending off the email to a user.
Update the Auth Registration Process
Before getting started, add ‘email_token’ in $fillable array in the User Model.
protected $fillable = [

‘name’, ‘email’, ‘password’,’email_token’

];
Now open RegisterController.php file (located inside the Controller/Authfolder).
First add the following namespaces:
use Illuminate\Auth\Events\Registered;

use Illuminate\Http\Request;

use App\Jobs\SendVerificationEmail;
Now modify the create() method and add the email_token in it.
protected function create(array $data)

{

return User::create([

‘name’ => $data[‘name’],

‘email’ => $data[‘email’],

‘password’ => bcrypt($data[‘password’]),

‘email_token’ => base64_encode($data[‘email’])

]);

}
For the email token, I have used the base64 encoding for the user’s email address. Next I added the following two new functions in it:
/**

* Handle a registration request for the application.

*

* @param \Illuminate\Http\Request $request

* @return \Illuminate\Http\Response

*/

public function register(Request $request)

{

$this->validator($request->all())->validate();

event(new Registered($user = $this->create($request->all())));

dispatch(new SendVerificationEmail($user));

return view(‘verification’);

}

/**

* Handle a registration request for the application.

*

* @param $token

* @return \Illuminate\Http\Response

*/

public function verify($token)

{

$user = User::where(‘email_token’,$token)->first();

$user->verified = 1;

if($user->save()){

return view(‘emailconfirm’,[‘user’=>$user]);

}

}
What I have done is to override the **register() **parent method and added two new lines in it.
dispatch(new SendVerificationEmail($user));

return view(‘verification’);
This way the email is dispatched into the queue. Instead of directly logging in the user, I will redirect him to another page, which will ask him to verify his email in order to continue. Next, I have created a new verify() method that will verify the user and the token.
I will next create the views that I called in these two methods.
Create a new file in the views folder with the name emailconfirm.blade.php and paste the following code in it.
@extends(‘layouts.app’)

@section(‘content’)

<div class="container”>

<div class="row”>

<div class="col-md-8 col-md-offset-2">

<div class="panel panel-default”>

<div class="panel-heading”>Registration Confirmed</div>

<div class="panel-body”>

Your Email is successfully verified. Click here to <a href="{{url(‘/login’)}}”>login</a>

</div>

</div>

</div>

</div>

</div>

@endsection
Create another file in the views folder with the name verification.blade.php. Paste the following code in it.
@extends(‘layouts.app’)

@section(‘content’)

<div class="container”>

<div class="row”>

<div class="col-md-8 col-md-offset-2">

<div class="panel panel-default”>

<div class="panel-heading”>Registration</div>

<div class="panel-body”>

You have successfully registered. An email is sent to you for verification.

</div>

</div>

</div>

</div>

</div>

@endsection
At this point the code is complete and ready for use. Let’s give it a try.
Add the following route in the web.php file for user verification:
Route::get(‘/verifyemail/{token}’, ‘Auth\RegisterController@verify’);
Test the Email Verification Process
At the command line, execute the following command to start listening for the queue.
php artisan queue:work
Leave the window of the command line open and open up the register page in another tab. Fill in the form and register a new user.

Once you click the Register button, you will notice that the registration confirmation page opens up quickly because it is dispatched into the queue.

Now look at command line: a new job has been processed successfully.

This means that an email has been sent to the user.

When the user click the link, he/she will be verified:

Once you close the terminal, the queue will stop working. If you want the queue to keep working, you need to use Supervised Queue Manager.
Installing Supervisord
Go to Server Management >> Settings & Packages >> Packages. Click the **Install **button next to Supervisord to start the installation process.

Before the process starts, you will be asked to install Redis on the server (if it is not already installed), as it is required for Laravel queues. Wait for the installation process to finish.

Note: You can check Supervisord service status from Manage Services section. You could even restart the service if required.
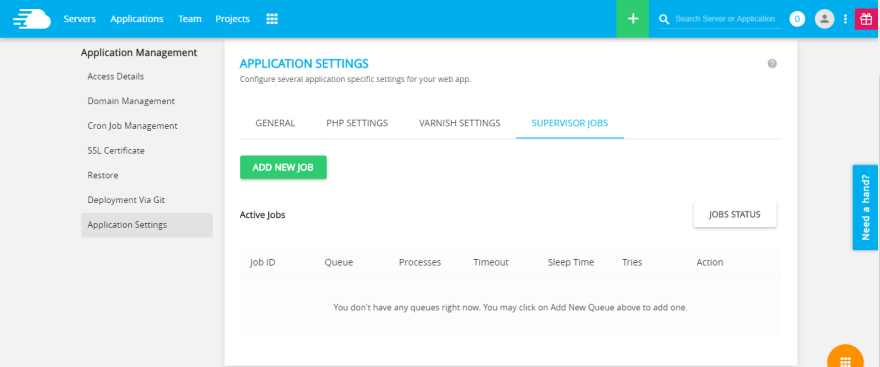
Add A New Job
Under Application Management, go to Application Settings **and select the tab for **Supervisor Jobs. Click the Add New Job button to add a job for Supervisord.

Note: Once a job has been created, Supervisord will use the platform default Artisan path which should be /home/master/applications/public_html/artisan.
Job Status and other options
The job status can be checked by clicking the Jobs Status button.
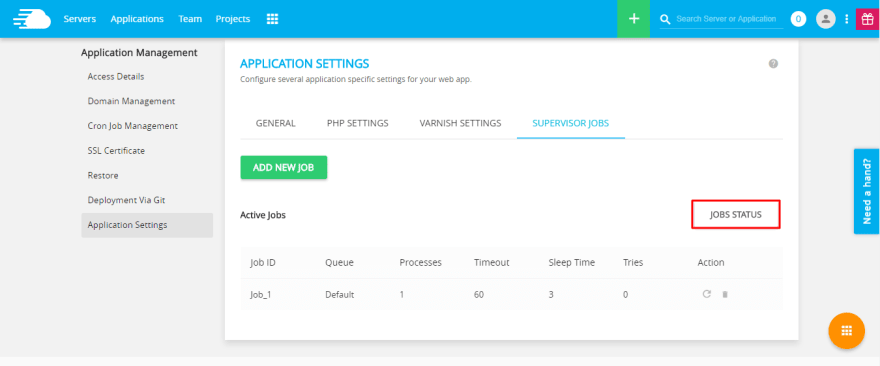
This will show the status of job and other related information including uptime.
If you want to restart any job, click the icon in front of it. There is also the option of removing any job by clicking the remove icon.

This will supervise your Laravel queues and keep them up and running.
Conclusion
In this article, I demonstrated how you can use Laravel queues by building a user registration system. Additionally, I also showed how you can keep your process up and run with the help of a supervisor. If you need any help, just post a comment.

Top comments (0)