Most people control their music players manually, pressing the pause button to pause a track or hitting a volume up control to raise the volume. With Repl.it, you can automate your media experience using code.
In this tutorial, we'll build a media player that can play audio files programmatically, allowing the user to pause playback, change the track, change the volume, or get looping information by giving text commands.
We'll also outline how this could be integrated into other applications, such as a chatbot, but we'll leave the implementation of that as an exercise for the reader.
Understanding how audio works on Repl.it
In Unix systems, including the ones that Repl.it is built on, everything is a file. You might think of file types like PDFs, text files, image files or audio files, but in fact even things like printers are often "seen" as files by the underlying operating system.
Repl.it uses a special file at /tmp/audio to control media output. There are more details on how to manipulate this file directly in the audio docs, but Repl.it also provides a higher level Python library that gives us some higher level functions like "play_audio". We'll be using the library in this tutorial.
Getting a free audio file from the Free Music Archive
You can use your own mp3 files if you prefer, but as most music is under copy protection, we'll use a file from the Free Music Arhive for demo purposes.
Let's grab the URL of a file we want so that we can use code to download it to our Repl.it project.
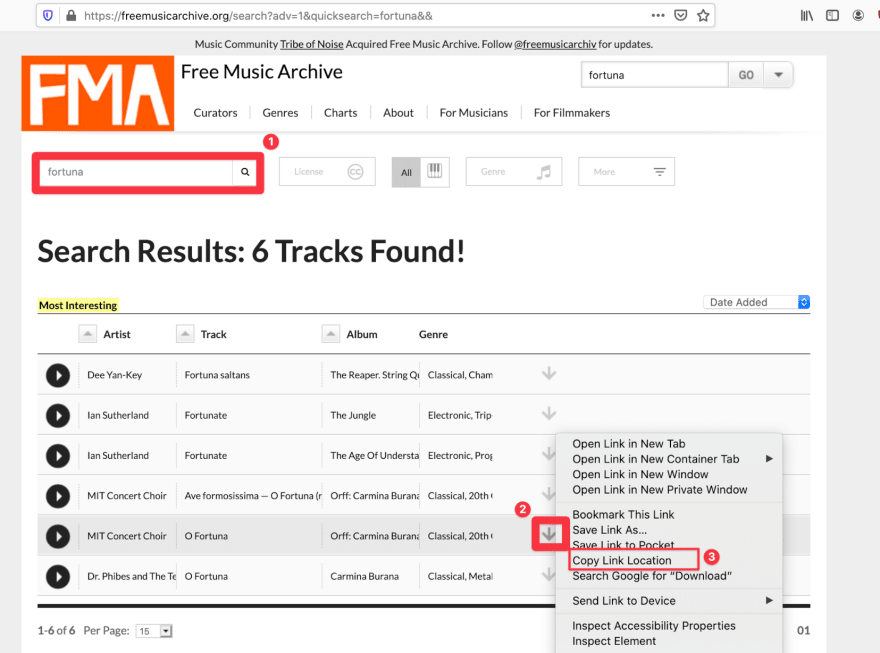
Search for a song that you like, right-click on the download link and press "copy link location", as shown below.
Downloading audio files to our project
Our first goal is to download the song and play it.
Create a new Python repl called audio and add the following code to the main.py file.
import requests

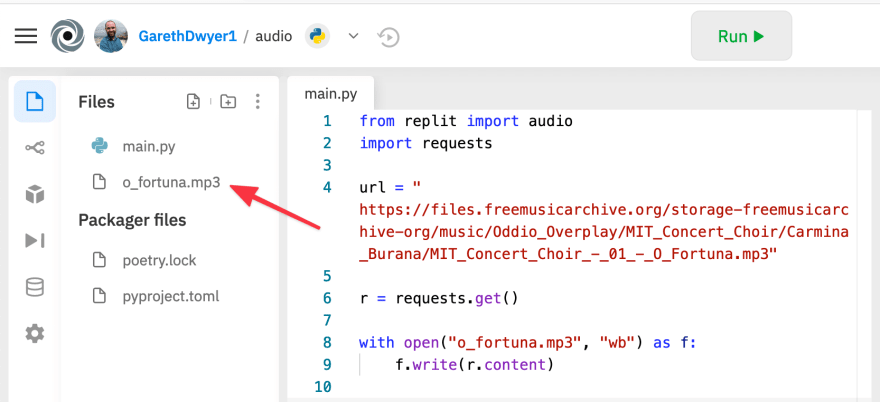
url = " https://files.freemusicarchive.org/storage-freemusicarchive-org/music/Oddio_Overplay/MIT_Concert_Choir/Carmina_Burana/MIT_Concert_Choir_-_01_-_O_Fortuna.mp3"

r = requests.get(url)
with open("o_fortuna.mp3", "wb") as f:
    f.write(r.content)
Change the URL to the one you chose and o_fortuna.mp3 to something more appropriate if you chose a different song.
This downloads the song, opens up a binary file, and writes the contents of the download to the file. You should see the new file pop up in the files tab on the left after you run this code.
Instead of downloading the audio file using requests as shown above, you can also press the add file button in your repl and upload an audio file from your local machine.
Playing the audio file using Python
Now that we have the file we can play it by importing the audio module and calling the play_file method. Replace the code in main.py with the following:
from replit import audio
import time

audio.play_file("o_fortuna.mp3")
time.sleep(10)
Note that your repl usually dies the moment there is no more code to execute, and playing audio doesn't keep it alive. For now, we are sleeping for 10 seconds which keeps the repl alive and the audio playing. If you run this, you should hear the first 10 seconds of the track before it cuts out.
It's not ideal to keep the execution loop locked up in a sleep() call as we can't interact with our program so we can't control the playback in any way.
To keep the music playing until the user presses a key, change the last line to:
choice = input("Press enter to stop the music. ")
Now the program is blocked waiting for user input and the music will keep playing until the user enters something.
Let's add some more useful controls.
Allowing the user to pause, change volume, or get information about the currently playing track
The controls we add next are based around:
-
source.volume: an attribute that we can add to or subtract from to increase or decrease the volume -
source.paused: an attribute we can change to True or False to pause or unpause the track -
source.set_loop(): a method we can call to specify how many times a track should loop before ending
We can also display useful information about the current status of our media player by looking at:
-
source.loops_remaining: an attribute to see how many more time a track will loop -
source.get_remaining(): a method to see the remaining playtime for the current track.
We'll allow the user to see the current information but for simplicity we'll only update this on each input, so our display will often display 'out of date' information.
Creating the prompt menu
Remove the code in main.py and replace it with the following.
import time
from os import system
from replit import audio

main_message = """
+: volume up
-: volume down
k: add loop
j: remove loop
<space>: play/pause
"""
Here we add one more import for system which we'll use to clear the screen so that the user doesn't see old information. We then define a string that will prompt the user with their options.
Creating the show_status() method
Let's add a method that will show the user the current status of our media player. It will take source as an input, which is what the play_media() method that we already used returns.
def show_status(source):
    time.sleep(0.2)
    system("clear")
    vbar = '|' * int(source.volume * 20)
    vperc = int(source.volume * 100)
    pp = "⏸️" if source.paused else "▶️"

    print(f"Volume: {vbar}  {vperc}% \n")
    print(f"Looping {source.loops_remaining} time(s)")
    print(f"Time remaining: {source.get_remaining()}")
    print(f"Playing: {pp}")
    print(main_message)
Note that we add a time.sleep() at the top of this function. Because changing the status involves writing to the /tmp/audio file we discussed before and reading the status involves reading from this file, we want to wait a short while to ensure we don't read stale information before showing it to the user.
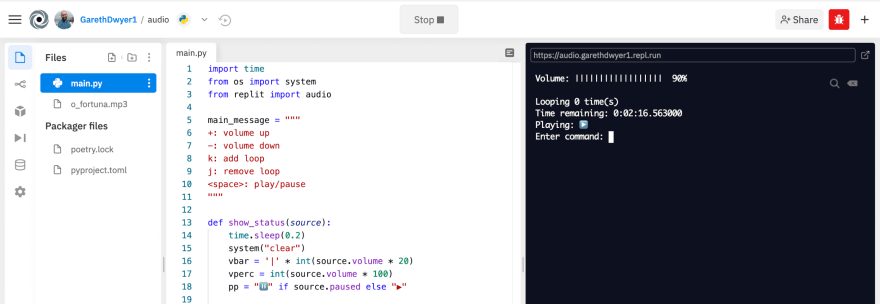
Otherwise our function clears the screen, prints out a text-based volume bar along with the current volume percentage, and shows other information such as whether the track is currently playing or paused, how many loops are left, and how much time is left before the track finishes.
Finally, we need a loop to constantly prompt the user for the next command which will also keep our repl alive and continue playing the track while we are waiting for user input. Add the following main() function to main.py and call it:
def main():
    source = audio.play_file("o_fortuna.mp3")
    time.sleep(1)
    show_status(source)

    while True:
        choice = input("Enter command: ")
        if choice == '+':
            source.volume += 0.1
        elif choice == '-':
            source.volume -= 0.1
        elif choice == "k":
            source.set_loop(source.loops_remaining + 1)
        elif choice == "j":
            source.set_loop(source.loops_remaining - 1)
        elif choice == " ":
            source.paused = not source.paused
        show_status(source)

main()
Once again, you should replace the "o_fortuna" string if you downloaded or uploaded a different audio file.
If you run the repl now you should hear you track play and you can control it by inputting the various commands.
Playing individual tones
Instead of playing audio from files, you can also play specific tones or notes with the play_tone() method. This method takes three arguments:
- duration: how long the tone should play for
- pitch: the frequency of the tone (how high or low it sounds)
- wave form: the fundamental wave form that the tone is built on.
If you've ever played a musical instrument, you'll probably have come across notes referred to by the letters A-G. With digital audio, you'll specify the pitch in hertz (Hz). "Middle C" on a piano is usually 262 Hz and the A above this is 440 Hz.
Let's write a program to play "Twinkle Twinkle Little Star". Create a new Python repl and add the following code to main.py.
import time
from replit import audio

def play_note(note, duration):
    note_to_freq = {
        "C": 262, "D": 294, "E": 330, "F": 349, "G": 392, "A": 440
    }
    audio.play_tone(duration, note_to_freq[note], 0)
    time.sleep(duration)

play_note("C", 2)
Above we set up a convenience function to play specific notes for a specific duration. It includes a dictionary mapping the names of notes to their frequencies. We've only done one octave and no sharps or flats, but you can easily extend this to add the other notes.
It then plays the tone of the note passed in for the specified duration. We sleep for that duration too, as otherwise the next note will be played before the previous note is finished. We also pass a 0 to play_tone which specifies the default sine waveform. You can change it to 1, 2, or 3 for triangle, saw, or square, which you can read about in more detail.
Test that you can play a single note as expected. Now you can play the first part of "Twinkle Twinkle Little Star" by defining all of the notes and durations, and then looping through them, calling play_note on each in turn.
notes = ["C", "C", "G", "G", "A", "A", "G", "F", "F", "E", "E", "D", "D", "C"]
durations = [2, 2, 2, 2, 2, 2, 4, 2, 2, 2, 2, 2, 2, 4]

for i in range(len(notes)):
    play_note(notes[i], durations[i])
We can also control the volume of each tone by passing a volume argument to play_tone(). As for audio files, this is a float where 1 represents 100% volume. If we wanted to implement a decrescendo (gradual decrease in volume), we could modify our code to look as follows:
def play_note(note, duration, volume=1):
    note_to_freq = {
        "C": 262, "D": 294, "E": 330, "F": 349, "G": 392, "A": 440
    }
    audio.play_tone(duration, note_to_freq[note], 0, volume=volume)
    time.sleep(duration)


notes = ["C", "C", "G", "G", "A", "A", "G", "F", "F", "E", "E", "D", "D", "C"]
durations = [2, 2, 2, 2, 2, 2, 4, 2, 2, 2, 2, 2, 2, 4]

volume = 1
for i in range(len(notes)):
    volume -= 0.05
    play_note(notes[i], durations[i], volume=volume)
Here we added a volume argument to our play_note() function so that we can pass it along to play_tone(). Each time around the loop we reduce the volume by 5%. Play it again and you should hear the song slowly fade out (if you add more than 20 notes, the volume will hit 0 so you'll have to reduce the step or increase the volume at some point to stop the song going silent).
Make it your own
If you followed along you'll have your own version to extend, otherwise you can fork the media player repl below.
Note: Playing audio from the embedded repl below is not supported. To test out this repl, click "open in repl.it" at the top right of the embed window. The repl will open in a new window with a pop-up asking you to confirm audio activation.
The "Twinkle Twinkle Little Star" repl can be found at https://repl.it/@GarethDwyer1/cwr-12-audio-twinkle-twinkle.
Where next
Controlling your audio files through a text-based interface might feel like a downgrade from using a GUI media player, but you can use these concepts to integrate audio controls into your other applications. For example, you could create a Discord chatbot that plays different tracks and automatically pauses or reduces the volume of your music when you join a Discord voice channel. Or you could integrate audio tracks into a web application or game (e.g. playing a victory or defeat sound at a specific volume given certain conditions).
Once you can control something using code, the possibilities are pretty broad, so use your imagination!


Top comments (0)